Sharp MX-1800N (serv.man14) Service Manual ▷ View online
MX-1800N ADJUSTMENTS 6 – 61
27-A
Print image main scanning direction image
magnification ratio automatic adjustment
magnification ratio automatic adjustment
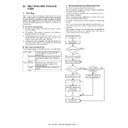
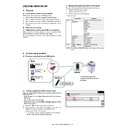
1) Enter the SIM50-28 mode.
2) Select [BK-MAG ADJ] with the key button.
2) Select [BK-MAG ADJ] with the key button.
3) Select the paper feed tray with paper in it with the key button.
(Any paper size will do.)
4) Touch [EXECUTE] key.
The adjustment pattern is printed out.
5) Set the adjustment pattern on the document table. (Any direc-
tion)
Note: Fit the adjustment pattern correctly with the document
guide.
Note: Fit the adjustment pattern correctly with the document
guide.
6) Touch [EXECUTE] key.
The following item is automatically adjustment.
* Print image main scanning direction image magnification
* Print image main scanning direction image magnification
ratio
7)
Touch [OK] key.
The adjustment result becomes valid.
The adjustment result becomes valid.
27-B
Image off-center automatic adjustment
1)
Enter the SIM50-28 mode.
2)
Select [SETUP/PRINT] ADJ with the key button.
3)
Select [ALL] with the key button.
(NOTE)
By touching [LEAD] or [OFFSET] button, the following items
can be executed individually.
* [LEAD]: Print image lead edge image position adjustment
* [OFFSET]: Print image off-center adjustment
By touching [LEAD] or [OFFSET] button, the following items
can be executed individually.
* [LEAD]: Print image lead edge image position adjustment
* [OFFSET]: Print image off-center adjustment
When [ALL] is selected, both of the above two items are
executed simultaneously.
executed simultaneously.
4)
Select a paper feed tray to be adjusted.
SIMULATION NO.50-28
TEST
AUTO IMAGE POSITION ADJUSTMENT : SERVICE
OC ADJ
BK-MAG ADJ
SPF ADJ
SETUP/PRINT ADJ
RESULT
DATA
1/1
0
CLOSE
0
SIMULATION NO.50-28
TEST
AUTO IMAGE POSITION ADJUSTMENT㧦SERVICE
EXECUTE
1/1
MFT
CS1
CS2
CLOSE
0
SIMULATION NO.50-28
TEST
AUTO IMAGE POSITION ADJUSTMENT 㧦SERVICE
CLOSE
EXECUTE
PLEASE WAIT
NOW EXECUTING…
REPRINT
0
SIMULATION NO.50-28
TEST
AUTO IMAGE POSITION ADJUSTMENT㧦SERVICE
CLOSE
BK MAG
: ** |**|
RESCAN
REPRINT
OK
RETRY
DATA
SIMULATION NO.50-28
TEST
AUTO IMAGE POSITION ADJUSTMENT : SERVICE
OC ADJ
BK-MAG ADJ
SPF ADJ
SETUP/PRINT ADJ
RESULT
DATA
1/1
0
CLOSE
SIMULATION NO.50-28
TEST
AUTO IMAGE POSITION ADJUSTMENT : SERVICE
LEAD
OFFSET
ALL
1/1
0
CLOSE
0
SIMULATION NO.50-28
TEST
AUTO IMAGE POSITION ADJUSTMENT : SERVICE
EXECUTE
1/1
MFT
CS1
CS2
ADU
CLOSE
CS3
CS4
LCC
MX-1800N ADJUSTMENTS 6 – 62
5) Touch [EXCUTE] key.
The adjustment pattern is printed out.
6) Set the adjustment pattern on the document table. (Any direc-
tion)
Note: Fit the adjustment pattern correctly with the document
guide.
Note: Fit the adjustment pattern correctly with the document
guide.
7) Touch [EXCUTE] key.
The following items are automatically adjusted.
* Print image lead edge image position adjustment
* Print image off-center adjustment
* Print image lead edge image position adjustment
* Print image off-center adjustment
8) Touch [OK] key.
The adjustment result becomes valid.
Perform procedures 4) to 7) for each paper feed tray.
27-C
Copy lead edge image reference position
adjustment, image off-center, sub scanning
direction image magnification ratio
automatic adjustment
adjustment, image off-center, sub scanning
direction image magnification ratio
automatic adjustment
1) Enter the SIM50-28 mode.
2) Select [OC ADJ] with the key button.
3) Select the paper feed tray with paper in it with the key button.
3) Select the paper feed tray with paper in it with the key button.
(Any paper size will do.)
4) Touch [EXCUTE] key.
The adjustment pattern is printed out.
5)
Set the adjustment pattern on the document table. (Any direc-
tion)
Note: Fit the adjustment pattern correctly with the document
guide.
tion)
Note: Fit the adjustment pattern correctly with the document
guide.
6)
Touch [EXCUTE] key.
The following items are automatically adjusted.
Copy lead edge image reference position adjustment,
image off-center, sub scanning direction image magnifica-
tion ratio automatic adjustment
Copy lead edge image reference position adjustment,
image off-center, sub scanning direction image magnifica-
tion ratio automatic adjustment
7)
Touch [OK] key.
The adjustment result becomes valid.
The adjustment result becomes valid.
27-D
SPF mode image off-center, image lead
edge position, sub scanning direction
image magnification ratio automatic
adjustment
edge position, sub scanning direction
image magnification ratio automatic
adjustment
Refer to the RSPF (MX-RPX1) SM.
SIMULATION NO.50-28
TEST
AUTO IMAGE POSITION ADJUSTMENT : SERVICE
OC ADJ
BK-MAG ADJ
SPF ADJ
SETUP/PRINT ADJ
RESULT
DATA
1/1
0
CLOSE
0
SIMULATION NO.50-28
TEST
AUTO IMAGE POSITION ADJUSTMENT㧦SERVICE
EXECUTE
1/1
MFT
CS1
CS2
CLOSE
0
SIMULATION NO.50-28
TEST
AUTO IMAGE POSITION ADJUSTMENT SERVICE
CLOSE
EXECUTE
PLEASE SET THE SIT CHART PAPER ON THE OC
THEN PRESS [EXECUTE] TO START
REPRINT
0
SIMULATION NO.50-28
TEST
AUTO IMAGE POSITION ADJUSTMENT SERVICE
CLOSE
OC
LEAD
OFFSET
SUB
RESCAN
REPRINT
OK
RETRY
DATA

