Sharp XV-Z2000E (serv.man14) Service Manual ▷ View online
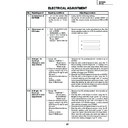
No.
Adjusting point
Adjusting conditions
Adjusting procedure
29
XV-Z2000
DT-400
DT-400
9
DTV Color
Saturation Level
Saturation Level
1. Group: DVD
Subject: Color
1. Check the fixed value.
Color: 8
10
Video Bright/
Contrast
Adjustment
Contrast
Adjustment
1. Group: VIDEO
Subject:BRIGHT
(Black level)
CONTRAST
(White level)
(Black level)
CONTRAST
(White level)
1. Check the fixed value.
Contrast: 5
Bright: 55
Bright: 55
8
DVD Tint
1. Check the fixed value.
Tint: 4
1. Group: DVD
Subject: Tint
7
DVD Bright/
Contrast Ad-
justment
Contrast Ad-
justment
1. Group: DVD
Subject:BRIGHT
(Black level)
CONTRAST
(White level)
(Black level)
CONTRAST
(White level)
1. Check the fixed value.
Contrast: 5
Bright: 55
Bright: 55
5
DTV Tint
1. Group: DTV
Subject: Tint
1. Check the fixed value.
Tint: 8
6
DTV Color
Saturation
Level
Saturation
Level
1. Group: DTV
Subject: Color
1. Check the fixed value.
Color: 6
12
VIDEO Color
Saturation Level
Saturation Level
1. Group: VIDEO
Subject:N-Color
P-Color
S-Color
P-Color
S-Color
1. Check the fixed values.
N-Color: 7
P-Color: 4
S-Color: 7
P-Color: 4
S-Color: 7
11
VIDEO Tint
1. Group: VIDEO
Subject:N-Tint
P-Tint
S-Tint
P-Tint
S-Tint
1. Check the fixed values.
N-Tint: 8
P-Tint: 4
S-Tint: 4
P-Tint: 4
S-Tint: 4
4-4
DTV B-Bright/
Contrast Ad-
justment
(Manual or auto
adjustment)
Contrast Ad-
justment
(Manual or auto
adjustment)
1. Group: DTV
Subject:B-BRIGHT
(Black level)
B-CONTRAST
(White level)
(Process/GAMMA interac-
tion Input5 Color differ-
ence input)
(Black level)
B-CONTRAST
(White level)
(Process/GAMMA interac-
tion Input5 Color differ-
ence input)
1. Observe the 0%black window pattern chroma-
ticity on CA100.
2. Starting with a bit dropout screen, vary the Bright
setting until the bright blue "y" setting turns to-
ward the black tone and stays there. Now raise
the setting by one point and adjust to the point
where the first bit dropout is encountered (the
setting changes over 5/1000).
ward the black tone and stays there. Now raise
the setting by one point and adjust to the point
where the first bit dropout is encountered (the
setting changes over 5/1000).
3. Observe the 100% W window pattern chromatic-
ity on CA100.
4. Starting with a bit dropout screen, vary the Con-
trast setting until the bright blue "y" setting turns
toward the black tone and stays there. Now raise
the setting by one point and adjust to the point
where the first bit dropout is encountered (the
setting changes over 5/1000).
toward the black tone and stays there. Now raise
the setting by one point and adjust to the point
where the first bit dropout is encountered (the
setting changes over 5/1000).
30
XV-Z2000
DT-400
DT-400
13
DVD White
balance
(Auto
adjustment)
balance
(Auto
adjustment)
1. Feed the component 75%
gray scale signal.
2. Group: PIXEL
Subject:R-GAIN (R)
B-GAIN (B)
Input 5 Color
difference input
B-GAIN (B)
Input 5 Color
difference input
1. Adjust the white balance by controlling R-GAIN and
B-GAIN.
(Adjust x=298 and y=319.)
(Adjust x=298 and y=319.)
1. Make the following settings.
Destination
Process adjustment Remote controller setting
Europe
SS3
Factory setting 3
North America
SS4
Factory setting 4
15
Factory setting
14
DLP voltage
adjustment
adjustment
1. Read the DLP-listed volt-
age rank.
2. Make the switch setting
corresponding to the read-
out rank.
(on the Formatter PWB)
out rank.
(on the Formatter PWB)
1. Make this adjustment when the DLP chip has been
replaced or the combination of DLP chip and
Formatter PWB has been changed.
Formatter PWB has been changed.
1. Ranking: D E
No.
Adjusting point
Adjusting conditions
Adjusting procedure
30
31
XV-Z2000
DT-400
DT-400
*1272-6bbc
CHXXXX
LLLLL
YYYYYYY
L LLL LM
TI Intemal Numbering
TI Intemal Numbering
2-Dimensional Matrix Code
(DMD Part Number and
Serial Number)
Part 1 of Serial Number
(7 characters)
Part 2 of Serial Number
(6 or 7 characters)
DMD Part Number
The last alphabet letter indicates the
Bin voltage setting (D. E).
Bin voltage setting (D. E).
1
* Precautions in setting up the DMD (Digital Micromirror Device) unit
Before connecting the formatter PWB to the optical engine, take the following steps. Look at the voltage rank marking
that is on the DMD itself. Referring to this marking, set the DIP switches on the formatter PWB. And connect this PWB
to the optical engine. Wrong settings will adversely affect the system performance.
Set the formatter PWB switches according to the Bin voltage shown on the back face of the DMD.
2
Based on Bin voltage, switch is set up as follows.
D:
E:
32
XV-Z2000
DT-400
DT-400
Calling and quitting the process mode with the control keys on this model.
∗
Although it is possible for the process OUT to exit using the process menu, the IN/OUT toggle command is also
available considering the existing specification.
available considering the existing specification.
1. Calling and quitting
With the menu not displayed, press the "
'
", "
'
", "
"
", "
"
", "
|
", "
\
" and "ENTER" keys on main unit.
2. Others
Press the S2002 process key (toggle) on the main PWB to call and quit the process menu.
Note: When adjusting in the process mode, set a signal with a vertical frequency of 60 Hz or no signal. (May not be
properly adjusted with other signals.)
»
Adjustment mode process menu
Adjustment mode process menu 1
* Adjust only the shaded items below.
Adjustment Process Menu
First layer
DTV
VERSION
DVD
SS
VIDEO
TEMP
AD
OPTION
DLP
PATTERN
VIDEO1
LAMP
PIXEL
LINE
Pedestal
EXIT
second layer
Initial Value
DTV
Contrast
5
Tint
8
Color
4
Sharpness
1
Bright
55
R-Bright
20
G-Bright
20
B-Bright
20
R-Contrast
120
G-Contrast
120
B-Contrast
120
EXIT
DVD
Contrast
5
Tint
4
Color
5
Sharpness
1
CTi-Level
1
LTi-Level
0
CB-Offset
7
CR-Offset
7
Bright
55
B-DRIVE
41
R-DRIVE
41
EXIT
VIDEO
Contrast
5
N-Tint
7
P-Tint
4
S-Tint
4
N-Color
7
P-Color
4
S-Color
7
Sharpness
2
CTi-Level
1
LTi-Level
0
CB-Offset
7
CR-Offset
7
Bright
55
B-DRIVE
41
R-DRIVE
41
EXIT
Display

