Sharp XV-Z90E (serv.man28) User Manual / Operation Manual ▷ View online
Basic Operation
-42
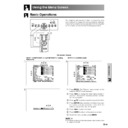
Reversing/Inverting Projected Images
This projector is equipped with a reverse/invert image
function which allows you to reverse or invert the pro-
jected image for various applications.
function which allows you to reverse or invert the pro-
jected image for various applications.
Description of Projected Images
1 Press MENU. The “Picture” menu screen appears.
2 Press
/
to display the “PRJ Mode” menu
screen.
3 Press / to select the desired projection mode.
4 Press ENTER to save the setting.
5 To exit the menu screen, press MENU.
• This function is used for the reversed image and ceiling-
mount setups. See page 23 for these setups.
On-screen Display
2,3
1, 5
4
Selecting the On-screen Display Language
English is the preset language for the On-screen
Display; however, this can be changed to German,
Spanish, Dutch, French, Italian, Swedish, Portuguese,
Chinese, Korean or Japanese.
Display; however, this can be changed to German,
Spanish, Dutch, French, Italian, Swedish, Portuguese,
Chinese, Korean or Japanese.
1 Press MENU. The “Picture” menu screen appears.
2 Press
/
to display the “Language” menu
screen.
3 Press / to select the desired language.
4 Press ENTER to save the setting. The On-screen
Display is now programmed to display in the
language selected.
language selected.
5 To exit the menu screen, press MENU.
2,3
1, 5
4
On-screen Display
Selected item
Front
Ceiling
ⳭFront
Rear
Ceiling
ⳭRear
Description
Normal image
Inverted image
Reversed image
Reversed and inverted image
Basic Operation
-43
Advanced Picture Adjustment
2,3
1,4
1
1
1 The “Advanced” menu appears when the buttons
are pressed in the order shown below.
-
-
-
-
-
-
2 Press / to select a specific adjustment item.
3 Press / to move the mark of the selected
adjustment item to the desired setting.
4 To exit the menu screen, press MENU.
• To reset all adjustment items, “Reset” in the "Picture" menu
screen and press ENTER.
On-screen Display
On-screen Display
R-Contrast
G-Contrast
B-Contrast
R-
Brightness
Brightness
G-
Brightness
Brightness
B-
Brightness
Brightness
Reset
For less contrast of red
colour
colour
For less contrast of
green colour
green colour
For less contrast of blue
colour
colour
For less brightness of
red colour
red colour
For less brightness of
green colour
green colour
For less brightness of
blue colour
blue colour
button
button
For more contrast of red
colour
colour
For more contrast of green
colour
colour
For more contrast of blue
colour
colour
For more brightness of red
colour
colour
For more brightness of
green colour
green colour
For more brightness of
blue colour
blue colour
Selected
All image adjustment items are returned to the factory
preset settings.
preset settings.
Detailed picture adjustments can be made in addition
to the adjustments on the normal menu screen.
to the adjustments on the normal menu screen.
1
2

