Sharp XG-V10XE (serv.man29) User Manual / Operation Manual ▷ View online
73
Maintenance &
Tr
oubleshooting
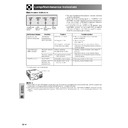
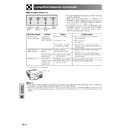
• This projector is equipped with one air filter to ensure the optimal operating condition of the projector.
• The air filter should be exchanged after every 2,000 hours of use.
• Have your nearest Sharp Authorised LCD Projector Dealer or Service Centre exchange the filter (PFILD0110CEZZ).
• The air filter should be exchanged after every 2,000 hours of use.
• Have your nearest Sharp Authorised LCD Projector Dealer or Service Centre exchange the filter (PFILD0110CEZZ).
Front View
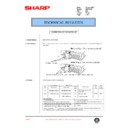
Replacing the Air Filter
4
6
Remove the air filter.
5
Replace the air filter.
1
3
Turn off the power.
2
Turn off the main power
and unplug the power cord.
and unplug the power cord.
Grasp the tab and lift open the
filter cover in the direction of the
arrow.
filter cover in the direction of the
arrow.
Remove the front filter
cover.
cover.
Reset the filter
cover.
cover.
Insert the tab on the end of the
filter cover into the filter cover
opening and press the filter
cover into position.
filter cover into the filter cover
opening and press the filter
cover into position.
Press the air filter firmly into the
filter compartment.
filter compartment.
Grasp the air filter tabs between
your fingers and pull it out of
the filter compartment.
your fingers and pull it out of
the filter compartment.
• When resetting the filter cover, be sure the filter is securely installed. The power will not turn on unless it is correctly
installed.
Replacing the front air filter
or
Air filter
74
Maintenance &
Tr
oubleshooting
Troubleshooting
Check
• Keylock level is set to “Level A” or “Level B”, preventing operation of some or all
buttons. (See page 59.)
• When the projector is set to slave, use the buttons on the master projector or change the
setting by RS-232C commands from the computer. (See page 63.)
• When using slave setting in combination with Keylock Level B or C, all the buttons on
the projector and the remote control are disabled. Use the SAPS or RS-232C commands
to release slave and Keylock setting and enable buttons to operate.
Without a computer, you can release slave and Keylock setting by entering the buttons
on the projector as follows.
ON
to release slave and Keylock setting and enable buttons to operate.
Without a computer, you can release slave and Keylock setting by entering the buttons
on the projector as follows.
ON
→ ENTER → ON → ENTER → ON → ENTER → MENU
However, this operation also releases the password set.
• Projector power cord is not plugged into the wall outlet.
• The front filter cover is not securely installed.
• Selected input is wrong. (See page 31.)
• Cables incorrectly connected to side panel of the projector. (See pages 14–18.)
• Remote control batteries have run down. (See page 12.)
• Remote control’s MOUSE/ADJUSTMENT switch is set to MOUSE.
• The front filter cover is not securely installed.
• Selected input is wrong. (See page 31.)
• Cables incorrectly connected to side panel of the projector. (See pages 14–18.)
• Remote control batteries have run down. (See page 12.)
• Remote control’s MOUSE/ADJUSTMENT switch is set to MOUSE.
• Cables incorrectly connected to side panel of the projector. (See pages 14–18.)
• “Contrast” and “Bright” adjustments are set to minimum position. (See page 43.)
• On-screen Display (“BLACK SCREEN”) is turned off and Black Screen function is turned
• “Contrast” and “Bright” adjustments are set to minimum position. (See page 43.)
• On-screen Display (“BLACK SCREEN”) is turned off and Black Screen function is turned
on, creating a black image. (See page 32.)
• “Color” and “Tint” adjustments are not correct. (See page 43.)
• Adjust the focus. (See page 29.)
• Projection distance is too long or too short to allow for proper focus. (See pages 21–28.)
• Projection distance is too long or too short to allow for proper focus. (See pages 21–28.)
• Cables incorrectly connected to side panel of the projector. (See pages 14–18.)
• Volume is set to minimum. (See page 31.)
• Volume is set to minimum. (See page 31.)
• OSD Display is set to “Level A” or “Level B”, preventing to display some or all On-screen
Displays. (See page 53.)
• If the picture is normal, the sound is due to cabinet shrinkage caused by temperature
changes. This will not affect operation or performance.
• Refer to “Lamp/Maintenance Indicators” on page 69.
• Adjust the “Phase” setting. (See page 46.)
• Noise may appear when used with certain computers. Set the NOISE FILTER to ON
• Noise may appear when used with certain computers. Set the NOISE FILTER to ON
using the RS-232C command. (See pages 80–82.)
• Set the resolution mode to 480P. (See page 48.)
• Change the input signal type. (See page 45.)
• Align the mark on the lens with the corresponding mark on the projector, push the lens
firmly in place, and rotate to the right.
Problem
Power cannot be turned on or
off using the POWER buttons
(ON/OFF) on the projector.
off using the POWER buttons
(ON/OFF) on the projector.
Cannot be operated by
remote control.
remote control.
Cannot be operated by all
buttons of the projector and
remote control.
buttons of the projector and
remote control.
No picture and no sound.
Sound is heard but no picture
appears.
appears.
Colour is faded or poor.
Picture is blurred.
Picture appears but no sound
is heard.
is heard.
No OSD appears.
An unusual sound is occasion-
ally heard from the cabinet.
ally heard from the cabinet.
Maintenance indicator lights
up.
up.
Picture noise appears.
480P images do not appear.
Image is green on INPUT 1, 2,
4 or 5 COMPONENT.
Image is pink (no green) on
INPUT 1, 2 RGB.
4 or 5 COMPONENT.
Image is pink (no green) on
INPUT 1, 2 RGB.
Lens comes off.
Display

