Sharp XG-V10XE (serv.man27) User Manual / Operation Manual ▷ View online
31
Operation Buttons
1.2.3
4.5.6
Conference Series
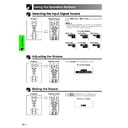
Selecting the Input Signal Source
Using the Operation Buttons
Muting the Sound
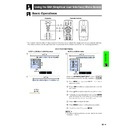
Press VOLUME
/ to adjust the volume.
Press MUTE to temporarily turn off the sound.
Press MUTE again to turn the sound back on.
Press MUTE again to turn the sound back on.
1.2.3
4.5.6
Conference Series
Projector
Remote Control
Projector
Remote Control
VOLUME
buttons
MUTE
button
1.2.3
4.5.6
Projector
Remote Control
INPUT
buttons
Adjusting the Volume
Press INPUT 1.2.3 or INPUT 4.5.6 again to change the
mode.
mode.
• When no signal is received, “NO SIGNAL” will be displayed.
When a signal that the projector is not preset to receive is
received, “NOT REG.” will be displayed.
received, “NOT REG.” will be displayed.
INPUT 1 Mode
INPUT 2 Mode
INPUT 3 Mode
INPUT 4 Mode
INPUT 5 Mode
INPUT 6 Mode
On-screen Display
On-screen Display
On-screen Display
32
Operation Buttons
1.2.3
4.5.6
1, 2
This function can be used to superimpose a black
screen over the projected image.
screen over the projected image.
Blacking out the Projected Image
Press BLACK SCREEN. The screen turns black and
“BLACK SCREEN” is displayed on the screen. To return
to the original projected image, press BLACK SCREEN
again.
“BLACK SCREEN” is displayed on the screen. To return
to the original projected image, press BLACK SCREEN
again.
• To use the remote control to operate this
function, slide the MOUSE/ADJUSTMENT
switch to the MOUSE position before pressing
BLACK SCREEN.
switch to the MOUSE position before pressing
BLACK SCREEN.
1.2.3
4.5.6
Superimposing a Black Screen
Projector
Remote Control
BLACK
SCREEN
button
Displaying a Still Image
This function allows you to instantly freeze a moving
image. This is useful when you want to display a still
image from a computer or video, giving you more time
to explain the image to the audience.
You can also use this function to display a still image
from a computer while you make preparations for the
next computer images to be presented.
image. This is useful when you want to display a still
image from a computer or video, giving you more time
to explain the image to the audience.
You can also use this function to display a still image
from a computer while you make preparations for the
next computer images to be presented.
1 Press FREEZE to freeze the image.
2 Press FREEZE again to return to the moving
image.
Projector
Remote Control
On-screen Display
Projected Image
sg
MOUSE
ADJ.
33
Operation Buttons
1.2.3
4.5.6
3
2
1
3
Magnifying a Specific Portion of an Image
s
On-screen Display
Projector
This function allows you to magnify a specific portion of
an image. This is useful when you want to display a
detailed portion of the image.
an image. This is useful when you want to display a
detailed portion of the image.
(Slide the MOUSE/ADJUSTMENT switch
on the remote control to the ADJ. position)
on the remote control to the ADJ. position)
1 Press ENLARGE. Each time ENLARGE is
pressed, the image will be magnified.
2 When the image is magnified, you can pan and
scan around the image by using ∂/ƒ/ß/©.
• ENLARGE does not work with UXGA signal image.
• Each time ENLARGE is pressed, image
• Each time ENLARGE is pressed, image
magnification
toggles as shown below.
1
4
9
16
36
64
• If the input signal is changed during digital image
magnification, the image will return to
1. The input signal
is changed
(a) when INPUT 1.2.3 or INPUT 4.5.6 is pressed,
(b) when the input signal is interrupted, or
(c) when the input resolution and refresh rate changes.
(a) when INPUT 1.2.3 or INPUT 4.5.6 is pressed,
(b) when the input signal is interrupted, or
(c) when the input resolution and refresh rate changes.
3 To return to
1, press UNDO.
Remote Control
MOUSE
ADJ.
4
34
Operation Buttons
Adjusting the Picture
Aspect Ratio
This function allows you to modify or customise the
picture display mode to enhance the input image.
Depending on the input signal, you can choose
NORMAL, FULL,
picture display mode to enhance the input image.
Depending on the input signal, you can choose
NORMAL, FULL,
DOT BY DOT
,
BORDER
,
STRETCH
or
SMART STRETCH
image.
1 Press RESIZE. Each time RESIZE is pressed, the
picture mode changes as shown below.
2 To return to the standard image, press UNDO
while “
RESIZE
” is displayed on the screen.
COMPUTER
Projector
Remote Control
1.2.3
4.5.6
2
1
2
VIDEO/DTV
480i
480P
NTSC
PAL
SECAM
720P
1080i
Input Signal
NORMAL
BORDER
Output screen image
STRETCH
SMART STRETCH
FOR 4:3 aspect ratio
FOR 16:9 aspect ratio
with squeeze
STRETCH
RESIZE
NORMAL
RESIZE
NORMAL
RESIZE
BORDER
RESIZE
BORDER
RESIZE
STRETCH
RESIZE
STRETCH
RESIZE
SMART STRETCH
RESIZE
SMART STRETCH
RESIZE
EXAMPLE
1024
768
–
800
600
SVGA (800
600)
NORMAL
FULL
DOT BY DOT
For 4:3
aspect ratio
For without
4:3 aspect ratio
1024
768
–
–
XGA (1024
768)
1024
768
–
1024
768
SXGA (1280
960)
1024
768
–
1024
768
UXGA (1600
1200)
960
768 1024 768 1024 768
SXGA (1280
1024)
1024
768 768 576
NTSC, SECAM, 480i
1024
768 768 576
PAL, 580i
1024
768 768 576
480P
–
–
720P
–
–
1024
576*
1024
576*
1024
576*
1024
576*
NORMAL BORDER STRETCH
SMART
STRETCH
1024
576*
1024
576*
1024
576*
1024
576*
–
–
1080i
For 4:3
aspect ratio
For 16:9
aspect ratio
EXAMPLE
* The digital image shift function can be used with these picture display modes.
Input Signal
NORMAL
FULL
Output screen image
DOT BY DOT
FOR 4:3 aspect ratio
FOR 4:3 aspect ratio
(1024
(1024
768)
FOR 5:4 aspect ratio
(1280
(1280
1024)
NORMAL
RESIZE
NORMAL
RESIZE
NORMAL
RESIZE
DOT BY DOT
RESIZE
FULL
RESIZE
DOT BY DOT
RESIZE

