Sharp XG-MB70X (serv.man13) Service Manual ▷ View online
45
XG-MB70X
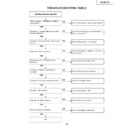
Checking RS-232C
Communication is disabled even though
connecting the control PC and projector
with a RS-232C cable.
connecting the control PC and projector
with a RS-232C cable.
Is the connecting cable connected
correctly? (cross cable)
correctly? (cross cable)
Replace the connecting cable.
Does pin (8) of IC8002 receive a signal?
Check R8002 and the peripheral circuits of SC8001.
Does pin (4) of IC8202 receive a signal?
Check the peripheral circuits of IC8002.
Do pin (3) of IC8202 output a signal?
Check IC8202 and the peripheral circuits of the
microprocessor IC8001.
microprocessor IC8001.
Does pin (106) of IC2201 receive a
signal?
signal?
Check the peripheral circuits of the microprocessor
IC8001 and IC2201.
IC8001 and IC2201.
Do pin (105) of IC2201 output a signal?
Check the peripheral circuits of the microprocessor
IC2003 and IC2201.
IC2003 and IC2201.
Check the peripheral circuits of the
microprocessor IC8001.
microprocessor IC8001.
YES
NO
YES
NO
YES
NO
NO
NO
NO
YES
YES
YES
YES
46
XG-MB70X
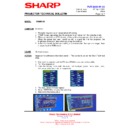
Resetting after replacing IC8003 (EEP ROM)
MAC address returns to default. Follow the steps below to reset.
1 Open the top cabinet of the projector and confirm the MAC address (MAC: ************) of the seal on the PWB.
2 Connect the control PC and projector with a RS-232C cable.
3 Turn on the AC power supply.
4 EEP ROM returns to default.
5 Turn off the AC power supply and turn on again.
6 Set MAC address by using the RS-232C command. (Refer to "MAC address setting" for the setting procedure.)
7 Enter and check the response.
Check that it is the same as the set MAC address.
8 Setting is completed.
MAC address setting
RS-232C commands to be used
*1
1st byte of the MAC address
*2
2nd byte of the MAC address
*3
3rd byte of the MAC address
*4
4th byte of the MAC address
*5
5th byte of the MAC address
*6
6th byte of the MAC address
*7
7th byte of the MAC address
*8
8th byte of the MAC address
*9
9th byte of the MAC address
*10
10th byte of the MAC address
*11
11th byte of the MAC address
*12
12th byte of the MAC address
1 Enter and [*2], and press "ENTER".
Responds "OK".
2 Enter and [*2], and press "ENTER".
Responds "OK".
3 Enter and [*2], and press "ENTER".
Responds "OK".
4 Enter and [*2], and press "ENTER".
Responds "OK".
5 Enter and [*2], and press "ENTER".
Responds "OK".
6 Enter and [*2], and press "ENTER".
MAC address setting is completed.

