Sharp AR-M351U / AR-M451U (serv.man14) Service Manual ▷ View online
AR-M351U/M451U, AR-M355U/M455U MAINTENANCE AND DETAILS OF EACH SECTION 7 - 63
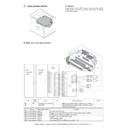
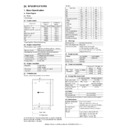
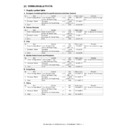
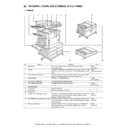
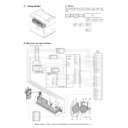
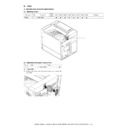
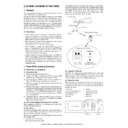
B. Major parts and signal functions
3
12
5
11
13
19
20
20
6
7
8
7
8
14
15
15
1
9
2
17
10
16
4
18
21
22
23
24
22
23
24
GND2
CN1
27
26
28
34
35
29
30
32
25
31
33
36
37
38
39
37
38
39
42
41
43
49
50
50
44
45
47
40
46
48
51
52
53
54
52
53
54
57
56
58
59
60
60
55
3
12
5
11
13
19
20
20
6
7
8
7
8
14
15
15
1
9
2
17
10
16
4
18
21
22
23
24
22
23
24
27
26
28
34
35
35
29
30
30
32
25
31
33
36
37
38
39
37
38
39
42
41
43
49
50
50
44
45
45
47
40
46
48
51
52
53
54
52
53
54
57
56
58
64
65
65
59
60
60
62
55
61
63
66
67
68
69
67
68
69
75
71
70
76
72
73
73
78
77
74
80
79
BOARD TO BOARD
TX25-100P-LT-H1
CN3
77
78
78
73
72
76
70
71
71
75
79
80
80
74
65
64
69
68
67
66
63
61
62
62
92
84
97
98
99
98
99
94
89
88
87
90
91
91
95
86
83
81
82
82
85
96
93
100
99
98
97
96
91
94
88
92
93
93
89
85
84
82
90
81
86
83
95
87
+24V3
/XL
+12V1
GND2
GND2
GND2
RES_CCD1
PDSEL1
SEG0
TXD_CCD1
CLK_CCD1
FRM_CCD1
GND2
/BZR
XH
/F2
/F0
+3.3V
PD
GND2
/CL1
RXD_CCD1
ADD_CCD1
ADD_CCD1
PAGE1
PDSEL0
/STSET
YH
SEG1
Lcd DIS
/CCFT
/YL
/YL
TH
/1_DBL-
/1_DBL+
/1_DBL+
1_DATA0-
1_DATA0+
1_DATA1-
1_DATA1+
1_DATA0+
1_DATA1-
1_DATA1+
1_CLK-
1_CLK+
1_CLK+
GND2
GND2
GND2
GND2
GND2
(NC)
GND2
(NC)
+24V3
PDSEL2
/KEYIN
/KEYIN
GND2
GND2
GND2
LcdS-
LcdS+
LcdM+
LcdM-
LcdCP1+
LcdM-
LcdCP1+
LcdCP2+
LcdCP1-
LcdCP2-
LcdD2-
LcdD1+
LcdD3-
LcdD3+
LcdD1-
LcdD0-
LcdD0+
LcdD2+
GND2
GND2
GND2
/STMPS
GND2
GND2
GND2
GND2
+12V1
+12V1
GND2
+5V2
GND2
GND2
GND2
GND2
+12V1
+12V1
GND2
+5V2
+5V2
GND2
GND2
GND2
GND2
GND2
GND2
+5V2
SEG2
GND2
GND2
GND2
GND2
GND2
/F3
/F1
+5V1
+3.3V
GND2
GND2
LCD-VEE
+24V3
+24V3
+24V3
GND2
GND2
GND2
+24V3
+12V1
GND2
GND2
GND2
PDSEL1
SEG0
GND2
/1_DBL-
/1_DBL+
/1_DBL-
/1_DBL+
1_DATA0-
1_DATA0+
1_DATA1-
1_DATA1+
1_DATA0+
1_DATA1-
1_DATA1+
1_CLK-
1_CLK+
1_CLK+
GND2
GND2
GND2
GND2
GND2
(NC)
GND2
(NC)
+24V3
PDSEL2
/KEYIN
/KEYIN
GND2
GND2
GND2
LcdS-
LcdS+
LcdM+
LcdM-
LcdM-
GND2
/XL
+3.3V
/STSET
YH
LcdCP1+
LcdCP2+
LcdCP1-
LcdCP2-
LcdD2-
LcdD1+
LcdD3-
LcdD3+
LcdD1-
LcdD0-
LcdD0+
LcdD2+
GND2
GND2
GND2
/STMPS
GND2
GND2
GND2
GND2
+12V1
+12V1
GND2
+5V2
GND2
GND2
GND2
GND2
+12V1
+12V1
GND2
+5V2
+5V2
GND2
GND2
+5V2
RES_CCD1
FRM_CCD1
CLK_CCD1
TXD_CCD1
CLK_CCD1
TXD_CCD1
/F0
/F2
/BZR
GND2
PD
ADD_CCD1
RXD_CCD1
/CL1
PDSEL0
PDSEL0
PAGE1
SEG1
GND2
GND2
+5V2
GND2
GND2
GND2
SEG2
GND2
GND2
GND2
/F1
/F3
+5V1
XH
Lcd DIS
/CCFT
/YL
/YL
TH
+3.3V
GND2
GND2
LCD-VEE
+24V3
+24V3
GND2
GND2
+24V3
GND2
GND2
SCN
JNT
PWB
SCN
cnt
PWB
(1/3)
(1/2)
100
TX24-100R-LT-H1
1
BL
/LED1
RD
LB
LB
GY
BR
ORSLED
3
1
+24V3
BR
GND2
BL
OCSW
4
S6B-PH-K-S
H3P-SHF-AA+B3P-SHF-1AA
GY
LB
LB
3
/LED0
2
+5V1
5
6
6
+5V1
RD
2
GND2
OCSW
OCSW
CN6
OCSW
21
LcdD1-
12
YH
1
18
30
LcdD0+
18
LcdD3+
1
15
LcdDIS
/YL
30FMZ-BT
15
LcdM-
3
12
LcdCP2+
+24V3
LcdS-
+24V3
9
LcdCP1+
GND2
LcdCP1-
LcdCP2-
13
TH
29
6
23
25
LcdS-
LcdD2-
23
LCD-VEE
2
/YL
26
3
20
28
LcdD1+
20
LcdD2+
4
17
LCD-VEE
YH
17
LcdD3-
6
14
GND2
XH
14
LcdD0+
8
11
GND2
GND2
LcdD0-
LcdD1+
GND2
8
LcdM-
LcdD3-
30FMN-BT
LcdDIS
5
CN5
CN1
/CCFT
28
5
22
26
LcdS+
LcdD2+
22
GND2
7
/XL
25
2
19
29
LcdD0-
19
LcdD2-
9
16
/XL
16
LcdM+
11
13
LcdCP2-
/CCFT
LcdS+
GND2
10
LcdCP1-
TH
LcdCP1+
LcdCP2+
GND2
30
7
24
LcdM+
LcdD3+
24
3.3V
10
XH
27
4
21
27
LcdD1-
T24FAZ-SMT-TF
24
23
22
21
20
19
18
17
16
15
14
13
12
11
10
9
8
7
6
5
4
3
2
1
CN4
1
CN3
S02(8.0)B-BHS-L
HV
/CCFT
2
B6B-PH-SM3-TB
PDSEL1
+5V2
GND2
PD
PDSEL0
PDSEL2
5
3
6
4
CN102
2
1
MFP
OPE
OPE
PWB
/CCFT
2
1
HV
PL
BR
LB
BR
BL
4
GY
ORS PD
PDSEL1
1
+5V2
PDSEL0
PDSEL2
5
S6B-PH-K-S
6
3
PD
GND2
GND2
2
17
9
23
3
11
4
13
5
10
15
1
2
21
20
20
16
22
19
24
18
14
12
8
6
7
CN101
T24FAZ-SMT-TF
/F0
SEG2
SEG1
SEG0
/KEYIN
+5V1
GND2
GND2
PD
/F1
+5V2
/F2
/F3
/F3
GND2
PDSEL2
GND2
PDSEL1
PDSEL0
/BZR
(NC)
(NC)
GND2
GND2
GND2
+5V2
GND2
GND2
/F1
PDSEL2
+5V2
(NC)
SEG1
SEG0
PD
PDSEL1
PDSEL0
/BZR
GND2
/F3
/F0
GND2
/F2
+5V2
/KEYIN
(NC)
GND2
SEG2
GND2
+5V1
3.3V
04FM-1.0ST
YH
4
2
1
XH
CN2
3
(X2)
(X1)
FFC-4PIN
(Y1)
(Y2)
/XL
/YL
LCD-VEE
11
18
8
6
10
CN4
9
2
13
GND2
5
19
(NC)
(NC)
(NC)
(NC)
(NC)
17
(NC)
LCD CP1
LCD D0
GND2
4
7
14
GND2
20
16
LCD M
LCD S
LCD S
GND2
20FLS-SM1-TB
1
1
GND2
3.3V
Lcd DIS
Lcd DIS
LVDS
PWB
LCD D3
LCD D1
LCD D2
3
12
15
LCD CP2
LCD
TOUCH
/CCFT
1
2
AR-M351U/M451U, AR-M355U/M455U MAINTENANCE AND DETAILS OF EACH SECTION 7 - 64
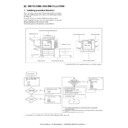
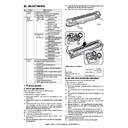
C. Maintenance and parts replacement
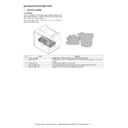
a. Original detection unit
a-1. Original size detection PWB (Light emitting side)
1) Remove the rear cabinet.
2) Remove the original detection unit (Light emitting side).
3) Remove the document size detection PWB (Light emitting
side)
a-2. Original size detection PWB (Light receiving side)
1) Remove the operation panel lower cabinet.
2) Remove the original size detection PWB (Light receiving side)
b. Operation panel unit
1) Remove the original exit tray.
Code
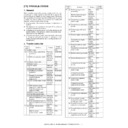
Signal
name
Name
Function/Operation
Type
Note
LCD
LCD unit
Display the each memu and the information.
TOUCH
Touch panel
Various adjustments and setting operation are
performed.
performed.
ORSLED
Document size detection light
emitting PWB
emitting PWB
Generates the document size detection signal.
ORSPD
Document size detection light
receiving PWB
receiving PWB
Generates the document size detection signal.
OCSW
OCSW
SPF open/close detector
Document size detection trigger
Transmission type Sensor
/CCFT
/CCFT
LCD backlight
LCD backlight
CCFT cool CRT
No.
Name
Function
1
LVDS/INV PWB
Generates the LCD display signal and a high voltage for the backlight.
2
Operation control PWB
Controls the display operation panel.
No.
Unit
Parts
a
Original detection
unit
unit
1
Original size detection PWB
(Light emitting side)
(Light emitting side)
2
Original size detection PWB
(Light receiving side)
(Light receiving side)
b
Operation panel
unit
unit
1
LVDS PWB
2
MFP operation PWB
a-1
b-2
b-1
a-2
b
1)
2)
3)
4)
1)
1)
1)
2)
3)
3)
2)
1)
2)
2)
1)
2)
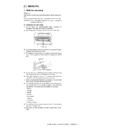
AR-M351U/M451U, AR-M355U/M455U MAINTENANCE AND DETAILS OF EACH SECTION 7 - 65
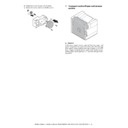
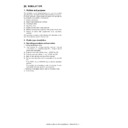
2) Remove the scanner left cabinet.
3) Remove the scanner right cabinet.
4) Remove the operation panel lower cabinet.
5) Remove the harnesses.
6) Remove the operation panel unit.
b-1. LVDS PWB
1) Remove the operation panel unit.
2) Remove the connector and the screw, and remove the LVDS
PWB.
b-2. MFP operation PWB
1) Remove the operation panel unit.
2) Remove the MFP operation PWB
1)
1)
2)
1)
2)
1)
1)
2)
1)
1)
1)
1)
1)
2)
1)
1)
2)
2)
3)
1)
1)
2)
2)
2)
2)

