Sharp VC-M333 (serv.man6) User Manual / Operation Manual ▷ View online
33
If problems persist contact the SHARP Helpline on tel: 0990-274277
MORE INFORMATION ABOUT YOUR VCR
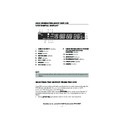
ON-SCREEN DISPLAY
All the information you need on the VCR status will be summarised on the on-screen display.
If you are recording, playing back a tape or watching a broadcast on the video channel you
can call up three standard on-screen displays. The display can be selected by pressing the
If you are recording, playing back a tape or watching a broadcast on the video channel you
can call up three standard on-screen displays. The display can be selected by pressing the
MODE OSD
button on the remote control, 1,2,3 or 4 times.
1.
AUTO
, the current mode and channel
number will be displayed for 3 seconds when an
operation or number button is pressed.
operation or number button is pressed.
2.
FULL
., all the active features will also be shown
on screen.
3.
COUNTER
, this display will show the tape
counter and amount of tape remaining.
4.
DISPLAY OFF
, this will remove the display
from the screen.
NOTES:
•
The default time and date will not be displayed if the clock has not been set.
•
The VCR will return to display
1
. each time it is switched on.
•
If you are recording from this VCR to another, make sure you remove the display from
the screen otherwise it will be recorded.
the screen otherwise it will be recorded.
1.
■
1 CH 5 9
S P
Programme number and channel
Tape Status
Tape speed
Tape remaining
Time
Date
Tape counter
2.
■
1 CH 5 9
S U P E R
P .
ON
S P
2 2 : 0 0
R EM 1 : 0 5
9 / 0 7 0 0
0 : 0 0 . 0 0
REM 1:05
0:00.00
3.
TINS-3809UMZZ ENGLISH.book Page 33 Monday, April 3, 2000 2:03 PM
34
If problems persist contact the SHARP Helpline on tel: 0990-274277
MORE INFORMATION ABOUT YOUR VCR
SPECIFICATIONS
•
Specifications are subject to change without notice as part of our policy of continuous
improvement.
improvement.
•
No liability is accepted for any inaccuracies or omissions in this publication, although
every possible care has been taken to make it complete and as accurate as possible.
every possible care has been taken to make it complete and as accurate as possible.
Format:
VHS PAL standard
Number of heads:
Two
Video signal system::
PAL colour or monochrome signal: 625 lines
Maximum playing time:
480 min. with E-240 video cassette in Long Play
(LP) mode
(LP) mode
Tape width:
12.7 mm
Tape speed:
23.39 mm/s Standard Play (SP): 11.70 mm/s
Long Play (LP)
Long Play (LP)
Antenna:
75
Ω unbalanced
Reception channels:
UHF channel 21-69
RF output signal:
UHF channel 21-69
Power requirement:
AC 230-240V, 50 Hz
Power consumption:
17 W approx. (POWERSAVE
≤ 1.5W)
Operating temperature:
5 ˚C to 40 ˚C
Storage temperature:
-20 ˚C to 55 ˚C
Video input:
1.0 Vp-p, 75
Ω
Video output:
1.0 Vp-p, 75
Ω
Audio input:
Line1&2: -3.8 dBs, 10 k
Ω, Line 3: -5.0 dBs, 47 kΩ
Audio output:
Line1&2: -3.8 dBs, 1 k
Ω
Dimensions:
430(W) x 300(D) x 91.5(H) mm
Weight:
4.3 kg (approx.)
Supplied accessories:
75
Ω RF Connection cable, operation manual,
remote control, AA/R6/UM3 battery (x2)
TINS-3809UMZZ ENGLISH.book Page 34 Monday, April 3, 2000 2:03 PM
35
If problems persist contact the SHARP Helpline on tel: 0990-274277
TROUBLESHOOTING
TROUBLESHOOTING
BEFORE REQUESTING SERVICE!
The following conditions do not always denote trouble. Therefore, perform the checks
described below before calling for service. If the problem cannot be corrected by the use of
this guide, remove the mains plugs from the wall socket and contact the dealer or supplier
from whom the unit was purchased in order to obtain service. Where this is not possible, please
contact the telephone number listed below, you will then be given details of how to obtain
service.
Tel.: 0345 125387 - Please note: All calls will be charged at local rate.
AREA
PROBLEM
POSSIBLE CAUSE/CURE
INITIAL
INSTALLATION
When the VCR is first
plugged in the VCR
display appears blank.
When the
STANDBY (
plugged in the VCR
display appears blank.
When the
STANDBY (
)
button is pressed the
display still appears
blank.
display still appears
blank.
• The Video may be in POWERSAVE mode. Press
the STOP (
) button to switch the VCR on
then press and hold the MENU and CHANNEL
buttons together on the front of the VCR for
10 seconds.
Now continue from step 1 of TUNING THE TV INTO
THE VCR.
Now continue from step 1 of TUNING THE TV INTO
THE VCR.
INSTALLATION
TV will not tune in to
the VCR.
the VCR.
• Check all the cables are correctly connected.
• Check your TV manual for correct tuning of your
• Check your TV manual for correct tuning of your
TV.
Auto Installation
screen does not
appear when the VCR
is switched on OR Auto
Installation is not
complete.
screen does not
appear when the VCR
is switched on OR Auto
Installation is not
complete.
• Reset the VCR and complete AUTO
INSTALLATION again. (Refer to VCR Reset at the
back of the book.)
back of the book.)
POWER
Display is not working.
• Make sure the VCR is not in POWERSAVE mode.
• Make sure the power cord is plugged in.
• Make sure the wall socket has power (check by
• Make sure the power cord is plugged in.
• Make sure the wall socket has power (check by
plugging another appliance in).
VCR will not operate -
appears in VCR
display.
• Press the TIMER ON/OFF button to disengage
timer.
VCR will not respond
to any commands.
to any commands.
• Check CHILD LOCK is not engaged.
• Safety device operating: unplug VCR for 2
• Safety device operating: unplug VCR for 2
hours.
PLAYBACK
No picture appears.
• Make sure the TV is set to the video channel.
• Check all connecting cables.
• Check all connecting cables.
Playback picture is
snowy.
snowy.
• Adjust the tracking using CHANNEL
/
buttons.
• Try another tape.
• The video heads may have been
• The video heads may have been
contaminated - refer to a SHARP Service Facility.
TINS-3809UMZZ ENGLISH.book Page 35 Monday, April 3, 2000 2:03 PM
36
If problems persist contact the SHARP Helpline on tel: 0990-274277
TROUBLESHOOTING
TROUBLESHOOTING
AREA
PROBLEM
POSSIBLE CAUSE/CURE
RECORDING
Tape is automatically
ejected when pressing
REC (
ejected when pressing
REC (
) or TIMER
ON/OFF buttons.
• The record-protection tab has been removed.
VIDEOPLUS+ does not
record desired
programme.
record desired
programme.
• Broadcast does not carry VPS/PDC signal which
alters recording time.
• Check VPS/PDC mode is switched to ON.
• Ensure date and time are correctly set on the
• Ensure date and time are correctly set on the
VCR.
TAPE
TRANSPORT/
MECHANISM
Tape can not be
loaded.
loaded.
• Make sure there is no other tape in the VCR.
• Make sure you are loading the tape correctly.
• Make sure you are loading the tape correctly.
Rewind is not possible.
• Make sure the tape is not at the start.
REMOTE
CONTROL
The VCR can not be
operated by remote
control.
operated by remote
control.
• Remote control is too far away from the main
unit.
• Point the remote control at the VCR.
• Batteries are flat - replace both.
• Batteries have not been inserted correctly.
• VCR is positioned in strong light.
• Batteries are flat - replace both.
• Batteries have not been inserted correctly.
• VCR is positioned in strong light.
OTHER
PROBLEMS
Picture does not
change even though
CHANNEL
change even though
CHANNEL
/
buttons are
pressed.
• Make sure the VCR is not in Timer or Menu
mode.
Desired channel
position can not be
selected.
position can not be
selected.
• The channel position has been set to be
skipped. Cancel the SKIP mode for that
channel.
channel.
No colour or poor TV
picture on normal
viewing.
picture on normal
viewing.
• Make sure all the cables are connected
properly.
• Make sure the VCR power cord is properly
plugged in.
Not possible to view
picture or playback
through RF OUT.
picture or playback
through RF OUT.
• Make sure the RF OUTPUT has not been switched
off. (Refer to note on RF THROUGH ON/OFF in
the TUNING THE TV TO THE VCR section of the
manual.)
the TUNING THE TV TO THE VCR section of the
manual.)
Desired channel has
interference.
interference.
• Possible weak signal strength, the same channel
with a better signal strength may have been
tuned in on another VCR preset channel.
Example;
VCR preset 1 = BBC1 and
VCR preset 14 = BBC1
(Refer to Manually Sorting Channels section to
move the channel to your desired position.)
tuned in on another VCR preset channel.
Example;
VCR preset 1 = BBC1 and
VCR preset 14 = BBC1
(Refer to Manually Sorting Channels section to
move the channel to your desired position.)
• TV aerial may need adjusting.
No picture appears.
• Make sure the TV is on the video channel.
• Check all connecting cables.
• Check all connecting cables.
TINS-3809UMZZ ENGLISH.book Page 36 Monday, April 3, 2000 2:03 PM
Display

