Sharp LC-52XS1E (serv.man10) User Manual / Operation Manual ▷ View online
LC-52XS1E/RU/LC-65XS1E/RU
1 – 5
1
3
2
4
5
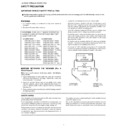
Supplying power to the antenna
You must supply power to the antenna in order to receive digital terrestrial broadcasts or satellite broadcasts
after running the initial auto installation. Go to “MENU” > “Setup” > “Antenna Setup-DIGITAL” > “Digital Setup”
> “Supply Voltage” > select “On”.
You must supply power to the antenna in order to receive digital terrestrial broadcasts or satellite broadcasts
after running the initial auto installation. Go to “MENU” > “Setup” > “Antenna Setup-DIGITAL” > “Digital Setup”
> “Supply Voltage” > select “On”.
Setting the TV and antenna cables
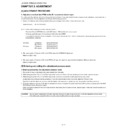
Insert the fixture for
the HDMI cable into
the hole below the
DISPLAY OUTPUT
terminal on the AVC
System.
the HDMI cable into
the hole below the
DISPLAY OUTPUT
terminal on the AVC
System.
1
Detach the parts
of the fixture
while holding the
tab of the fixture
downward.
Wrap the cushion
around the HDMI
cable.
of the fixture
while holding the
tab of the fixture
downward.
Wrap the cushion
around the HDMI
cable.
2
3
Attach the parts of
the fixture on the
cushion, pushing the
tab downward.
the fixture on the
cushion, pushing the
tab downward.
4
Connect the HDMI
cable with the fixture
to the DISPLAY
OUTPUT terminal
while sliding on the
bar of the fixture.
cable with the fixture
to the DISPLAY
OUTPUT terminal
while sliding on the
bar of the fixture.
5
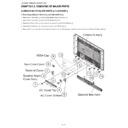
Handling the AVC System
CAUTION
Do not put a VCR or other device on top of the AVC System.
Keep enough space above and to the sides of the AVC
System.
Do not block the ventilation openings on the top and left side or
the exhaust fan on the right side.
Do not spread a thick cloth beneath the AVC System or cover it with one, as this can cause overheating and result in
malfunction.
Keep enough space above and to the sides of the AVC
System.
Do not block the ventilation openings on the top and left side or
the exhaust fan on the right side.
Do not spread a thick cloth beneath the AVC System or cover it with one, as this can cause overheating and result in
malfunction.
•
•
•
•
•
5cm
5cm
5cm
Satellite antenna
cable
Standard
DIN45325 plug
(IEC 169-2) 75
coaxial cable
DIN45325 plug
(IEC 169-2) 75
coaxial cable
Connecting the HDMI cable with the
fixture/cushion
fixture/cushion
HDMI cable (supplied)
Tab
NOTE
The
indicator of the AVC System lights up when the main power is turned on after connecting the Display and AVC System using the
supplied HDMI cable.
The HDMI cable should be firmly connected. Failure to do so will loosen the cable and cause a contact failure when moving the AVC System.
This can cause result in an error message appearing on the screen without a visible picture.
The HDMI cable should be firmly connected. Failure to do so will loosen the cable and cause a contact failure when moving the AVC System.
This can cause result in an error message appearing on the screen without a visible picture.
•
•
Do not use excessive
force when insering/
removing the HDMI
cable. The terminal or
cable may become
dameged.
force when insering/
removing the HDMI
cable. The terminal or
cable may become
dameged.
LC-52XS1E/RU/LC-65XS1E/RU
1 – 6
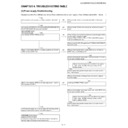
[3] DIMENSIONS
113.0
(1528.0) / [1243.0]
(1312.0)/[1075.0]
(1429.0) / [1156.0]
(597.6)
/
[511.0]
(1046.0
)
/
[878.0]
(933.0)
/
[765.0]
60.4
(804.0)
/
[652.0]
47.1
22.8
54.0
(
) : LC-65XS1E/RU
[
] : LC-52XS1E/RU
: LC-52XS1E/RU/65XS1E/RU
Unit: mm
400.0
(314.0)
[
2
00.0
]
Display


