Sharp LL-T2000 (serv.man3) Service Manual ▷ View online
LL-T2000A
2 – 2
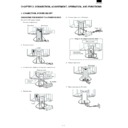
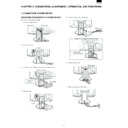
CONNECTING THE MONITOR TO A COMPUTER
(PC etc.)
(PC etc.)
When connecting, ensure that both the monitor and computer are
switched off.
switched off.
Note:
• Do not overly bend the cable or add extension cords as this
could lead to malfunction.
Note:
• If connecting to the Sun Ultra series, a conversion adapter
(purchased separately) may be required.
CONNECTING TO A SECOND COMPUTER
A RGB signal cable (to be purchased separately) is needed to connect
a second computer.
a second computer.
1.
Remove the cover.
2. Connect the RGB signal cable (purchased separately) to the
INPUT 2 terminal.
3.
Replace the cover.
CONNECTING A USB DEVICE
This monitor can be used with hubs which use the USB standard
(Rev. 1.1).
Downstream (2 ports)
USB devices such as keyboard and mouse can be connected here.
Up to 100mA of power is able to be supplied per port. Devices requir-
ing more than 100mA cannot be connected.
Up to 100mA of power is able to be supplied per port. Devices requir-
ing more than 100mA cannot be connected.
Upstream (1 port)
USB compatible computers and self-powered hubs can be connected.
(Bus-powered hubs cannot be connected.)
(Bus-powered hubs cannot be connected.)
Notes: • If a USB cable is required, please use the one included.
• Before connecting, ensure that the shape of the USB cable
connector is correct.
• For information regarding the USB function (such as set-up)
please refer to the operation manual of the computer to be
connected.
connected.
• Some computers, OS and other devices may not be able to
be activated. To ascertain a certain device's USB compatibil-
ity, please contact the manufacturer of the device.
ity, please contact the manufacturer of the device.
1. Remove the cover.
2. Connect the USB cable.
3. Replace
the
cover.
TURNING THE POWER ON
1. Press the monitor's power button.
2. Turn on the computer.
The power LED will be lit green, and the screen will display an
image.
Firmly insert the analog RGB output terminal
(mini D-sub 15 pin with 3 rows) then tighten the
screws each side.
(mini D-sub 15 pin with 3 rows) then tighten the
screws each side.
RGB cable
If connecting to a D-sub 15 pin 2 row Apple
Power Macintosh, attach a Macintosh conversion
adapter (to be purchased separately) to
the RGB signal cable.
Power Macintosh, attach a Macintosh conversion
adapter (to be purchased separately) to
the RGB signal cable.
Macintosh conversion adapter
RGB signal cable
After connecting the adapter,
tighten the screws on each side
to fix into place.
After connecting the adapter,
tighten the screws on each side
to fix into place.
(Rear View)
Cover
INPUT 2 terminal
RGB signal cable
(purchased separately)
(purchased separately)
To the computer's
RGB output terminal
RGB output terminal
(Rear View)
Cover
USB port: Downstream (2 ports)
USB port: Upstream (1 port)
ON
Turn monitor on
Turn on device to
which monitor is
connected
which monitor is
connected
Press power button
Power LED
Green light: In use
Orange light: Pow er saving mode or signal
Green light: In use
Orange light: Pow er saving mode or signal
failure
Lamp off: Power OFF
LL-T2000A
2 – 3
Notes: • Depending on the computer or OS, it may be necessary to
use the computer to install monitor set-up information. If so,
follow the steps below to install the monitor set-up informa-
tion.
follow the steps below to install the monitor set-up informa-
tion.
• When setting up the monitor or a connected computer for the
first time, connecting an additional computer or after having
changed an aspect of the current system, perform an auto-
matic screen adjustment before use.
changed an aspect of the current system, perform an auto-
matic screen adjustment before use.
CHANGING BETWEEN INPUT TERMINALS
(INPUT 1
(INPUT 1
0
0
0
0
2)
When connected to two computers, use the INPUT button to switch
between input signal terminals (i.e. to choose which computer's
screen you want displayed.)
between input signal terminals (i.e. to choose which computer's
screen you want displayed.)
TURNING THE POWER OFF
1. Turn the computer off.
2. Press the monitor's power button.
The Power LED will disappear.
If the monitor is not going to be used for a long period of time, be
sure to unplug it from the AC outlet.
If the monitor is not going to be used for a long period of time, be
sure to unplug it from the AC outlet.
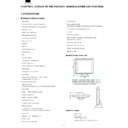
2. INSTRUCTIONS FOR ATTACHING A
VESA COMPLIANT ARM
An arm or stand based on the VESA standard (purchased separately)
can be attached to the monitor.
can be attached to the monitor.
Procurement of the arm or stand is at the customer's discretion.
Arms or stands able to be used
*
Attachments must satisfy the following.
*
Compatible with the VESA standard
*
Have a gap of at least 100 mm
u
100 mm between the screw holes
on the section to be attached
*
Not be likely to fall off or break off after being attached to the moni-
tor.
tor.
How to attach the arm or stand
Notes: • Do not bend the signal cable or the AC adapter cable nor
place weight on them. Doing so could lead to damage.
• While following these instructions, please also refer to the
installation instructions in the operation manual included with
the arm or stand.
the arm or stand.
1. Spread out a soft cloth on a suitable horizontal surface.
2. Being careful not to damage the monitor, gently lay the monitor on
it display-side down.
3. Remove the stand cover and the covers to the left and to the right.
4. Remove the two screws, and remove the cover.
5.
Remove the four screws and then remove the stand from the monitor.
6.
Attach the arm to the monitor with the four screws.
INPUT button
Pushing this button switches between input
signal terminals, so that the screen changes to
display any of the machines connected.
Pushing this button switches between input
signal terminals, so that the screen changes to
display any of the machines connected.
OFF
Turn off device to
which monitor is
connected
which monitor is
connected
Turn monitor off
Press power button
(Rear view)
Stand cover
Lift one side
Cover
Two screws
Stand
8~10mm
The screws used to attach the arm should be M4 screws
with a length of 8 mm ~ 10 mm protruding from the surface
to be attached.
Using any other kind of screw may lead to the monitor
falling off or damage to the internal part of the monitor
with a length of 8 mm ~ 10 mm protruding from the surface
to be attached.
Using any other kind of screw may lead to the monitor
falling off or damage to the internal part of the monitor
Screw used to attach arm
Arm
Part of monitor to which arm is attached
LL-T2000A
2 – 4
3. SET-UP INFORMATION, ICC PROFILE
Installing set-up information and the ICCprofile
(Windows)
(Windows)
Depending on the computer or OS, it may be necessary to use the
computer to operate the installation of monitor set-up information etc.
If so, follow the steps below to install the monitor set-up information.
(Depending on the type of computer or OS, command names and
methods may differ. Please follow the computer's own operation man-
ual while reading this.)
computer to operate the installation of monitor set-up information etc.
If so, follow the steps below to install the monitor set-up information.
(Depending on the type of computer or OS, command names and
methods may differ. Please follow the computer's own operation man-
ual while reading this.)
About the ICC profile
An ICC (International Color Consortium) profile is a file that describes
the color characteristics of the LCD monitor. By using an application
that works together with an ICC profile, a high color resolution can be
realized.
the color characteristics of the LCD monitor. By using an application
that works together with an ICC profile, a high color resolution can be
realized.
• Windows98, WindowsMe and Windows2000 all use the ICC profile.
• When installing Windows98, WindowsMe and Windows2000 set-up
information (described below), the ICC profile is also installed. If you
would like to install the ICC program only, please refer to Installing
the ICC profile.
would like to install the ICC program only, please refer to Installing
the ICC profile.
• When using the ICC profile, please set the [WHITE BALANCE] to
[STD] and the [COLOR MODE] to [OFF].
■
■
■
■
For Windows95
Installing monitor set-up information into Windows95.
This explanation assumes that the floppy disk drive is "A drive".
This explanation assumes that the floppy disk drive is "A drive".
1. Place the Utility Disk (provided) into the computer's A drive.
2. Click on the [Start] button. From [Settings], choose [Control
Panel].
3. Double click on [Display].
4. Click on [Settings], [Advanced Properties], and [Monitor], then
[Change].
5. Click on [Have disk], confirm that [Copy manufacturer's files from:]
is [A:] then click [OK].
6. Confirm that the monitor details are selected, and click [OK].
7. Check that the monitor details are displayed, then click [Apply].
8. Click [OK], and close the window.
9. Remove the Utility Disk from the A drive.
■
■
■
■
For Windows98
Installing monitor set-up information into Windows98, and setting the
monitor's ICC profile as a predetermined value.
This explanation assumes that the floppy disk drive is "A drive".
monitor's ICC profile as a predetermined value.
This explanation assumes that the floppy disk drive is "A drive".
If the "Add new Hardware Wizard" has appeared:
1. Place the Utility Disk (provided) into the computer's A drive.
2. Click
[Next].
3. Check [Display a list of all the drivers in a specific location, so you
can select the driver you want.], then click [Next].
4. When [Models] is displayed, click on [Have disk], confirm that
[Copy manufacturer's files from:] is [A:], and click [OK].
5. Confirm that the monitor details are selected, then click [Next],
[Next], and [Finish]. If the "Add New Hardware Wizard" appears,
repeat the installation commands beginning from 2 above.
repeat the installation commands beginning from 2 above.
6. Remove the Utility Disk from the A drive.
If the "Add New Hardware Wizard" has not appeared:
1. Place the Utility Disk in the computer's A drive.
2. Click on the [Start] button. From [Settings], choose [Control
Panel].
3. Double click on [Display].
4. Click on [Settings], [Advanced] and [Monitor].
5. In [Options], check [Automatically detect Plug & Play monitors]
and click on [Change].
6. Click [Next].
7. Click on [Display a list of all the drivers in a specific location, so
you can select the driver you want.], then click [Next].
8. When [Models] is displayed, click on [Have disk], confirm that
[Copy manufacturer's files from:] is [A:], and click [OK].
9. Confirm that the monitor details are selected, then click [Next],
[Next], and [Finish].
10. Check that the monitor details are displayed, then click [Apply].
11. Click [OK], and close the window.
12. Remove the Utility Disk from the A drive.
■
■
■
■
For Windows2000
Installing monitor set-up information into Windows2000, and setting
the monitor's ICC profile as a predetermined value.
This explanation assumes that the floppy disk drive is "A drive".
the monitor's ICC profile as a predetermined value.
This explanation assumes that the floppy disk drive is "A drive".
1. Place the Utility Disk (provided) into the computer's A drive.
2. Click on the [Start] button. From [Settings], choose [Control
Panel].
3. Double click on [Display].
4. Click on [Settings], [Advanced] and [Monitor].
5. Click on [Properties], [Driver] and [Update Driver].
6. When [Upgrade Device Driver Wizard] appears, click [Next].
7. Check [Display a list of the known drivers for this device so that I
can choose a specific driver] and click [Next].
8. When [Models] is displayed, click on [Have disk], confirm that
[Copy manufacturer's files from:] is [A:], and click [OK].
9. Select the monitor from the list displayed and click [Next].
10. Click [Next], confirm that the monitor's name appears on the
screen, and click [Finish]. If [The Digital Signature Not Found]
appears, click [Yes].
appears, click [Yes].
11. Click on [Close].
12. Click [OK], and close the window.
13. Remove the Utility Disk from the A drive.
■
■
■
■
For WindowsMe
Installing monitor set-up information into WindowsMe, and setting the
monitor's ICC profile as a predetermined value.
This explanation assumes that the floppy disk drive is "A drive".
monitor's ICC profile as a predetermined value.
This explanation assumes that the floppy disk drive is "A drive".
If the "Add new Hardware Wizard" has appeared:
1. Place the Utility Disk (provided) into the computer's A drive.
2. Check [Specify the location of the driver [Advanced]] and click
[Next].
3. Check [Display a list of all the drivers in a specific location, so you
can select the driver you want.], then click [Next].
4. When [Models] is displayed, click on [Have disk], confirm that
[Copy manufacturer's files from:] is [A:], and click [OK].
5. Select the monitor details from the list, then click [Next], [Next],
and [Finish]. If the "Add new Hardware Wizard" appears, repeat
the installation commands beginning from 2 above.
the installation commands beginning from 2 above.
6. Remove the Utility Disk from the A drive.
If the "Add New Hardware Wizard" has not appeared:
1. Place the Utility Disk in the computer's A drive.
2. Click on the [Start] button. From [Settings], choose [Control
Panel].
3. Double click on [Display].
4. Click on [Settings], [Advanced] and [Monitor].
LL-T2000A
2 – 5
5. In [Options], check [Automatically detect Plug & Play monitors]
and click on [Change].
6. Check [Specify the location of the driver [Advanced]] and click
[Next].
7. Check [Display a list of all the drivers in a specific location, so you
can select the driver you want.] and click [Next].
8. When [Models] is displayed, click on [Have disk], confirm that
[Copy manufacturer's files from:] is [A:], and click [OK].
9. Select the monitor details, then click [Next], [Next], and [Finish].
10. Check that the monitor details are displayed, then click [Apply].
11. Click [OK], and close the window.
12. Remove the Utility Disk from the A drive.
Installing the ICC profile
Installing the monitor's ICC profile. (If the set-up information has
already been installed, so too has the profile, and there is no need to
install it.)
This explanation assumes that the floppy disk drive is "A drive".
already been installed, so too has the profile, and there is no need to
install it.)
This explanation assumes that the floppy disk drive is "A drive".
1. Place the Utility Disk in the computer's A drive.
2. Click on the [Start] button. From [Settings], choose [Control
Panel].
3. Double click on [Display].
4. Click on [Settings] and [Advanced].
5. Click on [General] and from [Compatibility] select [Apply the new
display setting without restarting], then click on [Color Manage-
ment].
ment].
6. Click [Add], and select [3
1
/
2
Floppy [A:]] as the file location.
7. Choose the color profile that you would like to install, and click on
[Add].
8. Choose the profile and click on [Set As Default].
9. Click [OK], and close the window.
10. Remove the Utility Disk from the A drive.
• When using the ICC profile, please set the [WHITE BALANCE] to
[STD] and the [COLOR MODE] to [OFF].
Information about the ColorSync profile (MacOS)
About the ColorSync profile
ColorSync is the Apple Corporation's color management system and
is a function that enables color resolution to be realized when used
with a compatible application. A ColorSync profile describes the color
characteristics of the LCD monitor.
is a function that enables color resolution to be realized when used
with a compatible application. A ColorSync profile describes the color
characteristics of the LCD monitor.
Notes: • This monitor's ColorSync profile works with MacOS8.5 or
above.
• When using the ColorSync profile, please set the [WHITE
BALANCE] to [STD] and the [COLOR MODE] to [OFF].
Setting up the ColorSync profile
Notes: • A floppy disk drive is necessary. In addition, it is necessary
to have PC Exchange or File Exchange installed in your sys-
tem.
tem.
• Depending on the type of computer or OS, command names
and methods may differ. Please follow the computer's own
operation manual while reading this.
operation manual while reading this.
1. Place the Utility Disk (provided) into the computer's floppy disk drive.
2. Copy the profile to be used from the Mac folder on the Utility Disk
to the ColorSync profile folder located within the system folder.
3. Using the ColorSync on the control panel, choose the profile to be
used.
4. ADJUSTING THE SCREEN DISPLAY
If necessary, the screen can be adjusted as follows.
Automatic screen adjustment
The CLOCK, PHASE, H-POS (horizontal positioning) and V-POS (ver-
tical positioning) functions can be adjusted automatically.
tical positioning) functions can be adjusted automatically.
Adjustment of backlight
Brightness of backlight can be adjusted.
Manual adjustment
Fine adjustments can be made using the On Screen Display (OSD)
Menu.
Menu.
Note:
• All adjustments will be saved even after turning the power off.
■
■
■
■
Resetting MENU 1 (ADJUSTMENT)
MENU 1 (ADJUSTMENT) values can be returned to their original ex-
factory values in one command.
factory values in one command.
1. Turn on the monitor power.
2. Press the MENU button and the
e
button simultaneously. When
[RESET] appears on the screen, the reset is complete.
■
■
■
■
Resetting all adjustment values
All adjustment values can be returned to their original ex-factory val-
ues in one command.
ues in one command.
1. Turn off the monitor power.
2. Press the MENU button and the SELECT button simultaneously,
and while doing this press the power button (i.e. turn the power
on). When [ALL RESET] appears on the screen, the reset is com-
plete.
on). When [ALL RESET] appears on the screen, the reset is com-
plete.
Notes: • While ALL RESET is displayed, the control buttons are dis-
abled.
• It is not possible to reset values when the adjustment lock is
in place. Remove the adjustment lock before attempting to
operate control buttons.
operate control buttons.
■
■
■
■
Adjustment lock function
By disabling the control buttons (i.e. setting the lock) any attempted
changes to adjusted values will be voided.
changes to adjusted values will be voided.
1. Turn off the monitor power.
2. While pressing the MENU button, press the power button (i.e. turn
the power on). This will set the lock. (When this appears on the
screen, the lock is in place.)
screen, the lock is in place.)
Removing the lock
If the lock is in place and the above-mentioned command is repeated,
the lock will be removed.
the lock will be removed.
Note:
• When the lock is in place, all buttons other than the power
button are disabled.
■
■
■
■
Choosing a message language
Messages displayed on the screen and OSD Menu contents can be
changed to the following languages.
changed to the following languages.
Dutch, English, French, German, Spanish, Italian, Swedish.
1. Turn off the monitor.
2. Pressing
the
e
and
d
buttons simultaneously, press the power but-
ton (i.e. turn the power on).
The Language Selection Menu (LANGUAGE) will be displayed on
the screen.
the screen.
3. Use the SELECT button to choose a language.
4. Press the MENU button.
The setting is complete. From now, messages and adjustment
menus will be displayed in the chosen language.
menus will be displayed in the chosen language.
Display

