Sharp LC-30HV2E (serv.man10) Service Manual ▷ View online
LC-30HV2E
SERVICE MANUAL
In the interests of user-safety (Required by safety regulations in some countries) the set should be restored
to its original condition and only parts identical to those specified should be used.
to its original condition and only parts identical to those specified should be used.
CONTENTS
Page
SHARP CORPORATION
LCD TV
»
IMPORTANT SERVICE SAFETY PRECAUTION ..... 2
»
SPECIFICATIONS ................................................ 3
»
OPERATION MANUAL ........................................ 4
»
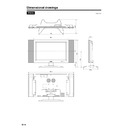
DIMENSIONS .................................................... 10
»
REMOVING OF MAJOR PARTS ........................ 12
»
ADJUSTMENT PROCEDURES ......................... 19
»
DESCRIPTION OF MAJOR IC FUNCTIONS .... 30
»
TROUBLE SHOOTING TABLE .......................... 56
»
PRINTED WIRING BOARD BLOCK DIAGRAM .. 63
»
LCD DISPLAY CHASSIS LAYOUT .................... 65
»
AVC SYSTEM BLOCK DIAGRAM ..................... 68
»
AVC SIGNAL FLOW BLOCK DIAGRAM ........... 70
»
AVC DC/DC CONVERTER BLOCK DIAGRAM . 72
Page
»
AVC POWER BLOCK DIAGRAM ...................... 74
»
PC I/F BLOCK DIAGRAM .................................. 76
»
LCD DISPLAY SIGNAL BLOCK DIAGRAM ...... 76
»
LCD DISPLAY POWER UNIT BLOCK
DIAGRAM .......................................................... 76
»
AVC OVERALL WIRING DIAGRAM .................. 82
»
LCD DISPLAY OVERALL WIRING DIAGRAM .. 86
»
DESCRIPTION OF SCHEMATIC DIAGRAM ..... 88
»
WAVEFORMS .................................................... 89
»
SCHEMATIC DIAGRAM .................................... 90
»
PRINTED WIRING BOARD ASSEMBLIES ..... 160
»
PARTS LIST ..................................................... 175
»
PACKING OF THE SET ................................... 215
オートセーブ
オンタイマー
電源
MODEL
LC-30HV2E
2
LC-30HV2E
DVM
AC SCALE
50k ohm
10W
0.15
µ
F
TEST PROBE
12345678901234567890123456789012123456789012345678901234567890121234567890123456789012345678901212
12345678901234567890123456789012123456789012345678901234567890121234567890123456789012345678901212
12345678901234567890123456789012123456789012345678901234567890121234567890123456789012345678901212
12345678901234567890123456789012123456789012345678901234567890121234567890123456789012345678901212
12345678901234567890123456789012123456789012345678901234567890121234567890123456789012345678901212
12345678901234567890123456789012123456789012345678901234567890121234567890123456789012345678901212
SAFETY NOTICE
Many electrical and mechanical parts in Plasma Display
television have special safety-related characteristics.
These characteristics are often not evident from visual
inspection, nor can protection afforded by them be
necessarily increased by using replacement components
rated for higher voltage, wattage, etc.
Replacement parts which have these special safety
characteristics are identified in this manual; electrical
components having such features are identified by “
å
”
and shaded areas in the
Replacement Parts List and
Schematic Diagrams.
For continued protection, replacement parts must be
identical to those used in the original circuit.
The use of a substitute replacement parts which do not
have the same safety characteristics as the factory
recommended replacement parts shown in this service
manual, may create shock, fire or other hazards.
CAUTION: FOR CONTINUED PROTECTION
AGAINST A RISK OF FIRE REPLACE ONLY WITH
SAME TYPE FUSE.
AVC SIDE: F701 (T2A, 250V), F702 (T2A, 250V),
F1702 (T4AL, 250V) FUSE.
LCD SIDE: F1(T3.5AL, 250V), F6551, F6552, F6553,
F6554, F6555, F6556 (T2.5AL, 250V)
AGAINST A RISK OF FIRE REPLACE ONLY WITH
SAME TYPE FUSE.
AVC SIDE: F701 (T2A, 250V), F702 (T2A, 250V),
F1702 (T4AL, 250V) FUSE.
LCD SIDE: F1(T3.5AL, 250V), F6551, F6552, F6553,
F6554, F6555, F6556 (T2.5AL, 250V)
WARNING
1. For continued safety, no modification of any circuit
should be attempted.
2. Disconnect AC power before servicing.
BEFORE RETURNING THE RECEIVER
(Fire & Shock Hazard)
(Fire & Shock Hazard)
Before returning the receiver to the user, perform
the following safety checks:
the following safety checks:
1. Inspect all lead dress to make certain that leads are
not pinched, and check that hardware is not lodged
between the chassis and other metal parts in the
receiver.
between the chassis and other metal parts in the
receiver.
2. Inspect all protective devices such as non-metallic
control knobs, insulation materials, cabinet backs,
adjustment and compartment covers or shields,
isolation resistor-capacitor networks, mechanical
insulators, etc.
adjustment and compartment covers or shields,
isolation resistor-capacitor networks, mechanical
insulators, etc.
3. To be sure that no shock hazard exists, check for
leakage current in the following manner.
»
Plug the AC cord directly into a 110~240 volt AC outlet,
and connect the DC power cable into the receiver's
DC jack. (Do not use an isolation transformer for this
test).
and connect the DC power cable into the receiver's
DC jack. (Do not use an isolation transformer for this
test).
»
Using two clip leads, connect a 1.5k ohm, 10 watt
resistor paralleled by a 0.15µF capacitor in series
with all exposed metal cabinet parts and a known
earth ground, such as electrical conduit or electrical
ground connected to an earth ground.
resistor paralleled by a 0.15µF capacitor in series
with all exposed metal cabinet parts and a known
earth ground, such as electrical conduit or electrical
ground connected to an earth ground.
»
Use an AC voltmeter having with 5000 ohm per volt,
or higher, sensitivity or measure the AC voltage drop
across the resisor.
or higher, sensitivity or measure the AC voltage drop
across the resisor.
»
Connect the resistor connection to all exposed metal
parts having a return to the chassis (antenna, metal
cabinet, screw heads, knobs and control shafts,
escutcheon, etc.) and measure the AC voltage drop
across the resistor.
All checks must be repeated with the AC cord plug
connection reversed. (If necessary, a nonpolarized
adaptor plug must be used only for the purpose of
completing these checks.)
Any reading of 35V peak (this corresponds to 0.7
milliamp. peak AC.) or more is excessive and
indicates a potential shock hazard which must be
corrected before returning the monitor to the owner.
TO EXPOSED
METAL PARTS
METAL PARTS
CONNECT TO
KNOWN EARTH
GROUND
KNOWN EARTH
GROUND
IMPORTANT SERVICE SAFETY PRECAUTION
Ë
Service work should be perfomed only by qualified service technicians who are thor-
oughly familiar with all safety checks and the servicing guidelines which follow:
oughly familiar with all safety checks and the servicing guidelines which follow:
3
LC-30HV2E
Specifications
Item
30" LCD COLOUR TV, Model:LC-30HV2E
Video Colour System
PAL/SECAM/NTSC 3.58/NTSC 4.43/PAL 60
TV
Function
Function
B/G, D/K, I, L/L’
VHF/UHF
E2–E69ch, F2–F10ch, I21–I69ch, IR A–IR Jch
CATV
Hyper-band, S1–S41ch
TV-Tuning System
Auto Preset 99 ch, Auto Label, Auto Sort
STEREO/BILINGAL
NICAM/IGR
Terminals
SCART (AV in, RGB in, TV out)
INPUT 2
SCART (AV in/out, S-VIDEO in, AV Link)
INPUT 3
SCART (AV in/out, S-VIDEO in, RGB in), Component
ANTENNA 75
Ω
Din Type
INPUT 4
S-VIDEO, AV in
PC
15 Pin mini D-Sub, Audio in (3.5mm Ø jack)
OSD language
English/German/French/Italian/Spanish/Dutch/Swedish/Portuguese/Greek/
Finnish/Russian/Turkish
Finnish/Russian/Turkish
Power Requirement
AC 220–240 V, 50/60 Hz
Power
Consumption
Consumption
40 W (0.8W Standby)
Weight
4.4 kg
Accessories
Operation manual (
✕
2), Remote control unit, System cable, AC cor d (
✕
2), R-6
(“AA” size, UM/SUM-3) Alkaline battery (
✕
2)
TV-standard (CCIR)
Receiving
Channel
Channel
Rear
INPUT 1
Front
• As a part of policy of continuous impr ovement, SHARP reserves the right to make design and specification changes for
product impr ovement without prior notice. The per formance specification figur es indicated ar e nominal values of production
units. There may be some deviations fr om these values in individual units.
units. There may be some deviations fr om these values in individual units.
LCD panel
30" Advanced Super View & BLACK TFT LCD
Number of dots
2,949,120 dots (1280
✕
3
✕
768dots)
Brightness
430 cd/m
2
Lamp life
60,000 hours (at normal mode)
Viewing angles
H : 170
°
V : 170
°
Audio amplifier
10W x 2
Speakers
8cm Ø 2pcs
AVC
System
System
Monitor Out Audio (Variable, Fixed), S-VIDEO out, AV out
DISPLAY Headphones
3.5mm Ø jack
AVC System
Display
AVC System
Display
109 W (0.9W Standby) (Method IEC60107)
20.1 kg
4
LC-30HV2E
Operation Manual
AC INPUT
110V–240V
DISPLAY INPUT2
DISPLAY INPUT1
AC INPUT
110V–240V
DISPLAY INPUT2
DISPLAY INPUT1
P
B
(C
B
)
COMPONENT
P
R
(C
R
)
Y
R - AUDIO - L
INPUT 3
INPUT 2
INPUT 1
RS-232C
DISPLAY OUTPUT1
DISPLAY OUTPUT2
AC INPUT
220–240V
AV OUTPUT
S-VIDEO
VIDEO
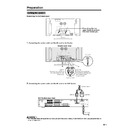
System cable
A
VC System (rear vie
w)
AC cor
d
Displa
y (rear vie
w)
AC cor
d
System cable
(WHITE)
Connect the plug into
the ter
minal and secur
e
it by tightning the
thumb scr
ews.
(GRA
Y)
Connect the plug fir
mly
until the hooks on both
sides click.
(GRA
Y)
(WHITE)
Setting the system
Remo
ving the terminal co
ver
2.
Connecting the system cab
le and the A
C
cor
d to the A
VC System
•
T
O
PREVENT RISK OF ELECTRIC SHOCK,
DO NO
T
T
OUCH UN-INSULA
TED P
A
R
TS OF ANY CABLES
WITH
THE A
C
CORD CONNECTED
.
Preparation
DISPLAY OUTPUT-2
D
ISPLAY OUTPUT-1
AC INPUT
110V–240V
Press do
wn the tw
o
upper hooks to remo
ve
the co
ver to
war
d y
ou.
1.
Connecting the system cab
le and the A
C
cor
d to the Displa
y
+
+
_
_
1
Open the batter
y cover
.
2
Inser
t batteries (two R-6 (“
AA”
size,
UM/SUM-3) Alkaline batteries,
supplied with pr
oduct).
•
Place batteries with their ter
minals
cor
responding to the (
+
) and (
–
)
indications in the batter
y compar
tment.
3
Close the batter
y cover
.
Impr
oper use of batteries can r
esult in chemical leakage or explosion. Be sur
e to follow the instructions below
.
•
Do not use manganese batteries. When you r
eplace the batteries, use alkaline ones.
•
Place the batteries with their ter
minals cor
responding to the (
+
) and (
–
) indications.
•
Do not mix batteries of dif
fer
ent types. Dif
fer
ent types of batteries have dif
fer
ent characteristics.
•
Do not mix old and new batteries. Mixing old and new batteries can shor
ten the life of new batteries or cause
chemical leakage in old batteries.
•
Remove batteries as soon as they have wor
n out. Chemicals that leak fr
om batteries can cause a rash. If you
find any chemical leakage, wipe thor
oughly with a cloth.
•
The batteries supplied with this pr
oduct may have a shor
ter life expectancy due to storage conditions.
•
If you will not be using the r
emote contr
ol unit for an extended period of time, r
emove the batteries fr
om it.
Inser
ting the batteries
If the r
emote contr
ol unit fails to operate LCD colour TV functions, r
eplace the batteries in the r
emote contr
ol
unit.
Using the remote contr
ol unit
Use the r
emote contr
ol unit by pointing it towar
ds the r
emote sensor window.
Objects between the r
emote contr
ol unit and sensor window may pr
event pr
oper
operation.
Cautions regar
ding remote contr
ol unit
•
Do not expose the r
emote contr
ol unit to shock.
In addition, do not expose the r
emote contr
ol unit to liquids, and do not place
in an ar
ea with high humidity
.
•
Do not install or place the r
emote contr
ol unit under dir
ect sunlight.
The heat may cause defor
mation of the unit.
•
The r
emote contr
ol unit may not work pr
operly if the r
emote sensor window of
the Display is under dir
ect sunlight or str
ong lighting. In such case, change
the angle of the lighting or Display
, or operate the r
emote contr
ol unit closer to
the r
emote sensor window
.
Preparation

