Sharp LC-22SV2E (serv.man4) Service Manual ▷ View online
5
LC-22SV2E
OPERATION MANUAL
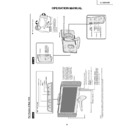
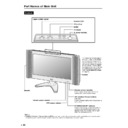
Part Names of Main Unit
Controls
Note:
•
TV/VIDEO
,
CH(
)/(
),
Volume (–)/(+)
and
MENU
on the main unit have the same functions as the same buttons on the remote control.
Fundamentally, this operation manual provides a description based on operation using the remote control.
CH
MENU
TV/VIDEO
Volume (–)/(+)
POWER/STANDBY
indicator
A green indicator lights when the power is
on and a red indicator lights when in the
standby mode (the indicator will not light
when the main power is off).
Remote sensor window
Remote sensor indicator
A red indicator blinks when the TV set
receives the remote control signal.
Upper control panel
CH (
)/(
)
MENU
TV/VIDEO
(MAIN POWER)
OPC sensor window
Speaker
OPC (Optical Picture Control)
indicator
A green indicator lights when “Brightness” is
set to “Auto”.
To change the vertical angle of
the LCD TV set, tilt the screen
up to 5 degrees forward or 10
degrees backward. The TV set
can also be rotated 25 degrees
to right and left. Please adjust
the angle so that the TV set can
be watched most comfortably.
(See
How to adjust the angle
on page 9.)
Speaker
Terminals
L
R
A
U
D
IO
O
U
T
A
V
-I
N
1
R
G
B
A
V
-I
N
2
S
-V
ID
E
O
V
ID
E
O
L
R
A
U
D
IO
P
O
W
E
R
IN
P
U
T
D
C
1
3
V
L
R
AU
DIO
OU
T
AV
-IN
1
R
GB
AV
-IN
2
S
-V
ID
E
O
V
ID
E
O
L
R
AU
DI
O
PO
W
E
R
IN
PU
T
D
C
1
3V
Carrying handl
e
Rear View
POWER INPUT DC13V
AV-IN 1
(21pin Euro-SCART)
S-VIDEO
VIDEO
AUDIO (L
)
AUDIO (R)
AV-IN 2
Antenna
AUDIO OUT (L)
AUDIO OUT (R)
Headphones
Tilt the displa
y
b
y
grabbing onto
the carr
ying handle while securely
holding do
wn the stand with y
our
other hand.
Ho
w to adjust the angl
e
6
LC-22SV2E
Part Names of Remote Control
CH
MENU
E
TV/VIDEO
R
EVE
A
L
H
O
LD
E
N
D
M
MENU
SOUND
S
U
B
T
IT
L
E
SUBPAGE
TEXT
R
O
T
A
T
E
WIDE
T
CH
OK
E
TV/VIDEO
R
EVE
A
L
H
O
LD
E
N
D
MENU
SOUND
S
U
B
T
IT
L
E
SUBPAGE
TEXT
R
O
T
A
T
E
WIDE
T
M
T
OK
SUBTITLE
Displays the Teletext
Subtitle directly.
HOLD
Temporarily holds the
current Teletext page.
(Mute)
Switches the sound on and off.
Yellow,
Timer function Menu
Cyan, Status Display
Turns on the status display
when the menu is not
displayed.
TV/VIDEO
Switches the input source
between AV1, AV2 and
TV mode.
Channel Select
MENU
Displa
ys the
TV menu
.
Volume (+)/(
-
)
(Flashback)
Returns to the previous
channel.
Red, Picture Menu
Upwards
/D
ownwards
Selection, zoom display
function
(Teletext mode)
END
Retur
ns to nor
mal screen.
TEXT
Displa
ys the
T
e
lete
xt mode
screen.
(Power)
SOUND
Switches the sound
mode.
REVEAL
Displa
ys hidden inf
o
rmation
such as solutions to r
iddles
and puzzles
.
Right /
Left
Selection
SUBPAGE
Displa
ys the
T
e
lete
xt
Subpage directly
.
ROTATE
Rotates the displa
y in e
v
er
y
direction.
WIDE
Selects the wide image mode.
Green, Sound Menu
CH (
)/(
)
Displays previous/next page.
(Teletext mode)
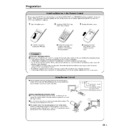
Installing Batteries in the Remote Control
Before using the LCD TV set for the first time, install the two R-03 (
“AAA
” size,
UM/SUM-4)
batteries
supplied
in
the
remote
control. When the batteries become depleted and the remote control fails to operate, replace the batteries with new R-03
(“
AAA
” size, UM/SUM-4) batteries.
1
Open the battery cover.
2
Insert two R-03 (
“AAA
” size,
UM/SUM-4) batteries.
3
Replace the battery cover.
■
Position the positive and
negative ends of the
batteries as indicated in
the compartment.
Caution!
Precautions regarding batteries
■
Improper use of batteries can result in a leakage of chemicals and/or explosion. Be sure to follow the instructions below.
•
Place batteries with their terminals corresponding to the (+) and (
–
) indications.
•
Different types of batteries have different characteristics. Do not mix batteries of different types.
•
Do not mix old and new batteries. Mixing old and new batteries can shorten the life of new batteries and/or cause old
batteries to leak chemicals.
•
Remove batteries as soon as they are depleted. Chemicals that leak from batteries can cause a rash. If chemical
leakage is found, wipe it off with a cloth.
•
The batteries supplied with the product may have a shorter life expectancy due to storage conditions.
•
If the remote control is not to be used for an extended period of time, remove the batteries from the remote control.
Preparation
■
Engaging the lower
claw with the remote
control, close the
cover.
Using Remote Control
■
Use the remote control by pointing it towards the remote sensor
window of the main unit. Objects between the remote control and
sensor window may prevent proper operation.
Cautions regarding use of remote control
■
Do not expose the remote control to shock. In addition, do not
expose the remote control to liquids, and do not place it in an area
with high humidity.
■
Do not install or place the remote control under direct sunlight. The
heat may cause deformation of the unit.
■
The remote control may not work properly if the remote sensor
window is under direct sunlight or strong lighting. In such a case,
change the angle of the lighting or main unit, or operate the remote
control closer to the remote sensor window.
■
Slide the cover while
pressing the (
"
) part.
Remote sensor indicator
OPC indicator
Power/Standby indicator
OPC sensor window
Remote sensor window
OPC
Display

