Sharp LC-15L1E (serv.man4) Service Manual ▷ View online
5
LC-15L1E
OPERATION MANUAL
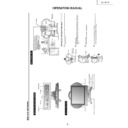
Main Unit Part Names
CH
MENU
TV/VIDEO
-
+
V
olume (–)/(+)
CH ( )/( )
MAIN PO
WER
TV/VIDEO
MENU
Charge indicator
P
o
wer/Standb
y indicator
Remote sensor windo
w
T
a
b
le stand (Detachab
le)
Left speak
er
Right speaker
Remote sensor indicator
Main unit (Top view: Control section)
Main unit (Front view)
Main unit (Rear view)
A
UDIO
A
V
-IN4
VIDEO
S-VIDEO
F
A
CT
OR
Y
SETTING
L
R
CH
MENU
E
TV/VIDEO
R
E
V
E
A
L
H
O
L
D
E
N
D
M
MENU
SOUND
S
U
BT
IT
L
E
SUBPAG
E
T
E
X
T
R
O
T
A
T
E
W
ID
E
T
CH
OK
E
TV/VIDEO
R
E
V
E
A
L
H
O
L
D
E
N
D
MENU
SOUND
S
U
BT
IT
L
E
SUBPAG
E
T
E
X
T
R
O
T
A
T
E
BR
IG
H
T
T
M
T
P
o
wer input DC 15
V
Headphones jac
k
S-VIDEO
VIDEO
A
V
-IN4
A
UDIO(R)
A
UDIO(L)
Remote control holder
The r
e
mote contr
ol can be placed in the
re
mote contr
o
l holder when moving the TV
.
1
Attach the r
e
mote contr
o
l holder to the
handle with the arr
ow ( ) in the centr
e of
the holder facing upwar
d.
2
Place the r
e
mote contr
o
l in the r
e
mote
contr
o
l holder
.
T
a
b
le stand
release b
u
tton
Handle
1
2
CH
MENU
E
TV/VIDEO
RE
V
E
A
L
H
O
L
D
END
M
MENU
SOUND
S
UB
T
IT
L
E
SUBPAG
E
T
E
X
T
R
O
T
A
T
E
W
ID
E
T
CH
OK
E
TV/VIDEO
RE
V
E
A
L
H
O
L
D
END
MENU
SOUND
S
UB
T
IT
L
E
SUBPAG
E
T
E
X
T
R
O
T
A
T
E
B
R
IG
H
T
T
M
T
Removing and Attaching the Table Stand
Handle
T
able stand
release button
T
able stand
Stand
Lift the main unit straight up by holding the handle while depressing the table
stand release button.
Unfold the stand.
•
Securely unfold the stand until you hear a clicking sound. Only use the
stand after first unfolding until a clicking sound is heard to ensure that it is
stable.
Fold up the stand.
•
Return the stand to its original unfolded position.
Insert the main unit straight into the table stand.
•
The main unit cannot be inserted if inclined on an angle. Inserting the main
unit with force can cause damage or a malfunction.
1
2
3
4
6
LC-15L1E
Wireless Centre
Part
Names
*
Failure to securely fasten the stand may cause the Wireless
Centre to tip over during use.
*
When placing the Wireless Centre upright, make sure to use
the SCART to SCART flat cable (commercially available) for
a connection. The use of this cable can prevent the Wireless
Centre from falling down.
Wireless Centre
stand
Rubber foot
Rubber foot
Power Indicator
When the TV is turned off with the remote control, the
Wireless Centre is switched to standby (power indicator
is lit red). (There may be a time lag of about 5 to
6
seconds.)
Setting Up the Wireless Centre
IN
OUT
A
V
-IN2
( AV
)
A
V
-IN3
A
V
-IN3
IR
MOUSE
PO
WER
INPUT DC12V
FA
CT
OR
Y
SETTING
VIDEO
S-VIDEO
A
UDIO
A
V
-IN1
( RGB
)
L
R
SIGNAL LEVEL
Transmission
SIGNAL LEVEL
indicator
(Reception gain)
· Green:
Communication
in progress
· Red:
Difficulty
in transmission
· Not lit:
Not communicatin
g
Power indicator
· Green:
Operation in
progress
(when power is on)
· Red: Standby
Power
button
Front
Antenna
input
terminal
Antenna
output
terminal
Rear
AV-IN1 (RGB)
(21-pin Euro-SCART)
S-VIDEO
VIDEO
AUDIO (R)
AUDIO (L)
AV-IN3
Factory
adjustment
terminal
Power input
DC 12V
Video control
terminal
AV-IN2 (AV)
(21-pin AV-SCART)
Wireless Centre
Main unit
•
The Wireless Centre can be placed horizontally or upright.
•
When placing horizontally:
The side on which the rubber feet are attached is the
bottom.
•
When placing upright:
Fasten the stand to the bottom of the Wireless Centre with
the screws provided.
Placing the Wireless Centre Where You Want It
We recommend placing the Wireless Centre in an area
where there are no obstructions to impede radio wave
transmission/reception.
(Do not place the Wireless Centre in a box.)
Power Connection
Antenna Connection
Connect to the DC input terminal of each product.
To enjoy a clearer picture, we recommend that you use
an outdoor antenna. The following is a brief explana-
tion of the types of connection that are used for coaxial
and feeder cables:
(1)
If your outdoor antenna uses a 75-ohm coaxial
cable, change this for a new standard DIN45325
(IEC169-2) plug and plug it into the antenna
terminal of the Wireless Centre via the antenna
cable (not supplied).
(2)
If your outdoor antenna uses a 300-ohm twin-lead
flat feeder, change this for a 300-ohm to 75-ohm
impedance converter and plug it into the antenna
terminal of the Wireless Centre via the antenna
cable (not supplied).
Note:
Note:
•
Always turn the
(MAIN POWER)
button of the LCD TV set and the power button of the Wireless Centre to OFF when
connecting the AC adapters.
•
If there is a Sharp product close to the video controller, the product may malfunction during transmission of the video control
ler.
•
Unplug the AC adapters from the LCD TV set, Wireless Centre unit and AC wall outlet when the LCD TV set is not to be used
for a long period of time.
IN
OUT
A
V
-IN2
( AV
)
A
V
-IN3
A
V
-IN3
IR
MOUSE
PO
WER
INPUT DC12V
FA
C
TO
R
Y
SETTING
VIDEO
S-VIDEO
A
UDIO
A
V
-IN1
( RGB
)
L
R
Wireless Centre
TV/VCR/D
V
D etc.
TV
75-ohm coaxial cab
le (round cab
le)
300-ohm twin-lead flat f
eeder
T
o
antenna
input ter
minal
( )
VCR
DV
D
* Product shape varies in some countries.
AC wall
outlet
AC adapter
AC cor
d*
TV main unit
AC wall
outlet
AC adapter
AC cor
d*
IR
MOUSE
PO
WER
INPUT DC12V
FA
CT
OR
Y
SETTING
Wir
eless
Cent
7
LC-15L1E
Remote Control Part Names
CH
MENU
E
TV/VIDEO
R
EVEA
L
H
O
L
D
E
N
D
M
MENU
SOUND
S
UB
T
ITLE
SUBPAGE
TEXT
R
OTA
T
E
WIDE
T
CH
OK
E
TV/VIDEO
R
EVEA
L
H
O
L
D
E
N
D
MENU
SOUND
S
UB
T
ITLE
SUBPAGE
TEXT
R
OTA
T
E
BRIGHT
T
M
T
OK, Programme Tabl
e
SUBTITLE
Displays the Teletext
Subtitle directly.
HOLD
Temporarily holds th
e
current Teletext page.
(Mute)
Switches the sound on and off.
Yellow, Timer functions
Cyan, Status Display
Turns on the status display
when the menu is not
displayed.
TV/VIDEO
Switches the input source
between AV1, AV2, AV3, AV4 and
TV mode.
Channel Select
MENU
Displa
ys the
TV menu.
Volume (+)/(
-
)
(Flashback)
Returns to the previous
channel.
Red, Picture menu
Upwards
/Downwards
Selection, Zoom Display
Function
(Teletext mode)
END
Retur
ns to nor
mal screen.
TEXT
Displa
ys the
T
elete
xt mode
screen.
(Power)
SOUND
Switches the sound mode.
REVEAL
Displa
ys hidden inf
o
rmation
such as solutions to
ri
ddles
and puzzles
.
Right
/ Left Selection
SUBPAGE
Displa
ys the
T
e
lete
xt
Subpage directly
.
ROTATE
Rotates the displ
a
y
in e
v
er
y
direction.
BRIGHT
Selects the brightness
of the display.
Green, Sound menu
CH (
)/(
)
Selects next higher channel
.
Selects next lower channel
.
Installing Batteries in the Remote Control
Before using the LCD TV set for the first time, install the two R-03 (
“AAA
” size, UM/SUM-4) batteries supplied in the remote
control. When the batteries become depleted and the remote control fails to operate, replace the batteries with new R-03
(“
AAA
” size, UM/SUM-4) batteries.
1
Open the battery cover.
2
Insert two R-03 (
“AAA
” size,
UM/SUM-4) batteries.
3
Replace the battery cover.
Ë
Position the positive and
negative ends of the
batteries as indicated in
the compartment.
Caution!
Precautions regarding batteries
Ë
Improper use of batteries can result in a leakage of chemicals and/or explosion. Be sure to follow the instructions below.
•
Place batteries with their terminals corresponding to the (+) and (
–
) indications.
•
Different types of batteries have different characteristics.
Do not mix batteries of different types.
•
Do not mix old and new batteries. Mixing old and new batteries can shorten the life of new batteries and/or cause old
batteries to leak chemicals.
•
Remove batteries as soon as they are depleted. Chemicals that leak from batteries can cause a rash. If chemical
leakage is found, wipe it off with a cloth.
•
The batteries supplied with the product may have a shorter life expectancy due to storage conditions.
•
If the remote control is not to be used for an extended period of time, remove the batteries from the remote control.
Ë
Close the cover while
engaging the lower
claw with the remote
control.
Ë
Slide the cover while
pressing the (
) part.
"
Display

