Sharp 37GQ-20 (serv.man8) User Manual / Operation Manual ▷ View online
Please refer to the oper
ation manual of
your
VCR for details
.
Page 1
Page 2
INSTALLA
TION
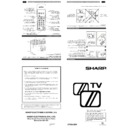
LOCATION OF CONTR
OLS
Connect the antenna cable to the
TV set.
An indoor antenna is supplied with 14’’TV’
s.
Rotating the antenna you will be ab
le to improve
the image reception or if the reception remains
poor, using an outdoor antenna.
Plug in your
TV into the mains supply
(220~240 V/ 50 Hz).
Insert tw
o (AA or UM-3, 1,5V) batter
ies into
the remote control.
Position the positiv
e and negative ends of the
batteries as indicated.
Press the POWER (
®
) button on the
TV set
to turn on
TV .If the
TV set remains in the Stand-
by
mode, press the Stand-b
y on (
æ
) button on
the remote control.
Remote Control
STANDBY/ON
(
æ
) button
Press
T o tur
n the set ON
Press again
T o tur
n the set to
ST ANDBY
TV/VIDEO Select b
utton
Press
Switch to exter
nal video
input mode
Press again
Switch to TV mode
.
Infrared Transmitter
Window
Aim this window at the infr
ared sensor
on your
TV set
FLASHBA
CK
(
e
)
button
Returns to pre
viously view
ed
channel
VOLUME UP
(
œ
)/DO
WN (
∑
)
buttons
(
œ
) Increases sound
(
∑
) Decreases sound
(These are also used for men
u
setup)
SOUND MUTE
(
c
)
button
Press
Mutes sound
Press again
Restores sound to
previous le
ve
l
Channel Select b
uttons
(
~
)
CHANNEL UP (
œ
)/DO
WN (
∑
)
buttons
(
œ
) Selects next higher channel
(
∑
) Selects next lo
wer channel
(These are also used for men
u
setup)
Single/Double
Entry selector (
6
)
CHILD LOCK
(
)
button
MENU b
utton
Used to call the MENU screen.
CALL/OFF TIMER
(
l
)
button
Used to display the diff
erent
current settings on the screen
and set the OFF Timer
.
AC
220~240 V
,
50Hz
SHARP ELECTRONICA ESPAÑA, S.A.
SHARP ELECTRONICS (U.K.) LTD.
Sharp House, Thorp Road, Newton Heath,
Manchester M40 5BE
PRINTED IN SPAIN
TINS-6825BMN3
02/01
TINS-6825BMN3
02/01
SAFETY PRECAUTION
This equipment complies with the requirements of Directives 89/336/EEC and 73/23/EEC as amended
by
93/68/EEC
For fur
ther infor
mation please refer to the Quic
k Reference Guide
.
The 5 cm in the dra
wing
indicates the minimum
ventilation distance
.
T o pre
vent fire
, neve
r pla-
ce any type of candle or
naked flames on the top
or near the TV set.
Enjoy the stunning visuals of a
VCR or DECODER by
connecting them to your
TV through the
Euro-SCAR
T 21-pin terminal.
TYPICAL CONNECTIONS
TV
Antenna
Scart-Cab
le
Out
In
VCR
TERMS OF GUARANTEE
Subject to the conditions listed below Sharp Electronics (U.K.) Ltd. (Hereinafter called «the Company»)
guarantee to provide for the repair of, or at its option replace the Sharp Equipment, or any component
thereof, (other than Batteries), which is faulty or below standard, as a result of inferior workmanship or
materials.
guarantee to provide for the repair of, or at its option replace the Sharp Equipment, or any component
thereof, (other than Batteries), which is faulty or below standard, as a result of inferior workmanship or
materials.
The conditions of the guarantee are:
1. This guarantee shall only apply to defects or faults which are notified to the Company, or its approved
Service Facility within one year from the date of purchase of the equipment.
2. This guarantee covers equipment intended for private domestic use only. This guarantee does not apply
to equipment used in the course of a business, trade or profession.
3. This guarantee does not cover any faults or defects caused by accident, misuse, fair wear and tear,
neglect, tampering with the equipment, or any attempt at adjustment or repair other than by an
approved Service Facility.
approved Service Facility.
4. In the unlikely event of your equipment requiring repair, please contact the Dealer or Supplier from
whom it was purchased. Where this is not possible please contact the telephone number listed below.
You will then be given details of how to obtain service.
You will then be given details of how to obtain service.
08705-274277 [or (01) 6760648 if telephoning from Ireland]
5. The cost of carriage to and from the Dealer, Supplier or Sharp approved Service Facility shall be borne
by the purchaser.
6. No person has any authority to vary the terms or conditions of this guarantee.
7. This guarantee is offered as an additional benefit to the consumer’s statutory rights
and does not affect rights in any way.
In the unlikely event of this equipment requiring repair during the guarantee period, you will
need to provide proof of date purchase to the repairing company.
Please keep your invoice or receipt, which is supplied at the time of purchase.
need to provide proof of date purchase to the repairing company.
Please keep your invoice or receipt, which is supplied at the time of purchase.
Web-site:
www.sharp.co.uk/suppor
t Help Line
(office hours onl
y)
:0
8705-274277
Web-site:
www.sharp.co.uk/suppor
t Help Line
(office hours onl
y)
:08705-274277
If you require any advice or assistance
regarding your Sharp product, please visit
our web-site www.sharp.co.uk/support.
Customers without Internet access may
telephone 08705-274277 [or (01) 6760648
if telephoning from Ireland] during
office hours.
regarding your Sharp product, please visit
our web-site www.sharp.co.uk/support.
Customers without Internet access may
telephone 08705-274277 [or (01) 6760648
if telephoning from Ireland] during
office hours.
Please read this operation manual carefully
before using the colour television.
before using the colour television.
1 Press MENU button to call the Picture menu.
2 Press CHANNEL UP (
2 Press CHANNEL UP (
œ
) or DOWN (
∑
) to select
the item to adjust:
CONTRAST, BRIGHTNESS, COLOUR
CONTRAST, BRIGHTNESS, COLOUR
3 Adjust the picture quality to your liking with the
VOLUME UP (
œ
) or DOWN (
∑
).
4 Repeat steps 2 and 3 above to adjust other items.
❚
OFF Timer
Automatically turns power OFF after the set length of time has passed.
1 Press the button
l
to display the different current settings
on the screen.
2 Press the button
l
to sequentially select the desired
switch off time. e.g. 30, 60, 90 or 120 minutes.
The timer starts count down.
NOTE: In the event of a power cut, disconnection from the
plug or the television is switched off at the mains switch, all
the data on the OFF Timer will be cancelled.
the data on the OFF Timer will be cancelled.
TROUBLESHOOTING
If the problem can not be corrected by the use of this guide, remove the mains plug from the wall socket,
and contact the Dealer or Supplier from whom the unit was purchased in order to obtain service. Where
this is not possible, please visit our web-site
and contact the Dealer or Supplier from whom the unit was purchased in order to obtain service. Where
this is not possible, please visit our web-site
www.sharp.co.uk/support
Internet access may telephone
08705-274277 [or (01) 6760648
if telephoning from Ireland]
during office hours.
Certain replacement parts and accessories may be obtained from our Main Parts Distributor, who can
be contacted on the following numbers:
Willow Vale Electronics Ltd.
Certain replacement parts and accessories may be obtained from our Main Parts Distributor, who can
be contacted on the following numbers:
Willow Vale Electronics Ltd.
0121 766 5414
In the unlikely event of this equipment requiring repair during the guarantee period, you will need to
provide proof of the date of purchase to the repairing company. Please keep your invoice or Receipt,
which is supplied at the time of purchasing.
provide proof of the date of purchase to the repairing company. Please keep your invoice or Receipt,
which is supplied at the time of purchasing.
This unit is equipped with a microprocessor. Its performance could be adversely affected by
external electrical noise or interference. If this should happen, unplug the unit and plug it in again
after a few minutes.
external electrical noise or interference. If this should happen, unplug the unit and plug it in again
after a few minutes.
Quick
Service
Check List
Service
Check List
Problems
Remote control does not work
●
●
●
●
Bars on screen
●
●
Picture distorted
●
●
●
Picture rolls vertically
●
●
●
No colour
●
●
●
●
●
Poor reception on some channels
●
●
●
●
Picture weak
●
●
●
●
●
Picture lines or streaks
●
●
●
Picture ghosting
●
●
●
●
Picture blurred
●
●
●
Sound OK, picture poor
●
●
●
●
●
●
●
Picture OK, sound poor
●
●
●
No picture or sound
●
●
●
●
●
●
●
●
Try a new channel to check for possible station
trouble
Possible Causes/Remedies
TV not plugged in
Outlet power OFF
Main Power button of TV not ON
Antenna not connected to terminal at the back
of the TV set
If outside antenna is used, check for broken
wires
Check for local interference
Turn off using the Main Power button, then turn
ON again after a minute
Adjust COLOUR control
Check batteries in the Remote Control
Try fine tuning to correct
Check if the Brightness or Contrast setting in the
picture setting mode might be all the way to the
minus side
Increase the volume
BASIC OPERATION (CONTINUED)
MENU
CONTRAST
BRIGHTNESS
COLOUR
❙
❙❙❙❙❙❙❙❙❙❙❙❙❙❙❙❙❙❙❙❙❙❙❙❙❙❙❙❙
120 PR 1
TIMER SETTING
l
l
PRESETTING THE CHANNELS
❚
Auto Channel Preset
1 Press MENU twice to call the Tune menu.
2 Press CHANNEL UP (
œ
) or DOWN (
∑
) to select
«AUTO SEARCH», (Red letters).
3 Press MENU to start Auto Channel Preset.
Pause in AUTO SEARCH: When a TV station is
located, «PROGRAMME» will be displayed in red
letters and there will be 7-second delay before search
continues.
If you wish: You may use this pause to sort the TV
stations into the desired CHANNEL PRE-SET by using
the number buttons to set a 2 digit entry e.g. BBC1=01
etc. then press the MENU button to store and continue.
If you do not use this pause to sort the channel order, the TV will automatically tune to all the available
channels in your area. These may not be tuned in your preferred order and may include some unwanted
low power signals. Please repeat the Auto Channel Preset by using the “Pause in AUTO SEARCH” if
you wish to re-sort the TV channels.
The screen shows whatever is on «PR 1» when full Auto Channel Preset is finished.
NOTE: To stop Auto Channel Preset, press MENU button.
NOTE: IF THE TV CANNOT BE INSTALLED BY THIS METHOD, PLEASE PHONE THE FOLLOWING
NUMBER: 08705-274277
NUMBER: 08705-274277
AUTO SEARCH
MANUAL
EXIT
MANUAL
EXIT
PROGRAMME...
VHF1
❙
❙❙❙❙❙❙❙❙❙❙❙❙❙❙❙❙❙❙❙❙❙❙❙❙❙❙❙❙
MENU
MENU
MENU
MENU
MENU
AUTO SEARCH
MANUAL
EXIT
MANUAL
EXIT
Tune menu
Tune menu
Picture menu
SEARCH –
a
a
+
FINE TUNE –
a
+
SKIP
OFF
NAME --------------
EXIT
EXIT
Manual Tune menu
SEARCH –
a
+
FINE TUNE –
a
a
+
SKIP
OFF
NAME --------------
EXIT
EXIT
FINE TUNE –
a
+
❙
❙❙❙❙❙❙❙❙❙❙❙❙❙❙❙❙❙❙❙❙❙❙❙❙❙❙❙❙❙❙❙❙❙❙
SEARCH –
a
+
FINE TUNE –
a
+
SKIP
ON
NAME --------------
EXIT
EXIT
SEARCH –
a
+
FINE TUNE –
a
+
SKIP
ON
NAME --------------
EXIT
EXIT
SEARCH –
a
+
FINE TUNE –
a
+
SKIP
OFF
NAME --------------
EXIT
EXIT
Manual Tune menu
SEARCH –
a
+
FINE TUNE –
a
+
SKIP
OFF
NAME --------------
EXIT
EXIT
❚
Manual Channel Preset
1 Press CHANNEL UP (
œ
) or DOWN (
∑
) (or 0~9
digit buttons) to select the channel to be tuned.
2 Press MENU twice to call the Tune menu.
3 Press CHANNEL UP (
3 Press CHANNEL UP (
œ
) to select «MANUAL»,
(Red letters).
4 Press MENU to call the Manual Tune menu.
5 Press CHANNEL UP (
5 Press CHANNEL UP (
œ
) or DOWN (
∑
) to select
«SEARCH», (Red letters).
6 Press VOLUME UP (
œ
) to start tuning, when a
channel is located the tuning will stop, if the channel
is not the one required press VOLUME UP (
is not the one required press VOLUME UP (
œ
) to
re-start tuning.
7 When the required channel is located press
CHANNEL DOWN (
∑
) to select «EXIT», and press
MENU to return to normal screen.
8 Repeat steps 1 to 8 if you wish to preset other
channels.
❚
OPTIONAL SETTINGS
1
Repeat steps 1 to 4 above from page 3. (Manual
channel Preset) to call the Manual Tune menu.
channel Preset) to call the Manual Tune menu.
5 Press CHANNEL UP (
œ
) to select «NAME »
«SKIP» or «FINE TUNE» (Red letters).
NAME
Use this option for giving a name made up of 4-digits to
the channels from «PR 0» to «PR15» of the TV.eg
BBC1
3 Press VOLUME UP (
the channels from «PR 0» to «PR15» of the TV.eg
BBC1
3 Press VOLUME UP (
œ
) for changing the position
of the cursor and the CHANNEL UP (
œ
) for
changing the letters (repeat this action for other
letters).
letters).
4 When you have finished the fourth letter, press the
VOLUME UP (
œ
) to quit.
5 Press CHANNEL DOWN (
∑
) to select «EXIT» and
press MENU to return to normal screen
6 Repeat the above for naming other channels.
Skipping channels
This function lets you skip vacant channels or the
channels that you never watch when selecting chan-
nels using the CHANNEL UP or DOWN buttons.
7 Press MENU to set «ON» or cancel «OFF»
channels that you never watch when selecting chan-
nels using the CHANNEL UP or DOWN buttons.
7 Press MENU to set «ON» or cancel «OFF»
Fine Tuning
When a pre-set programme channel is not exactly
tuned, you can fine tune the channel in this mode.
8 Press VOLUME UP (
tuned, you can fine tune the channel in this mode.
8 Press VOLUME UP (
œ
) or DOWN (
∑
) to adjust
the picture for the best quality, and press MENU.
(twice)
(twice)
T
urn OFF using the Main P
o
wer b
utton,
then turn ON
a
gain after a min
ute
MENU
MENU
MENU
BASIC OPERATION
CHILD LOCK (CHANNEL BLOCK)
NOTE:
If noise appears in TV or VCR mode, the screen turns blue. The blue back off-timer is then
engaged and will automatically switch the set to Stand-by mode after 4 minutes.
POWER (
l) button
POWER indicator
CHANNEL UP (
œ
) DOWN (
∑
) button
VOLUME UP (
œ
) DOWN (
∑
) button
TV Front
Remote control sensor
❚
Changing the Channels
To select a one-digit channel (eg. Program 5)
1 Press the
1 Press the
button.
2 If 5- is indicated and picture does not change, press
the
6
button to switch over to the 1 - digit select
mode and press 5 again.
To select a two-digit channel (eg. Program 15)
1 Press
1 Press
6
button to set the 2-digit select mode.
2 Press
button
3 Press
button.
❚
Watching a TV Programme
6
PR 5
t
t
ON
<How to use this system>, You can lock one or more channels for
parental control when a child is lelf unsupervised.
parental control when a child is lelf unsupervised.
1 Press (
) button to lock the channel.
(«
t
ON» mark will display)
●
Because the remote control is the “key” you must remember to
keep it under your supervision.
2 PRESS (
) BUTTON TO UNLOCK THE CHANNEL.
PR - -
PR 15
❚
Picture adjustment
Picture quality (CONTRAST, BRIGHTNESS and COLOUR) are adjustable
in the picture menu.
in the picture menu.
Page 3
Page 4
Page 5
Page 6
Web-site: www.sharp.co.uk/support Help Line
(office hours only)
: 08705-274277
Web-site: www.sharp.co.uk/support Help Line
(office hours only)
: 08705-274277
Web-site: www.sharp.co.uk/support Help Line
(office hours only)
: 08705-274277
Web-site: www.sharp.co.uk/support Help Line
(office hours only)
: 08705-274277
Display

