Sharp XR-30X (serv.man4) Service Manual ▷ View online
XR-30S/XR-30X/XG-F210X
3 – 1
XR-30S
Service Manual
CHAPTER 3.
THE OPTICAL UNIT OUTLINE
[1] THE OPTICAL UNIT OUTLINE
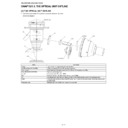
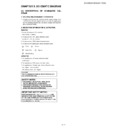
1. Layout for proper setup of the optical components and parts (top view)
(Schematic diagram)
Item
Function
Lamp
Light source. DC high-pressure mercury lamp.
UV/IR cut filter (UV GLASS)
Filters out harmful UV and IR rays from the lamp.
Color wheel
Splits light from the light source into R, G, B and W through a color filter.
Rod (ROD INTEGRATOR)
Assures uniform light ray.
L1, L2
Focus light from the rod on DMD.
M1
Reflects light from the illumination lenses toward DMD.
L3
Condenses the light from the reflection mirror to the DMD and the pupil of the projection lens.
DMD
Turns the internal micromirror ON/OFF at the rate of color component of each dot of the input source
to reflect light.
to reflect light.
Projection lens
Enlarges light from DMD and projects it on a screen.
Projection Lens
L2
L1
Rod
Color Wheel
DMD
L3
M1
UV Glass
Lamp
XR-30S/XR-30X/XG-F210X
3 – 2
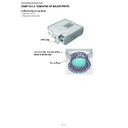
2. When the DMD unit has been replaced.
If shading shown in Figure 1 appears on the screen after replacing DMD, turn the adjustment screw of the optical engine to adjust the lighting area of
DMD.
DMD.
1) Loosen the adjustment lever fixing screw
. After adjusting the lighting area with the adjustment lever
, tighten the adjustment lever fixing
screw .
2) When mounting DMD, tighten the 4 screws evenly.
Fig. 1
Shading
1
2
1
1
2
Tightening order: 1
2
3
4
Screw torque: 0.44 ± 0.05 N·m
1
4
3
2
XR-30S/XR-30X/XG-F210X
3 – 3
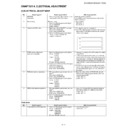
"Fixing and checking method of the focus ring base"
1) Match the paint mark and the mark as shown in the figure.
2) Fully turn the focus ring base in the anticlockwise direction viewed from the front. At this time, adjust the zoom to any position.
Project an image, and check that the focus area is within 0.75m to 1.4 m as shown in the figure below.
Adjust the mark.
Adjust the paint mark.
About 1.6mm
0.75m~1.4m
Display

