Sharp XG-P25XE (serv.man32) User Manual / Operation Manual ▷ View online
E-16
Setup & Connections
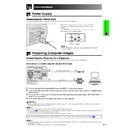
Connecting the Power Cord
Plug the supplied power cord into the AC socket on the rear of the projector.
Power cord
Connections
Power Supply
• If the bottom filter cover is not securely installed, the POWER
indicator blinks.
Projecting Computer Images
Connecting the Projector to a Computer
You can connect your projector to a computer for projection of full color computer images.
Connecting to a computer using the standard 15-pin Input
1
Connect one end of the supplied RGB cable to the INPUT 1 port on the projector.
2
Connect the other end to the monitor output port on the computer. Secure the connectors by tightening the
thumb screws.
thumb screws.
3
To use the built-in audio system, connect one end of the supplied computer audio cable to the AUDIO INPUT 1
terminal on the projector.
terminal on the projector.
4
Connect the other end to the audio output terminal on the computer.
CAUTION
• Before connecting, be sure to turn both the projector and the computer off. After making all connections, turn the projector on first. The
computer should always be turned on last.
• Please read the computer’s operation manual carefully before making connections.
• Refer to page
• Refer to page
74
“Compatibility Chart” for a list of computer signals compatible with the projector. Use with computer signals other than
those listed may cause some of the functions not to work.
• A ø3.5 mm stereo minijack to stereo RCA audio cable adaptor may be necessary.
When connecting this projector to a computer, select “RGB” for “Signal Type” on the GUI menu. (See page
41
.)
• A Macintosh adaptor may be required for use with some Macintosh computers. Contact your nearest Sharp Authorized LCD Projector
Dealer or Service Center.
• AUDIO INPUT 1 can be used to input audio corresponding to the INPUT 1.
Computer audio cable
3
4
RGB cable
1
2
Computer
POWER indicator
Make the necessary connections before
proceeding. Connect the power cord to a wall
outlet.
The POWER indicator lights up red and the
projector enters standby mode.
proceeding. Connect the power cord to a wall
outlet.
The POWER indicator lights up red and the
projector enters standby mode.
E-17
Setup & Connections
Projecting Computer Images
• This projector uses a 5 BNC computer input to prevent deterioration of image quality.
• Connect the R (P
• Connect the R (P
R
), G/G sync (Y), B (P
B
), HD/C sync and VD cables (sold separately) to the correct input
terminals on the projector and an RGB switcher (sold separately) connected to the computer, or connect a 5
BNC cable (sold separately) directly from the input terminals on the projector to the computer.
BNC cable (sold separately) directly from the input terminals on the projector to the computer.
Connecting to an external RGB switcher or other compatible computers using the BNC Input
(Typically used in larger installations )
(Typically used in larger installations )
5 BNC cable
(sold separately)
1
Connect each BNC connector of a 5 BNC cable to the corresponding INPUT 2 terminals on the projector.
2
Connect the other end of the 5 BNC cable to the corresponding BNC terminals on the external RGB switcher.
Connect the RGB switcher to the computer using a RGB cable.
Connect the RGB switcher to the computer using a RGB cable.
3
To use the built-in audio system, connect one end of the supplied computer audio cable to the AUDIO INPUT 2/
3 terminal on the projector.
3 terminal on the projector.
4
Connect the other end to the audio output terminal on the computer or external audio system.
• A ø3.5 mm stereo minijack to stereo RCA audio cable adaptor may be necessary.
When connecting the projector to a compatible computer other than a PC (VGA/SVGA/XGA/SXGA/UXGA) or Macintosh (i.e.
Workstation), a separate cable may be needed. Please contact your dealer for more information.
Workstation), a separate cable may be needed. Please contact your dealer for more information.
When connecting this projector to a computer, select “RGB” for “Signal Type” on the GUI menu. (See page
41
.)
• Connecting computers other than the recommended types may result in damage to the projector, the computer, or both.
• AUDIO INPUT 2/3 can be used to input audio corresponding to the INPUT 2/3.
• AUDIO INPUT 2/3 can be used to input audio corresponding to the INPUT 2/3.
Computer audio cable
4
To audio output
terminal
terminal
3
1
To R (P
R
), G/G sync (Y), B (P
B
),
HD/C sync and VD output terminals
2
To RGB switcher
RGB switcher
(sold separately)
(sold separately)
RGB cable
“Plug and Play” function (when connecting to a 15-pin terminal)
• This projector is compatible with VESA-standard DDC 1/DDC 2B. The projector and a VESA DDC compatible
computer will communicate their setting requirements, allowing for quick and easy setup.
• Before using the “Plug and Play” function, be sure to turn on the projector first and the connected computer last.
• The DDC “Plug and Play” function of this projector operates only when used in conjunction with a VESA DDC compatible computer.
Computer
E-18
Setup & Connections
Projecting Computer Images
Connecting to a computer using the direct digital input port
3
1
Computer audio cable
2
To digital output terminal
4
To audio output terminal
1
Connect one end of the DVI cable to the INPUT 3 port on the projector.
2
Connect the other end to the corresponding terminal on a computer.
3
To use the built-in audio system, connect one end of the supplied computer audio cable to the AUDIO INPUT 2/
3 terminal on the projector.
3 terminal on the projector.
4
Connect the other end to the audio output terminal on the computer.
• This DVI port is DVI version 1.0 compatible. Therefore when the signal is input from copy guard system compatible (DVI version 2.0)
equipment, no signal will be received.
• The analog RGB signal inputs on the DVI port are only compatible with separate sync.
DVI cable (sold separately)
AN-C3DV
AN-C3DV
Computer
Watching Video Images
Connecting to a VCR, laser disc player and other audiovisual
equipment using the standard video Input
equipment using the standard video Input
S-video cable (sold separately)
Video cable (sold separately)
1
2
Audio cable (sold separately)
To S-video output terminal
To video output terminal
To audio output terminals
VCR
or
Laser disc player
Example
1
Connect the yellow RCA connectors to the corresponding yellow VIDEO INPUT 4 terminal on the projector and
the Video output terminal on the video source.
the Video output terminal on the video source.
2
To use the built-in audio system, connect the red and white RCA connectors to the corresponding red and white
AUDIO INPUT 4/5 terminals on the projector and the Audio output terminals on the video source.
AUDIO INPUT 4/5 terminals on the projector and the Audio output terminals on the video source.
The S-VIDEO INPUT 5 terminal uses a video signal system in which the picture is separated into a color and a luminance signal
to realize a higher-quality image.
to realize a higher-quality image.
• For higher quality video, you may use the S-VIDEO INPUT 5 terminal on the projector. S-video cable is sold separately.
• If your video equipment does not have an S-video output terminal, use a composite video cable.
• If your video equipment does not have an S-video output terminal, use a composite video cable.
CAUTION
• Always turn off the projector before connecting to video equipment, in order to protect both the projector and the equipment
being connected.
E-19
Setup & Connections
Watching Component Video Images
Connecting to a DVD video player, DTV* decoder and other
component video equipment using the 5 BNC Input
component video equipment using the 5 BNC Input
4
To audio output terminals
1
3
Three BNC-RCA adaptors
DTV decoder
or
DVD video player
Example
Audio cable
(ø3.5 mm stereo minijack to RCA
cable, commercially available)
(ø3.5 mm stereo minijack to RCA
cable, commercially available)
2
To analog component output terminals
Component cable (sold separately)
CAUTION
• Always turn off the projector before connecting to video
equipment, in order to protect both the projector and the
equipment being connected.
equipment being connected.
1
Connect each BNC connector of a component cable to the corresponding BNC INPUT 2 terminals on the
projector.
projector.
2
Connect the other end of the cable to the corresponding terminals on a DVD video player or DTV decoder.
3
To use the built-in audio system, connect one end of an audio cable (sold separately) to the AUDIO INPUT 2/3
terminal on the projector.
terminal on the projector.
4
Connect the other end to the audio output terminal on the DVD video player or DTV decoder.
• BNC-RCA adaptors are included for use with RCA type cables and sources.
• A ø3.5 mm stereo minijack to stereo RCA audio cable adaptor may be necessary.
• A ø3.5 mm stereo minijack to stereo RCA audio cable adaptor may be necessary.
When connecting this projector to a DVD video player or DTV decoder, select “Component” for “Signal Type” on the GUI
menu. (See page
menu. (See page
41
.)
*DTV is the umbrella term used to describe the new digital television system in the United States.

