Sharp PG-M10SE (serv.man17) User Manual / Operation Manual ▷ View online
18
Basic OperationBasic Operation
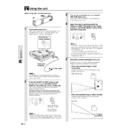
Using the unit
3
Turn on the connected source (computer,
VCR, DVD player, etc.).
VCR, DVD player, etc.).
If you use a video component, start playback for
screen/image adjustment.
screen/image adjustment.
4
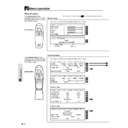
Select the input by pressing either the
VIDEO or COMPUTER button of the remote
control, or the INPUT SELECT button of the
unit (refer to page 20).
VIDEO or COMPUTER button of the remote
control, or the INPUT SELECT button of the
unit (refer to page 20).
MOUSE
ON/OFF
VIDEO
MENU
R-CLICK/UNDO
COMPUTER
POWER
STA
ON/OFF
• If no signal is being sent to the unit, the blue or black
screen (the background type differs depending on the
“BACKGROUND” setting. See page 32.) is projected.
Check the following:
– Is the source properly connected to the unit?
– Is the source component or computer turned on?
“BACKGROUND” setting. See page 32.) is projected.
Check the following:
– Is the source properly connected to the unit?
– Is the source component or computer turned on?
• The video resolution of the connected computer can be
changed. See page 17.
5
Adjust the position and height of the unit.
Move the unit to the position where the projected
image is horizontally centered to the screen.
image is horizontally centered to the screen.
•
When the projected image is offset
horizontally
horizontally
Adjust the position of the unit so that the unit is
square to the screen.
square to the screen.
•
When the projected image is offset vertically
Adjust the height balance of the unit with the
adjusters. See next page.
adjusters. See next page.
Screen
View from the top
Screen
Side view
Before Using, open the sliding lens cap.
1
Connect the power cord.
The POWER indicator will illuminate orange in color
indicating that the unit is in standby status. The
cooling fan will operate at slow speed.
indicating that the unit is in standby status. The
cooling fan will operate at slow speed.
COM
PUT
ER
S VID
EO
VIDE
O
MOU
SE
AUDI
O
AUTO
SYNC
INPUT SE
LECT
ON/O
FF
POWE
R
STATU
S
POWER
STATUS
ON/OFF
INPUT S
Illuminates in
orange (Standby)
orange (Standby)
Power cord
(supplied)
(supplied)
To wall outlet
1
2
The configuration of wall outlets differs from country to
country. Use the power cord that corresponds to the wall
outlet in your country.
country. Use the power cord that corresponds to the wall
outlet in your country.
2
Press the POWER ON/OFF button on the
remote control, or the POWER ON/OFF
button on top of the unit, to turn on the unit.
remote control, or the POWER ON/OFF
button on top of the unit, to turn on the unit.
The POWER indicator on top of the unit turns to
green and starts flashing.
It takes one minute for the unit to be ready for use.
Wait until the indicator stops flashing and illuminates
steadily in green. This will prevent the unit from
accidental shutoff.
green and starts flashing.
It takes one minute for the unit to be ready for use.
Wait until the indicator stops flashing and illuminates
steadily in green. This will prevent the unit from
accidental shutoff.
MOUSE
ON/OFF
VIDEO
MENU
R-CLICK/UNDO
COMPUTER
POWER
STA
ON/OFF
• While the POWER indicator is flashing, the unit doesn’t turn
off even if you press the POWER ON/OFF button on the
remote control, or the POWER ON/OFF button on the unit.
remote control, or the POWER ON/OFF button on the unit.
Green light flashes
(About one minute)
(About one minute)
↓
Then illuminates
steadily in green
steadily in green
19
Basic Operation
Adjuster Adjustment
There are two adjusters: one on the right side of the back
panel and another in the front center of the unit.
panel and another in the front center of the unit.
1 Use right hand to lift the front of the unit to
approximately the desired adjustment angle.
2 Press the foot release button on the front.
Loosen the foot release and allow it to drop into position.
3 Release the button.
The extended foot release will be locked.
4 Rotate the contact surfaces of the rear adjuster either
clockwise or counterclockwise to accurately adjust the
level.
level.
6
When distortion of the projected image
cannot be corrected with the adjusters,
press the KEYSTONE +/– buttons of the
remote control to fine adjust (see page 22).
cannot be corrected with the adjusters,
press the KEYSTONE +/– buttons of the
remote control to fine adjust (see page 22).
Using KEYSTONE to adjust projected image
distortion.
distortion.
ENLARGE
VOLUME
KEYSTONE
Maximum correction is 14 degrees (including optical
correction).
correction).
The top and bottom of the projected image is
corrected, as shown below.
If a menu is being displayed, distortion of the menu
will not be corrected.
corrected, as shown below.
If a menu is being displayed, distortion of the menu
will not be corrected.
7
Adjust the image size to match the distance
to the screen. Next, use the focus ring to
adjust the focus.
to the screen. Next, use the focus ring to
adjust the focus.
8
Change the unit setting to suit the method
and source selected in step 4.
and source selected in step 4.
•
Select the “PROJECTION” appropriate for
the type of projector installation. (See
page 33)
the type of projector installation. (See
page 33)
If the image is projected reversed, vertically, or
horizontally, reset “PROJECTION”.
horizontally, reset “PROJECTION”.
•
In the case of video or S-video, select the
color system as necessary. (See page 30)
color system as necessary. (See page 30)
Normally, it is not necessary to change the factory
settings. Also, set the COMPUTER input terminal
for YP
settings. Also, set the COMPUTER input terminal
for YP
B
P
R
(component video). (See page 31)
•
In the case of RGB input, adjust the video
of the connected PC.
of the connected PC.
This unit automatically identifies the input signal
and selects the most appropriate resolution.
However, manually adjust the “CLOCK” and
“PHASE” (see page 28) when there is flicker,
noise, color offset, etc., and manually adjust the
vertical and horizontal position (see page 28)
when the image is not centered.
You can maintain the original aspect ratio of the
incoming signal. (see page 31). (Normally, the
resolution is automatically detected and the
display is enlarged or reduced.)
9
Adjust the picture elements (see page 26),
then select the picture type according to the
video content (see page 30).
then select the picture type according to the
video content (see page 30).
10
Start using the unit.
The following functions are available while using the
unit:
• Adjusting the volume of the unit's speaker
unit:
• Adjusting the volume of the unit's speaker
(see pages 22 and 32),
• Turning off the image and muting the sound
temporarily (see page 22),
• Freezing a moving picture (see page 22),
• Enlarging the picture (see page 23)
• Enlarging the picture (see page 23)
When there is no signal input for a period of 5 min. or more,
the power is automatically turned off and standby status is
activated.
the power is automatically turned off and standby status is
activated.
Up
Down
4
3
2
1
Up
Down
Using the unit
Focus ring
20
Basic OperationBasic Operation
Using the Remote Control (Input Selection)
Using the Remote Control (Input Selection)
Operating from the main unit
Inputs can be selected not only by operating the remote control
but also by using the projector’s INPUT SELECT button.
but also by using the projector’s INPUT SELECT button.
ON/OFF
INPUT SELECT AUTO SYNC
POWER
STATUS
1
Press the VIDEO button.
The video signal (VIDEO, S-VIDEO) connected to the
input terminal of this unit will be detected and
projected automatically. If a video signal is not
detected, the message NO SIGNAL will be displayed.
input terminal of this unit will be detected and
projected automatically. If a video signal is not
detected, the message NO SIGNAL will be displayed.
VIDEO
2
Press the COMPUTER button.
The analog RGB signal connected to the input
terminal of this unit will be detected and projected
automatically.
(Component video will be detected if the
COMPUTER input terminal is set to “YP
terminal of this unit will be detected and projected
automatically.
(Component video will be detected if the
COMPUTER input terminal is set to “YP
B
P
R
” (page
31).) If a video signal is not detected, the message
NO SIGNAL will be displayed.
NO SIGNAL will be displayed.
COMPUTER
All video signals input to this device will be detected if
“AUTO SOURCE” is set to “ON” (page 33).
“AUTO SOURCE” is set to “ON” (page 33).
3
Press the INPUT SELECT button.
The video signal (RGB or YP
B
P
R
, VIDEO, S-VIDEO)
connected to the input terminal of this unit will
automatically be detected and projected. If a video
signal is not detected, the message NO SIGNAL will
be displayed.
automatically be detected and projected. If a video
signal is not detected, the message NO SIGNAL will
be displayed.
INPUT SELECT
The signals are detected repeatedly in the sequence
shown below.
shown below.
When “AUTO SOURCE” is set to “ON” (see page 33), all
signals input to this unit will be detected.
signals input to this unit will be detected.
Using the unit (continued)
After using the unit
1
Press the POWER ON/OFF button of the
remote control or the POWER ON/OFF
button of the main unit for a few seconds.
remote control or the POWER ON/OFF
button of the main unit for a few seconds.
The power will turn off and the POWER indicator will
blink orange for 1 min., then the standby status will
be activated. (The cooling fan will continue to run for
a while for cooling purposes.)
Do not unplug the power cord while the indicator is
blinking.
blink orange for 1 min., then the standby status will
be activated. (The cooling fan will continue to run for
a while for cooling purposes.)
Do not unplug the power cord while the indicator is
blinking.
MOUSE
ON/OFF
VIDEO
MENU
R-CLICK/UNDO
COMPUTER
POWER
STA
ON/OFF
• The POWER ON/OFF button of the remote control and
main unit will not operate until the blinking stops.
• After the standby status is activated, wait 1 min. or more
before turning the power on again. The power will not turn
on until the 1 min. interval has elapsed.
on until the 1 min. interval has elapsed.
• The cooling fan will continue to run even in standby status.
2
Disconnect the power cord.
The POWER indicator will turn off.
Blinks orange
(1 min.)
(1 min.)
↓
Illuminates orange
INPUT SELECT button
VIDEO button
COMPUTER button
→ RGB/YP
B
P
R
S-VIDEO
← VIDEO←
MOUSE
ON/OFF
VIDEO
MENU
R-CLICK/UNDO
COMPUTER
21
Basic Operation
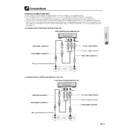
The remote control of this unit can be used as the PC mouse (wireless mouse function) by connecting the MOUSE terminal of
this unit and the PC.
this unit and the PC.
Remote control mouse functions
• The cursor key on the remote control operates the computer mouse functions.
• If a computer running Windows is connected, the ENTER button on the remote
• If a computer running Windows is connected, the ENTER button on the remote
control operates as the computer mouse left click button and the R-CLICK/UNDO
button as the computer mouse right click button.
button as the computer mouse right click button.
• If a Macintosh computer is connected, the ENTER and R-CLICK/UNDO buttons
operate in the same way as the computer mouse click button.
Connecting a PC and the MOUSE terminal of this unit
Before connecting a PC
• Before connecting, turn off the PC power. Turn off the power of this unit if it is on.
• When connection is completed, turn on the power of this unit and then start the PC.
• When connection is completed, turn on the power of this unit and then start the PC.
Using the Remote Control as the PC Mouse
USB Port Connection
Connect the supplied USB mouse control cable
directly to the USB port (universal serial bus) of the
personal computer, as shown in the diagram.
directly to the USB port (universal serial bus) of the
personal computer, as shown in the diagram.
IBM PS/2 Mouse Port Connection
Connect the supplied PS/2 mouse control cable to the
personal computer, as shown in the diagram.
personal computer, as shown in the diagram.
• Depending on the personal computer, the mouse may not be recognized in some cases if not connected to the MOUSE terminal before the
personal computer power is turned on.
• In the case of some notebook and laptop type personal computers, it may not be possible to use the standard pointing device (track ball, etc.)
of the personal computer when connected to the MOUSE terminal. In such case, it will not be possible to use the pointing device until the
personal computer is rebooted, even if disconnected from the MOUSE terminal.
personal computer is rebooted, even if disconnected from the MOUSE terminal.
• Windows 95 does not support USB mouse driver software.
AUDIO
MOUSE
COMPUTER
VIDEO
S-VIDEO
MOUSE terminal
USB mouse control cable (accessory)
Personal computer
USB port
USB port
IBM PC/AT or
Macintosh
Macintosh
PS/2 MOUSE
port
port
IBM PS/2 compatible
PS/2 mouse control cable (accessory)
MOUSE
ON/OFF
VIDEO
MENU
R-CLICK/UNDO
COMPUTER
MOUSE button
Display

