Sharp PG-A10X (serv.man32) User Manual / Operation Manual ▷ View online
-40
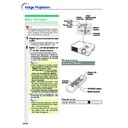
Picture Display Mode
Switching the Picture Dis-
play Mode
play Mode
Press
.
• Pressing
changes the display as shown on
pages
40
and
41
.
• To return to the standard image, press
while
“
RESIZE
” is displayed on the screen.
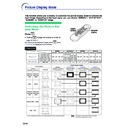
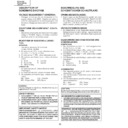
This function allows you to modify or customize the picture display mode to enhance the
input image. Depending on the input signal, you can choose “NORMAL”, “DOT BY DOT”,
“BORDER” or “STRETCH” image.
input image. Depending on the input signal, you can choose “NORMAL”, “DOT BY DOT”,
“BORDER” or “STRETCH” image.
COMPUTER
STRETCH
Projects 16:9 image
evenly over entire screen
(top/bottom blank bands).
Output screen image
Input Signal
Image type
NORMAL
Projects a full screen
image while maintaining
the aspect ratio.
DOT BY DOT
Projects the original
resolution signal
of the image.
BORDER
Projects 4:3 image fully
in STRETCH (the following
column) image.
4:3 aspect ratio
4:3 aspect ratio
4:3 aspect ratio
5:4 aspect ratio
16:9 aspect ratio
: Cutout area on which images cannot be projected.
: Area where the signals are off screen.
*
Mode for projecting an image with the original aspect ratio without cutting any portions.
*
*
*
*
*
*
*
*
*
*
Computer
PG-A10X
PG-A10S
Resolution
lower than
XGA
Resolution
lower than
SVGA
XGA
SVGA
Resolution
higher than
XGA
Resolution
higher than
SVGA
1280
× 720
SXGA (1280
× 1024)
RESIZE
button
button
UNDO
button
button
4:3
aspect ratio
Other aspect ratios
SVGA (800
× 600)
XGA (1024
× 768)
SXGA (1280
× 960)
SXGA+ (1400
× 1050)
SXGA (1280
× 1024)
1280
× 720
PG-A10X
1024
× 768
960
× 768
—
PG-A10X
800
× 600
—
1280
× 960
1400
× 1050
1280
× 1024
—
PG-A10X
768
× 576
720
× 576
—
PG-A10X
1024
× 576
960
× 576
1024
× 576
NORMAL
PG-A10S
800
× 600
750
× 600
—
DOT BY DOT
PG-A10S
—
1024
× 768
1280
× 960
1400
× 1050
1280
× 1024
—
BORDER
PG-A10S
600
× 450
562
× 450
—
STRETCH
PG-A10S
800
× 450
750
× 450
800
× 450
Easy to Use Functions
-41
VIDEO
• “STRETCH” is fixed when 540P, 720P or 1080
I
signals are entered.
4:3 aspect ratio
Letter box
Squeezed 16:9 image
Squeezed 4:3 image
16:9 aspect ratio
16:9 aspect ratio
(4:3 aspect ratio in
16:9 screen)
Output screen image
Input Signal
Image type
DVD / Video
480I, 480P,
NTSC, PAL, SECAM
540P, 720P,
1080I (16:9)
: Cutout area on which images cannot be projected.
: Area on which the image is not included in the original signals.
*
Mode for projecting an image with the original aspect ratio without cutting any portions.
*
*
*
*
*
*
*
*
BORDER
Projects 4:3 image fully in
STRETCH (the following
column) image.
STRETCH
Projects 16:9 image evenly
over entire screen
(top/bottom black bands).
NORMAL
Projects a full screen image.
480I, 480P,
NTSC, PAL, SECAM
540P, 720P, 1080I
4:3 aspect ratio.
Letter box, squeeze
16:9 aspect ratio
PG-A10X
1024
× 768
—
PG-A10X
768
× 576
—
PG-A10X
1024
× 576
NORMAL
PG-A10S
800
× 600
—
BORDER
PG-A10S
600
× 450
—
STRETCH
PG-A10S
800
× 450
-42
×1
×4 ×9 ×16 ×36 ×64
×2 ×3
You can instantly freeze a moving image and enlarge a specific portion of an image with the
remote control. Using these functions, you can explain the image to the audience more effec-
tively.
remote control. Using these functions, you can explain the image to the audience more effec-
tively.
Still and Zoom Image
Freezing a Moving
Image
Image
1
Press
.
• The projected image is frozen.
2
Press
again to return to the
moving image from the currently
connected device.
connected device.
Displaying an Enlarged
Portion of an Image
Portion of an Image
1
Press
.
• Pressing
or
enlarges or reduces
the projected image.
Note
• You can change the location of the en-
larged image using ', ", \ and |.
2
Press
to cancel the operation.
• The magnification then returns to ×1.
Note
In the following cases, the image will re-
turn to the normal size (
turn to the normal size (
×1).
• When switching the INPUT mode.
• When
• When
has been pressed.
• When the input signal is changed.
• When the input signal resolution and re-
fresh rate (vertical frequency) change.
', ", \, |
buttons
buttons
ENLARGE
(Enlarge/
Reduce)
buttons
(Enlarge/
Reduce)
buttons
FREEZE
button
button
UNDO
button
Easy to Use Functions
-43
Keylock
Function
Locking the Operation But-
tons
tons
Hold down
on the projector for
about 3 seconds while the projector is
being turned on.
being turned on.
Note
• The keylock function does not affect the opera-
tion with the remote control buttons.
• You cannot use the keylock function while the
projector is warming up.
Use this function to lock the operation buttons on the projector.
Taking the Keylock off
Hold down
on the projector for
about 3 seconds while the projector is
being turned on.
being turned on.
• You can take the keylock off by holding down
on the projector for about 3 seconds while the pro-
jector is in standby mode.
Power ON button

