Sharp MX-PNX1C (serv.man8) Service Manual ▷ View online
MX-FNX1/MX-PNX1 DISASSEMBLY AND ASSEMBLY 6 – 2
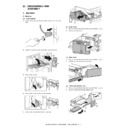
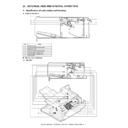
(5) Reverse guide unit
1)
Remove the inner finisher from the main unit. Refer to A-(1).
2)
Remove the inner cover. Refer to A-(2).
3)
Remove the reverse guide unit.
B. Transport section, paper exit section
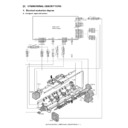
(1) Paddle
1)
Open the front cover, and slide the inner finisher.
2)
Remove the paddle holders, and remove the paddles.
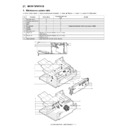
(2) Flapper solenoid
1)
Remove the inner finisher from the main unit. Refer to A-(1).
2)
Disconnect the connector, and remove the flapper solenoid.
* When installing, shift and fix the solenoid so that the reverse
flapper and the cushion material are in contact with each
other with the solenoid plunger pushed in.
other with the solenoid plunger pushed in.
(3) Inlet port sensor
1)
Remove the inner finisher from the main unit. Refer to A-(1).
2)
Remove the sensor holder, and remove the inlet port sensor.
2
1
MX-FNX1/MX-PNX1 DISASSEMBLY AND ASSEMBLY 6 – 3
(4) Roller up/down sensor
1)
Remove the inner finisher from the main unit. Refer to A-(1).
2)
Remove the inner cover. Refer to A-(2).
3)
Remove the bracket, and remove the roller up/down sensor.
(5) Take-up belt sensor
1)
Remove the inner finisher from the main unit. Refer to A-(1).
2)
Remove the inner cover. Refer to A-(2).
3)
Slide the harness guide, remove the bracket, and remove the
take-up belt sensor.
take-up belt sensor.
(6) Roller up/down motor
1)
Remove the inner finisher from the main unit. Refer to A-(1).
2)
Remove the inner cover. Refer to A-(2).
3)
Remove the rear cover. Refer to A-(3).
4)
Remove the reverse guide unit.
5)
Slide the stapler drive unit. Disconnect the connector from the
PWB. Remove the roller up/down motor unit. Remove the
roller up/down motor.
PWB. Remove the roller up/down motor unit. Remove the
roller up/down motor.
(7) Belt separation solenoid
1)
Remove the inner finisher from the main unit. Refer to A-(1).
2)
Remove the inner cover. Refer to A-(2).
3)
Remove the reverse guide unit. Refer to A-(5).
4)
Remove the parts, and remove the belt separation solenoid.
(8) Bundle exit paper transport roller
1)
Remove the inner finisher from the main unit. Refer to A-(1).
2)
Remove the inner cover. Refer to A-(2).
3)
Remove the reverse guide unit. Refer to A-(5).
4)
Remove the parts, and remove the bundle exit paper transport
roller unit.
roller unit.
5)
Remove the parts, and remove the bundle exit paper transport
roller.
roller.
1
2
1
2
3
2
1
3
1
1
2
2
3
1
2
3
MX-FNX1/MX-PNX1 DISASSEMBLY AND ASSEMBLY 6 – 4
(9) Take-up belt, paper exit roller
1)
Remove the inner finisher from the main unit. Refer to A-(1).
2)
Remove the inner cover. Refer to A-(2).
3)
Remove the reverse guide unit. Refer to A-(5).
4)
Remove the parts, and remove the bundle roller up/down lever
unit.
unit.
5)
Remove the parts, and remove the bundle roller unit.
6)
Remove the parts, and pull out the belt unit. Remove the parts,
and remove the belt unit.
and remove the belt unit.
7)
Remove the parts, and remove the take-up belt and the paper
exit roller.
exit roller.
(10) Inlet port gate
1)
Remove the inner finisher from the main unit. Refer to A-(1).
2)
Remove the inner cover. Refer to A-(2).
3)
Remove the left cover and the bottom cover. Refer to A-(4).
4)
Remove the reverse guide unit. Refer to A-(5).
5)
Remove the PWB. Refer to F-(1).
6)
Remove the flapper solenoid. Refer to B-(2).
7)
Remove the slide rail. Remove the slider fixing bracket and
remove the earth terminal.
remove the earth terminal.
1
1
2
1
1
2
3
1
2
1
2
2
3
1
3
2
1
3
2
MX-FNX1/MX-PNX1 DISASSEMBLY AND ASSEMBLY 6 – 5
8)
Remove the tray unit.
9)
Remove the harness from the guide, and remove the bottom
plate.
plate.
10) Remove the inlet port upper guide.
11) Remove the spring, and remove the parts. Remove the inlet
port gate.
(11) Inlet port paper transport roller
1)
Remove the inner finisher from the main unit. Refer to A-(1).
2)
Remove the inner cover. Refer to A-(2).
3)
Remove the tray unit. Refer to B-(10).
4)
Remove the bottom plate. Refer to B-(10).
5)
Remove the inlet port upper guide, and remove the transport
guide.
guide.
6)
Remove the parts, and remove the inlet port paper transport
roller.
roller.
(12) Transport motor
1)
Remove the inner finisher from the main unit. Refer to A-(1).
2)
Remove the inner cover. Refer to A-(2).
3)
Remove the tray unit. Refer to B-(10).
4)
Remove the bottom plate. Refer to B-(10).
5)
Disconnect the connector, and remove the transport motor.
1
2
3
1
1
2
3
4
2
1
2
3

