Sharp AR-PG1 (serv.man4) User Manual / Operation Manual ▷ View online
1
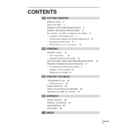
CONTENTS
1
GETTING STARTED
INTRODUCTION 2
MAIN FEATURES 3
MAKING FLOPPY DISKS FROM CD-ROM 3
CONNECTING THE INTERFACE CABLE 4
INSTALLING THE PRINTER DRIVER SOFTWARE 6
– Description of the printer driver 6
– Checking the hardware and software requirements 6
– Installing the printer driver 6
– AR-150 Series printer driver group 12
2
PRINTING
PRINTING A PAGE 13
– Executing printing
13
– Indicators on the operation panel 14
SETTING PRINT CONDITIONS FROM PRINTER DRIVER 14
PRINTING FROM AN MS-DOS APPLICATION 17
– Print setting from the MS-DOS prompt 17
– Settings on the front panel 18
– Software printer setting 18
3
PRINTER TROUBLE?
TROUBLESHOOTING 19
– Printing problems 19
STATUS MONITOR 22
USING OTHER INSTALLED DRIVERS 24
UNINSTALLING PRINTER DRIVER 25
4
APPENDIX
SPECIFICATIONS 26
PARALLEL INTERFACE 27
USB INTERFACE 28
PRINT AREA 29
INDEX
2
1
Getting started
GETTING STARTED
This chapter provides basic information for using the SHARP AR-150 series printer and its
features.
features.
INTRODUCTION
The AR-150 series machines can be used as a copier and a laser printer. This manual describes
only the printer features of the machine. To use an AR-150 series machine as a copier and to
learn additional information which relates to both the copier and printer features, see the copier
manual. To get full use of all printer features, familiarize yourself with this manual.
For quick reference during printer use, keep this manual in a handy location.
Conventions used in this manual
In this manual, the following icons are used to provide the user with information pertinent to the
use of the machine.
use of the machine.
Cautions the user that damage to the machine or one of its components may
result if the contents of the caution are not properly followed.
result if the contents of the caution are not properly followed.
Notes provide information relevant to the machine regarding specifications,
functions, performance, operation and such, that may be useful to the user.
functions, performance, operation and such, that may be useful to the user.
●
When you try to execute printing while copying is being performed, printing
will be executed after copying is finished.
will be executed after copying is finished.
●
When you try to make a copy while printing is being performed, printing will
be interrupted and you can make a copy. Printing will be resumed after copying
is finished.
be interrupted and you can make a copy. Printing will be resumed after copying
is finished.
Trademark acknowledgments
Windows, MS-DOS, Windows NT and Windows Printing System are trademarks of Microsoft
Corporation in the U.S.A. and other countries.
IBM, PC/AT and OS/2 are trademarks of International Business Machines Corporation.
HP, LaserJet and PCL are trademarks of Hewlett-Packard Company.
All other trademarks and copyrights are the property of their respective owners.
Corporation in the U.S.A. and other countries.
IBM, PC/AT and OS/2 are trademarks of International Business Machines Corporation.
HP, LaserJet and PCL are trademarks of Hewlett-Packard Company.
All other trademarks and copyrights are the property of their respective owners.
1
3
1
Getting started
MAIN FEATURES
q
Printing from Windows 3.1x, Windows 95, Windows 98*, and Windows
NT 4.0 applications
* USB is supported on Windows 98 pre-installed only.
●
High-speed and high-quality printing can be performed from Windows 3.1x, Windows
95, Windows 98, and Windows NT 4.0 applications through the SHARP GDI (Graphics
Device Interface) system.
95, Windows 98, and Windows NT 4.0 applications through the SHARP GDI (Graphics
Device Interface) system.
●
Since print data is processed in the computer, waiting time during printing is short.
w
High-speed printing at 8 pages/min.
●
First print time is approximately 9.6 seconds.
●
Print speed is 8 pages/min., when printing multiple pages.
MAKING FLOPPY DISKS FROM CD-ROM
If your computer is not equipped with a CD-ROM drive, the printer driver data in the CD-ROM
can be copied to floppy disks using a different computer (PC equipped with a CD-ROM drive).
You can then install the printer driver on your computer from floppy disks.
can be copied to floppy disks using a different computer (PC equipped with a CD-ROM drive).
You can then install the printer driver on your computer from floppy disks.
Windows 95/Windows 98/Windows NT 4.0:
1
Double-click My Computer, Ar_150, and Makedisk.
2
Double-click Makedisk.exe.
3
Follow the on-screen instructions.
Windows 3.1x:
1
Double-click the File Manager in the Main window of Program Manager and select
CD-ROM and the Makedisk directory.
CD-ROM and the Makedisk directory.
2
Double-click Makedisk.exe.
3
Follow the on-screen instructions.
4
1
Getting started
CONNECTING THE INTERFACE CABLE
To use the AR-150 series machine as a laser printer connect it to your computer using either a
parallel interface cable or a USB interface cable. (You can use a USB interface cable only if
your personal computer has Windows 98 pre-installed).
parallel interface cable or a USB interface cable. (You can use a USB interface cable only if
your personal computer has Windows 98 pre-installed).
You cannot use both the USB interface and the parallel interface at the same
time. If you connect both interfaces at the same time, the USB interface takes
precedence.
time. If you connect both interfaces at the same time, the USB interface takes
precedence.
When using the parallel interface
Use IEEE 1284 compliant parallel interface (2 m (6 feet) maximum length).
For specifications of the parallel interface, see page 27.
For specifications of the parallel interface, see page 27.
1
Check that the power switches of both the printer and the computer are in the OFF
position.
position.
2
Plug the parallel interface cable into the printer interface connector. Fasten the two
bail clips at the side of the printer connector to hold the interface connector in place.
bail clips at the side of the printer connector to hold the interface connector in place.
3
Plug the other end of the cable into the parallel interface connector on your computer.
(Refer to your computer manual for details.)
(Refer to your computer manual for details.)
Cable
Bail clip
Parallel interface connector
Interface connector
The printer sends and receives data bi-directionally and at high speed. Some
switch boxes and pass-through devices cannot support high-speed, bi-
directional transfer of data, and using them may cause printing errors.
switch boxes and pass-through devices cannot support high-speed, bi-
directional transfer of data, and using them may cause printing errors.

