Sharp AR-M351U / AR-M451U (serv.man11) Service Manual ▷ View online
AR-M351U/M451U, AR-M355U/M455U MAINTENANCE AND DETAILS OF EACH SECTION 7 - 7
C. Operational descriptions
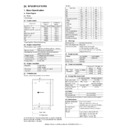
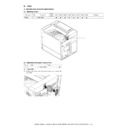
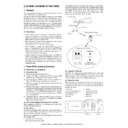
The OPC drum surface is negatively charged by the main charger.
The laser beam images are radiated to the OPC drum surface by
the laser unit to form latent electrostatic images.
The laser beam images are radiated to the OPC drum surface by
the laser unit to form latent electrostatic images.
1) The OPC drum surface is negatively charged by the main
charger.
The main charger grid is provided with the screen grid. The
OPC drum is charged at a voltage virtually same as the volt-
age applied to the screen grid.
OPC drum is charged at a voltage virtually same as the volt-
age applied to the screen grid.
2) LED lights are radiated to the OPC drum surface by the laser
unit to form latent electrostatic images.
When LED lights are radiated to the OPC drum CGL, negative
and positive charges are generated.
and positive charges are generated.
Positive charges generated in CGL are attracted to the nega-
tive charges on the OPC drum surface. On the other hand,
negative charges are attracted to the positive charges in the
OPC drum aluminum layer.
tive charges on the OPC drum surface. On the other hand,
negative charges are attracted to the positive charges in the
OPC drum aluminum layer.
Therefore, positive charges and negative charges are bal-
anced out on the OPC drum and in the aluminum layer, reduc-
ing positive and negative charges to decrease the OPC drum
surface voltage.
anced out on the OPC drum and in the aluminum layer, reduc-
ing positive and negative charges to decrease the OPC drum
surface voltage.
Electric charges remain at a position where LED lights are not
radiated.
radiated.
As a result, latent electrostatic images are formed on the OPC
drum surface.
drum surface.
3) After transfer operation, remaining toner is removed by the
cleaning blade.
Residual toner removed from the OPC drum surface is trans-
ported to the recycle toner collection section in the toner car-
tridge by the waste toner transport screw.
ported to the recycle toner collection section in the toner car-
tridge by the waste toner transport screw.
4) All the surface of the OPC drum is discharged by laser beams.
After completion of the job, laser beams are radiated onto al
the surface of the OPC drum.
When laser beams are radiated onto the CGL of the OPC
drum, positive and negative charges are generated.
the surface of the OPC drum.
When laser beams are radiated onto the CGL of the OPC
drum, positive and negative charges are generated.
Positive charges generated in CGL are attracted to the nega-
tive charges on the OPC drum surface. On the other hand,
negative charges are attracted to positive charges in the alu-
minum layer of the OPC drum.
tive charges on the OPC drum surface. On the other hand,
negative charges are attracted to positive charges in the alu-
minum layer of the OPC drum.
Therefore, positive and negative charges are balanced out on
the OPC drum surface and in the aluminum layer, reducing
positive and negative charged to decrease the surface voltage
of the OPC drum.
the OPC drum surface and in the aluminum layer, reducing
positive and negative charged to decrease the surface voltage
of the OPC drum.
Aluminum
layer
OPC drum
CTL
CGL
High voltage unit
Main corona unit
Screen grid
OPC drum
LED lights
Aluminum
layer
OPC drum
CGL
CTL
Drum
LED lights
CLT
CGL
Aluminum
layer
Aluminum
layer
CLT
CGL
CGL
AR-M351U/M451U, AR-M355U/M455U MAINTENANCE AND DETAILS OF EACH SECTION 7 - 8
D. Maintenance and parts replacement
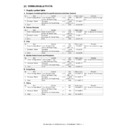
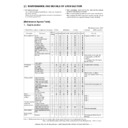
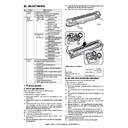
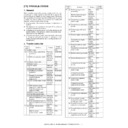
(1) Maintenance list
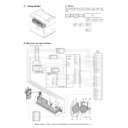
(2) Maintenance and parts replacement
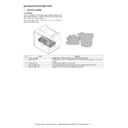
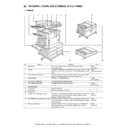
a. Drum cartridge
1) Release the lock, and pull out the left door.
2) Open the front door.
3) Put down the DV guide handle. Loosen the screw, and remove
the drum cartridge.
Unit name
No.
Part name
When
calling
100K 200K 300K 400K 500K 600K 700K 800K
Remark
Drum
peripheral
peripheral
1
Drum
✕
▲
✕
▲
✕
▲
✕
▲
Replace at 200K or 1 year.
2
DSD collar
❍
❍
❍
❍
❍
❍
❍
❍
3
Cleaner blade
✕
▲
✕
▲
✕
▲
✕
▲
4
Toner reception seal
✕
▲
✕
▲
✕
▲
✕
▲
5
Side molt F
✕
▲
✕
▲
✕
▲
✕
▲
Apply side seal powder.
6
Side molt R
✕
▲
✕
▲
✕
▲
✕
▲
Apply side seal powder.
7
Drum separation pawl unit
✕
▲
✕
▲
✕
▲
✕
▲
8
MC unit
✕
❍
▲
❍
▲
❍
▲
❍
▲
Includes the screen grid, the
charging plate, and the MC
cleaner.
charging plate, and the MC
cleaner.
❍
: Charging plate cleaning by
the MC cleaner
1
7
2
4
6
2
5
3
8
No.
Unit
Parts
a
Drum cartridge
1
MC unit
×
❍
2
Drum
▲
3
DSD collar
❍
4
Drum separation pawl unit
×
5
Toner reception seal
×
6
Cleaner blade
×
7
Side molt F
×
8
Side molt R
×
b
1
Separation solenoid
a-2
a-4
a-3
a-7
a-6
a
a-1
a-3
b-1
a-5
a-8
AR-M351U/M451U, AR-M355U/M455U MAINTENANCE AND DETAILS OF EACH SECTION 7 - 9
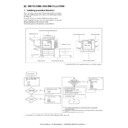
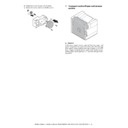
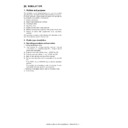
a-1. MC unit
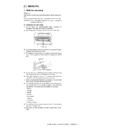
1) Remove the drum cartridge.
2) Check to confirm that the cleaning unit is inserted fully to the
bottom.
3) Remove the pawl, and remove the MC unit.
∗
For cleaning the MC unit (charging plate), reciprocate the clean-
ing unit back and forth 3 times or more.
ing unit back and forth 3 times or more.
a-2. Drum
a-3. DSD collar
1) Remove the drum cartridge.
2) Loosen the screw, and remove the drum boss mounting plate.
3) Remove the drum, and remove the DSD collar.
∗
When removing the drum, place the drum cartridge as shown in
the figure and remove the drum.
the figure and remove the drum.
∗
When replacing the OPC drum, clear the following counters.
• Drum rotating time
• Drum counter
∗
When installing a new drum, apply starting powder.
∗
When installing, install the DSD collar R to the drum frame, then
install the drum and the DSD collar F. When installing the DSD
collar, engage the DSD collar boss with the drum frame hole.
install the drum and the DSD collar F. When installing the DSD
collar, engage the DSD collar boss with the drum frame hole.
a-4. Drum separation pawl unit
1) Remove the drum cartridge.
2) Remove the screw, and remove the drum separation pawl
unit.
∗
When handling the separation pawl, be careful not to break or
scratch the tip of the separation pawl and keep it away from dirt.
scratch the tip of the separation pawl and keep it away from dirt.
After installing the drum separation pawl unit, push the separation
lever and check to confirm that the separation pawl operates nor-
mally.
lever and check to confirm that the separation pawl operates nor-
mally.
a-5. Toner reception seal
1) Remove the drum cartridge.
2) Remove the drum and the DSD collar.
3) Remove the drum separation pawl unit.
4) Remove the screw, and remove the toner reception seal.
∗
When installing the toner reception seal, tighten the screw (a)
on the positioning side for the first time. Check to confirm that
the process earth plate and the toner reception seal are conduc-
tive. (10
on the positioning side for the first time. Check to confirm that
the process earth plate and the toner reception seal are conduc-
tive. (10
Ω
or less)
(a)
AR-M351U/M451U, AR-M355U/M455U MAINTENANCE AND DETAILS OF EACH SECTION 7 - 10
a-6. Cleaner blade
1) Remove the drum cartridge.
2) Remove the drum and the DSD collar.
3) Pull it out until the cleaning unit stops.
4) Remove the screw, and remove the cleaner blade.
∗
When removing the drum blade, place the drum as shown in the
figure and remove the drum blade to prevent toner from dispers-
ing.
figure and remove the drum blade to prevent toner from dispers-
ing.
∗
Do not damage the cleaner blade. Do not touch the lead edge.
∗
When installing the cleaner blade, pull the cleaner shaft fully
toward you.
toward you.
∗
After installing the cleaner blade, insert the cleaner shaft fully to
the bottom.
the bottom.
a-7. Side molt F
a-8. Side molt R
1) Remove the drum cartridge.
2) Remove the drum and the DSD collar.
3) Remove the toner reception seal.
4) Remove the cleaner blade.
5) Remove the side molt F and R.
∗
When attaching the side molts F/R, attach them to the attach-
ment reference as shown.
ment reference as shown.
∗
After attaching the side molt F/R, push the both ends of the
blade with your fingers to check to confirm that the red moquette
moves smoothly.
blade with your fingers to check to confirm that the red moquette
moves smoothly.
Put side seal powder (1g) on the moquettes F/R and spread side
seal powder all over the moquettes surfaces.
seal powder all over the moquettes surfaces.
Side seal powder: UKOG-0309FCZZ
∗
Do not apply powder excessively to the ambient parts.
∗
Be careful not to damage the cleaning blade and the side blade.
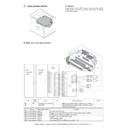
b-1. Separation solenoid
1) Remove the screw, and remove the rear cabinet.
Reference
Reference
0.3mm
0mm
0mm
0.3mm
Side molt F
0.3mm
Reference
Reference
0mm
0.1mm
0.5mm
(From the blade edge)
0.1mm
Side molt R

