Sharp AR-FN5 (serv.man2) Service Manual ▷ View online
[4] OPERATIONAL DESCRIPTIONS
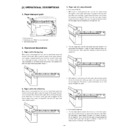
1. Paper transport path
a. Tray 1 paper exit
b. Tray 2 paper exit (Offset function selectable)
c. Tray 2 staple paper exit
b. Tray 2 paper exit (Offset function selectable)
c. Tray 2 staple paper exit
2. Operational descriptions
1. Paper exit to the top tray
When paper is discharged from the machine, the finisher lowers the
direction switch gate right to pass the paper to the upper transport
path (escape transport section) and lowers the direction switch gate
left to discharge the paper to the top tray. The direction switch gate
right is triggered by the finisher paper entry sensor and operated only
when the paper lead edge passes through it.
2. Paper exit to the offset tray
When paper is discharged from the machine, the finisher lowers the
direction switch gate right to pass the paper to the upper transport
path, and lowers the direction switch gate left to discharge the paper
to the offset tray. The direction switch gate right is triggered by the
finisher paper entry sensor and operated only when the paper lead
edge passes through it.
3. Paper exit of a stapled bundle
·
In the case of A3, WL
a. When paper is discharged from the machine, the finisher raises
the direction switch gate right to pass the paper to the alignment
tray. When the read edge of paper passes the paper entry sensor,
the operation is triggered. That is, when the rear edge of paper
passes the direction switch gate right, the gate is lowered to store
the rear edge of paper completely in the alignment tray.
tray. When the read edge of paper passes the paper entry sensor,
the operation is triggered. That is, when the rear edge of paper
passes the direction switch gate right, the gate is lowered to store
the rear edge of paper completely in the alignment tray.
b. The rear edge plate and the side guide plate are moved in the
paper alignment direction to lower the upper alignment plate, per-
forming alignment. After alignment, stapling is performed by the
staple unit.
forming alignment. After alignment, stapling is performed by the
staple unit.
c. After alignment and stapling, the side guide plate is loosened and
the shutter is lowered to discharge paper to the paper exit roller by
the rear edge plate. The bundle of paper is discharged to the offset
tray by the paper exit roller.
the rear edge plate. The bundle of paper is discharged to the offset
tray by the paper exit roller.
·
In the case of small size
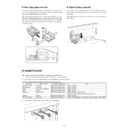
a. The rear edge plate is moved to the center and the direction switch
gate right is raises to pass the paper to the alignment tray. When
the read edge of paper passes the paper entry sensor, the opera-
tion is triggered. That is, when the rear edge of paper passes the
direction switch gate right, the gate is lowered to store the rear
edge of paper completely in the alignment tray.
the read edge of paper passes the paper entry sensor, the opera-
tion is triggered. That is, when the rear edge of paper passes the
direction switch gate right, the gate is lowered to store the rear
edge of paper completely in the alignment tray.
b. When the second last paper is passed, the rear edge plate (1) is
lowered and passed under the paper bundle (2) to the rear edge of
the paper bundle (3). Then the rear edge plate is raised. (HP
position)
the paper bundle (3). Then the rear edge plate is raised. (HP
position)
c. When the last paper from the machine passes the direction switch
gate right, it lowers the gate.
d. The paper bundle is moved in the paper exit direction by the rear
edge plate.
e. The rear edge plate and the side guide plate are moved in the
paper guiding direction and the upper guide plate is lowered to
perform the last alignment. Then stapling is performed by the sta-
ple unit.
perform the last alignment. Then stapling is performed by the sta-
ple unit.
f.
After alignment and stapling by the stapler unit, the side guide
plate is loosened and the shutter is lowered. The paper is moved
to the paper exit roller by the rear edge plate, and discharged to
the offset tray by the paper exit roller.
plate is loosened and the shutter is lowered. The paper is moved
to the paper exit roller by the rear edge plate, and discharged to
the offset tray by the paper exit roller.
3. Descriptions on each section
This machine is composed of the paper exit unit and the alignment
unit. The paper exit unit includes the paper exit tray 1 and 2. The
paper exit tray 2 is provided with the offset function and the lift-up
function.
unit. The paper exit unit includes the paper exit tray 1 and 2. The
paper exit tray 2 is provided with the offset function and the lift-up
function.
The alignment unit includes the paper transport section used for the
non-staple mode, the paper alignment section for the staple mode,
and the staple unit.
non-staple mode, the paper alignment section for the staple mode,
and the staple unit.
a. Paper exit unit section
(1) Paper transport (Main motor)
By rotating the main drive motor, the paper exit unit and the all trans-
port rollers of the alignment unit are driven.
port rollers of the alignment unit are driven.
(2) Tray 1 full detection
The top of paper bundle on the tray is detected by the combination of
the lever and the photo sensor to judge paper full on Tray 1.
the lever and the photo sensor to judge paper full on Tray 1.
(3) Lift-up section
·
Lift-up motor
In order to discharge paper always at a fixed position regardless of
paper load on the tray 2, the lift-up motor is driven, the pulley is
rotated normally or in reverse, and the timing belt is driven to move
the tray 2 up and down.
paper load on the tray 2, the lift-up motor is driven, the pulley is
rotated normally or in reverse, and the timing belt is driven to move
the tray 2 up and down.
(1)
(2)
(3)
·
Full detection
Paper full on the tray 2 is detected in combination between the
lower limit sensor ON and detection of the top of paper bundle on
the tray by the paper exit actuator.
lower limit sensor ON and detection of the top of paper bundle on
the tray by the paper exit actuator.
(4) Offset tray section
·
Offset motor
The offset motor moves the offset tray vertically to the paper exit
direction so that each bundle of paper discharged to the offset tray
is separately grouped.
direction so that each bundle of paper discharged to the offset tray
is separately grouped.
·
Paper exit clutch
This clutch is turned on when a stapled bundle of paper is dis-
charged so that the bundle of paper is warped by the difference
between the speeds of the upper and the lower paper exit rollers,
preventing the bundle from being caught by the preceding bundle’s
staple.
charged so that the bundle of paper is warped by the difference
between the speeds of the upper and the lower paper exit rollers,
preventing the bundle from being caught by the preceding bundle’s
staple.
b. Alignment unit section
(1) Transport switch gate right (gate right solenoid)
Selection between the transport section and the alignment section
in the alignment unit is made by the transport switch gate right.
This gate drops the rear edge of paper entering the alignment
section so that the rear edge is completely transported.
in the alignment unit is made by the transport switch gate right.
This gate drops the rear edge of paper entering the alignment
section so that the rear edge is completely transported.
(2) Rear edge plate unit
·
Rear edge plate motor
The motor is turned on at the timing when paper enters the align-
ment tray to drive the rear edge plate unit. Paper of A3 or WLT is
aligned to the shutter, and paper of a smaller size is aligned to the
right side of the alignment tray in the transport direction.
ment tray to drive the rear edge plate unit. Paper of A3 or WLT is
aligned to the shutter, and paper of a smaller size is aligned to the
right side of the alignment tray in the transport direction.
·
Rear edge plate solenoid
After provisional alignment of small size paper, this solenoid puts
down the rear edge plate of the rear edge unit to pass it under the
aligned paper. After returning to the home position, it is turned off
and the rear edge plate is put back and paper is transported to the
shutter.
down the rear edge plate of the rear edge unit to pass it under the
aligned paper. After returning to the home position, it is turned off
and the rear edge plate is put back and paper is transported to the
shutter.
(3) Side guide plate (Guide plate motor)
When paper enters the alignment tray, this plate is driven to align
paper vertically to the paper transport direction toward the fixed
wall of the alignment tray front side.
paper vertically to the paper transport direction toward the fixed
wall of the alignment tray front side.
(4) Shutter (Shutter solenoid)
The shutter solenoid drives the shutter which stops the lead edge
of paper for alignment. After stapling, the shutter is put down to
transport paper to the paper exit roller.
of paper for alignment. After stapling, the shutter is put down to
transport paper to the paper exit roller.
(5) Transport switch gate left (Gate left solenoid)
Paper passed through the escape transport path is sent to the tray
1 or to the tray 2.
1 or to the tray 2.
4. Basic operations
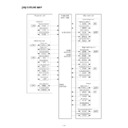
A. Flowchart of basic operations
The initialization (home positioning of each motor) is performed at the
following timing:
following timing:
1) When the power is turned on.
2) When the staple section door on the upper side of the finisher
paper exit unit is opened or closed.
3) When the alignment unit is opened or closed.
4) When the copy start key is pressed (JOB_START): Recovery op-
eration
5) When copying is completed (JOB_END).
6) When a jam occurs: Jogger saving
Job end operation
Initializing at power ON
Individual printing
operation (Offset tray)
operation (Offset tray)
Operation in case
of an error
of an error
Operation when the
door is closed
door is closed
Stapling operation
Job start operation
Transport operation
Offset paper exit operation
Power ON
B. Operations of each section when the power it turned on
Unit
No.
Operation
Remark
Alignment unit
Escape transport upper unit
1
Finisher paper entry detection
OP: Paper provided. JAM display
CL: Paper empty. Go to READY
CL: Paper empty. Go to READY
2
Paper width detection
3
Transport switch gate right drive
4
Transport switch gate left drive
Escape transport lower unit
5
Upper alignment plate drive
Alignment tray unit
6
Side guide plate alignment drive
7
Rear edge plate alignment drive
8
Rear edge plate drive
9
Side guide plate home position
10
Rear edge plate unit home position
11
Shutter drive
12
Tray paper empty detection
Staple unit
13
Staple empty detection
14
Cartridge empty detection
15
Stapling operation
16
Home position detection
17
Self priming
Others
18
Staple supply cover open/close detection
19
Tray JAM process detection
Paper exit tray unit
Escape tray
20
No. 1 tray paper exit detection
21
JAM process PG open/close detection
Lift-up tray
22
No. 2 tray paper exit detection
23
Lift-up drive
24
Lift-up drive rotation control
25
Tray position detection (upper)
26
Paper position detection
27
Tray position detection (lower)
28
Tray offset drive
29
Offset home position
Main drive system
30
Main rotation drive
31
Paper exit roller rotation control
5. Operational specifications of each section
(1) Operational specifications of side guide plate
Pulse motor specifications and control
·
1 step = 7.5 degrees
·
1-2 phase drive 1200pps
·
Reduction ratio 15P
®
40P = 24P (MXL tooth shape)
·
Side guide plate shift for an input of 1 pulse: 0.1905mm / pulse
·
Slow up/down control for tuning:
Basic operations of side guide plate
1. Moving to the standby position
·
The side guide plate is moved from the home position to the
standby position according to the paper size information supplied
by the main body.
standby position according to the paper size information supplied
by the main body.
Paper width (mm) Shift quantity (mm) Pulse number (pluse)
A3, A4
297
0
0
B4, B5
257
22.1
116
A4R
210
45.5
239
WLT, LT
279.4
12.4
65
RG, LTR,GLG
215.9
42.7
224

