Sharp AR-C260 (serv.man9) Service Manual ▷ View online
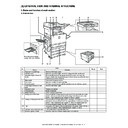
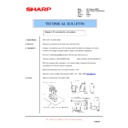
AR-C260/C260M EXTERNAL VIEW AND INTERNAL STRUCTURE 6 - 1
[6] EXTERNAL VIEW AND INTERNAL STRUCTURE
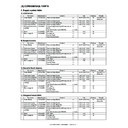
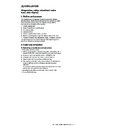
1. Name and function of each section
A. External view
No.
Parts
Model
Note
Name
Function
1
Paper exit tray (Left tray)
Receives discharged paper.
2
Left side cover
Opened to process a paper jam in the fusing unit or the transfer unit.
3
4
Main switch
Turns on/off the power source.
5
Front cover
Opened to replace the toner cartridge.
6
Operation panel
Performs various functions with the operation keys and the touch panel.
7
Upper paper exit tray (Center
tray)
tray)
Receives discharged paper.
8
Document cover
9
Original stacker
10
Manual feed tray
Used for manual paper feed.
11
3-stage paper feed desk
Provided with the 3-stage trays for paper feed. Each tray holds about 500
sheets of the recommended color paper (80g/m² (21 lbs.)) or about 550
sheets of Sharp standard paper (64g/m² (17 lbs.)). (Option)
sheets of the recommended color paper (80g/m² (21 lbs.)) or about 550
sheets of Sharp standard paper (64g/m² (17 lbs.)). (Option)
12
2-stage duplex paper feed desk
Provided with the 2-stage duplex paper feed trays. Each tray holds about
500 sheets of the recommended color paper (80g/m² (21 lbs.)) or about 550
sheets of Sharp standard paper (64g/m² (17 lbs.)). For duplex paper exit,
the reverse bypass module (AR-RB1) (15) is required. (Option)
500 sheets of the recommended color paper (80g/m² (21 lbs.)) or about 550
sheets of Sharp standard paper (64g/m² (17 lbs.)). For duplex paper exit,
the reverse bypass module (AR-RB1) (15) is required. (Option)
13
Tray
Holds about 500 sheets of the recommended color paper (80g/m² (21 lbs.))
or about 550 sheets of Sharp standard paper (64g/m² (17 lbs.)).
or about 550 sheets of Sharp standard paper (64g/m² (17 lbs.)).
14
Left side cover open/close knob
Push up this knob to open the left cover.
15
Reverse bypass module
Reverses paper for automatic duplex paper exit. (Option)
12
13
14
15
1
2
3
4
5
6
7
8
9
10
11
When the reverse bypass
module (15) is not installed.
module (15) is not installed.
AR-C260/C260M EXTERNAL VIEW AND INTERNAL STRUCTURE 6 - 2
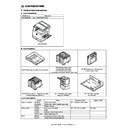
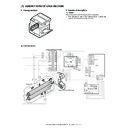
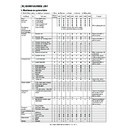
B. Internal structure
No.
Parts
Model
Note
Name
Function
16
Fusing section
Fuses transferred images on paper.
Note: Since the fusing
section is heated to a high
temperature, be careful not
to burn your hands when
processing a paper jam.
section is heated to a high
temperature, be careful not
to burn your hands when
processing a paper jam.
17
Toner cartridges
Toner is in this cartridge. When toner is empty, replace the
empty cartridge with a new one.
empty cartridge with a new one.
18
Right side cover
Opened to process a paper jam in the paper feed section.
19
Paper feed desk right cover
Opened to process a paper jam in a peripheral unit.
20
Cleaning lever
Use this level to clean the charger. Provided for each toner
cartridge.
cartridge.
16
17
18
19
20
AR-C260/C260M EXTERNAL VIEW AND INTERNAL STRUCTURE 6 - 3
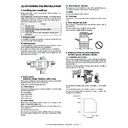
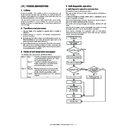
C. Operation panel
*1: For the AR-C250S, [IMAGE SEND] key.
No.
Parts
Model
Note
Name
Function
1
Touch panel
Displays messages and keys. The display key can be directly
touched to be operated. Provides selection of PRINTER/COPY/
NETWORK SCANNER/FAX mode.
touched to be operated. Provides selection of PRINTER/COPY/
NETWORK SCANNER/FAX mode.
2
Mode select key/ Display lamp
Switches the display mode of the touch panel.
[PRINTER] key
READY lamp
DATA lamp
READY lamp
DATA lamp
[PRINTER] key: Set to the printer mode.
• READY lamp: ON when reception of print data is allowed.
• READY lamp: ON when reception of print data is allowed.
• DATA lamp: On or flashing during printing or receiving print
data.
[FAX/IMAGE SEND] key *1
Communication lamp
Data lamp
Communication lamp
Data lamp
Switches the network scanner (when expanded)/
FAX mode (AR-C250F only).
FAX mode (AR-C250F only).
[COPY] key
Switches to the copy mode.
3
[JOB STATUS] key
Displays the current job status.
4
[USER SETUP] key
Used to adjust contrast of the touch panel and set the key operator
program.
program.
5
10-key pad
Used to input figures for various setups.
6
[
] key ([DEPT COUNT END] key)
Used in the copy function and the FAX function.
7
[#/P] key ([PROGRAM] key)
Used when dialing in the copy function and the FAX function.
8
[C] key (Clear key)
Used in the copy function and the FAX function.
9
B/W [START] key
Used during outputting B/W copy in the copy function, during
scanning B/W images in the network scanner function, and during
scanning a send document in the FAX function.
scanning B/W images in the network scanner function, and during
scanning a send document in the FAX function.
10
[CA] key ([ALL CANCEL] key)
Used in the copy function and the FAX function.
11
Color [START] key
Used during outputting a full-color or single-color copy in the copy
function and during scanning color images in the network scanner
function.
function and during scanning color images in the network scanner
function.
2
9
6
10
11
7
1
3
8
4
5
For the model which is
not provided with the FAX
function, this indication is
"IMAGE SEND."
not provided with the FAX
function, this indication is
"IMAGE SEND."
PRINTER
PRINTER
READY
DATA
DATA
DATA
LINE
READY
DATA
DATA
DATA
LINE
IMAGE SEND
FAX/IMAGE SEND
COPY
COPY
JOB STATUS
USER SETUP
DEPT COUNT END
PROGRAM
CLEAR
CLEAR ALL
Color
START
B/W
AR-C260/C260M EXTERNAL VIEW AND INTERNAL STRUCTURE 6 - 4
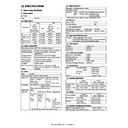
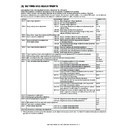
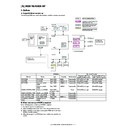
D. Job status display
The job status display is shown by pressing the [JOB STATUS] key on the operation panel.
The list of jobs which are reserved, being executed, or completed is displayed to allow checking the job contents or to delete (terminate) jobs.
∗
The above example shows the job list of reservation and execution.
No.
Display of inside of touch panel
Model
Note
Name
Function
1
Job list
Displays the list of reservation and execution. Tough the key (3),
(4) or (5) to select the mode and display the job list.
The icon in front of each job name indicates the job mode.
(4) or (5) to select the mode and display the job list.
The icon in front of each job name indicates the job mode.
Copy mode
Printer mode
Network scanner mode
FAX mode (Send job)
FAX mode (Receive job)
When the job list of reservation and execution is displayed, each
job on the list serves as a key. To terminate the output, touch the
job key to select the job and press [HALT/DELETE] key (6)
([PRIORITY] key (7)).
job on the list serves as a key. To terminate the output, touch the
job key to select the job and press [HALT/DELETE] key (6)
([PRIORITY] key (7)).
∗
Paper empty of status
display
display
If the status display is in paper
empty, the specified size
paper is exhausted. (Need to
be supplied.) To print on
another size paper already
set, touch and select the job
and touch the detail key (8) to
change the size.
empty, the specified size
paper is exhausted. (Need to
be supplied.) To print on
another size paper already
set, touch and select the job
and touch the detail key (8) to
change the size.
2
Mode select key
This key is displayed only in the job status display in the FAX
mode, and is used to switch the job list display to the
[RESERVATION/EXECUTION] job or the [COMPLETED] job.
[RESERVATION/EXECUTION] job: Displays the list of reserved
or executing jobs.
[COMPLETED] job: Displays the list of completed jobs.
mode, and is used to switch the job list display to the
[RESERVATION/EXECUTION] job or the [COMPLETED] job.
[RESERVATION/EXECUTION] job: Displays the list of reserved
or executing jobs.
[COMPLETED] job: Displays the list of completed jobs.
3
[PRINT] key
Displays the list of the output jobs in all the modes (printer, copy,
and FAX).
and FAX).
4
[SCANNER] key
Displays only the jobs of the network scanner function.
∗
When the network scanner function is optionally expanded.
5
Display select key
Switches the page of displayed job list.
6
[HALT/DELETE] key
Halts or deletes a job which is being executed or a reserved job.
∗
Halt/delete during execution cannot be made.
7
[PRIORITY] key
This key is valid only in the job status display in the FAX mode.
Touch and select the reserved FAX job to set the highest priority
on the job.
Touch and select the reserved FAX job to set the highest priority
on the job.
8
[DETAIL] key
This key is displayed only on the job status display in the print
mode.
It is valid only for a print job from PC.
The details of the selected job are displayed. Also used to
change the specified output paper.
mode.
It is valid only for a print job from PC.
The details of the selected job are displayed. Also used to
change the specified output paper.
1
3
4
5
6
8
7
2

