Sharp AL-1555 (serv.man26) User Manual / Operation Manual ▷ View online
7
57
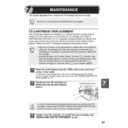
This chapter describes how to replace the TD cartridge and drum cartridge.
TD CARTRIDGE REPLACEMENT
The TD cartridge replacement required (
) indicator will light up when toner is
needed. For more information on purchasing the TD cartridge, see "ABOUT
SUPPLIES AND OPTIONS" (p.70). If copying is continued while the indicator is lit,
copies will gradually become lighter until the unit stops and the indicator begins
blinking. Replace the old TD cartridge by following the procedure below.
SUPPLIES AND OPTIONS" (p.70). If copying is continued while the indicator is lit,
copies will gradually become lighter until the unit stops and the indicator begins
blinking. Replace the old TD cartridge by following the procedure below.
1
Open the multi-bypass tray (AL-1555), side cover, and front
cover, in that order.
cover, in that order.
To open the multi-bypass tray, see "The multi-bypass tray (AL-1555)"
(p.17). To open the side cover and front cover, see "INSTALLING THE TD
CARTRIDGE" (p.10).
(p.17). To open the side cover and front cover, see "INSTALLING THE TD
CARTRIDGE" (p.10).
2
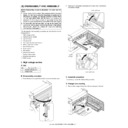
Gently pull the TD cartridge out
while pressing the lock release
button.
while pressing the lock release
button.
3
Install a new TD cartridge. To install the new cartridge, see
"INSTALLING THE TD CARTRIDGE" (p.10).
"INSTALLING THE TD CARTRIDGE" (p.10).
Be sure to use only genuine SHARP parts and supplies.
• After the unit stops, it may be possible to make a few more copies by
taking the TD cartridge out of the unit, shaking it horizontally, then
reinstalling it. If copying is not possible after this operation, replace the
TD cartridge.
reinstalling it. If copying is not possible after this operation, replace the
TD cartridge.
• During long copy run of a dark original, the start (
) indicator may
blink, the indicator light up, and the unit stop, even though toner is left.
The unit will feed toner up to 2 minutes and then the start (
The unit will feed toner up to 2 minutes and then the start (
)
indicator will light up. Press the start (
) key to restart copying.
In order to help preserve the global environment, we recycle used TD
cartridges. Please read "COPIER TONER CARTRIDGE RECYCLING",
which is enclosed in the new toner cartridge package.
cartridges. Please read "COPIER TONER CARTRIDGE RECYCLING",
which is enclosed in the new toner cartridge package.
Lock release button
7
MAINTENANCE
58
4
Close the front cover and then the side cover by pressing the
round projections near the side cover open button. The
indicator will go out and the start (
round projections near the side cover open button. The
indicator will go out and the start (
) indicator will light up.
DRUM CARTRIDGE REPLACEMENT
The useful life of the drum cartridge is approximately 18,000 copies. When the internal
counter reaches approximately 17,000 copies, the drum replacement required (
counter reaches approximately 17,000 copies, the drum replacement required (
)
indicator will light up indicating that replacement of the drum cartridge will be needed
soon. For more information on purchasing the drum cartridge, see "ABOUT SUPPLIES
AND OPTIONS" (p.70). When the indicator begins to blink, the unit will stop operating
until the cartridge is replaced. Replace the drum cartridge at this time.
soon. For more information on purchasing the drum cartridge, see "ABOUT SUPPLIES
AND OPTIONS" (p.70). When the indicator begins to blink, the unit will stop operating
until the cartridge is replaced. Replace the drum cartridge at this time.
1
Remove the TD cartridge (see "TD CARTRIDGE REPLACEMENT" (p.57)).
2
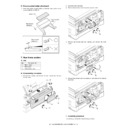
Hold the drum cartridge handle and
gently pull the cartridge out. Dispose
of the old drum cartridge in
accordance with local regulations.
gently pull the cartridge out. Dispose
of the old drum cartridge in
accordance with local regulations.
3
Remove the new drum cartridge from the protective bag and
remove the protective cover from the cartridge. Then gently
install the new drum cartridge.
remove the protective cover from the cartridge. Then gently
install the new drum cartridge.
When closing the covers, be sure to close the front cover securely and
then close the side cover. If the covers are closed in the wrong order,
the covers may be damaged.
then close the side cover. If the covers are closed in the wrong order,
the covers may be damaged.
Do not remove the protective cover on the drum portion (black paper) of
a new drum cartridge before use. The cover protects the drum against
external light.
a new drum cartridge before use. The cover protects the drum against
external light.
• Do not touch the surface of the drum (green portion) of the
cartridge. Doing so may cause smudges on the copies.
• Dispose of the old TD cartridge in accordance with local
regulations.
Drum cartridge handle
59
7
4
Gently install the TD cartridge. To install the TD cartridge, see
"INSTALLING THE TD CARTRIDGE" (p.10).
"INSTALLING THE TD CARTRIDGE" (p.10).
5
Close the front cover and then the side cover by pressing the
round projections near the side cover open button. The drum
replacement required (
round projections near the side cover open button. The drum
replacement required (
) indicator will go out and the start
(
) indicator will light up.
CLEANING THE UNIT
Proper care is essential in order to get clean, sharp copies. Be sure to take a few
minutes to regularly clean the unit.
minutes to regularly clean the unit.
Cabinet
Wipe the cabinet with a soft, clean cloth.
Original table and the back side of the original cover/SPF/
RSPF
RSPF
Stains on the glass, scanning window (AL-1255/AL-1456/AL-1555), cover or SPF/
RSPF roller will also be copied. Wipe the glass, scanning window, cover and SPF/
RSPF roller with a soft, clean cloth. If necessary, dampen the cloth with a glass
cleaner.
RSPF roller will also be copied. Wipe the glass, scanning window, cover and SPF/
RSPF roller with a soft, clean cloth. If necessary, dampen the cloth with a glass
cleaner.
When closing the covers, be sure to close the front cover securely and
then close the side cover. If the covers are closed in the wrong order,
the covers may be damaged.
then close the side cover. If the covers are closed in the wrong order,
the covers may be damaged.
• Before cleaning, be sure to turn the power switch off and remove the
power cord from the outlet.
• Do not use thinner, benzene or other volatile cleaning agents. Doing
so may cause deformation, discoloration, deterioration or malfunction.
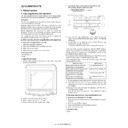
Original table/scanning window
Original cover/SPF/RSPF
SPF/RSPF roller
Scanning window
60
Transfer charger
If copies start becoming streaky or blotchy, the transfer charger may be dirty. Clean
the charger using the following procedure.
the charger using the following procedure.
1
Turn the power switch off. (p.12)
2
Ensure that the multi-bypass tray is open (AL-1555) and then
open the side cover while pressing the side cover open button.
open the side cover while pressing the side cover open button.
3
Take the charger cleaner out by holding the tab. Set the charger
cleaner onto the right end of the transfer charger, gently slide
the cleaner to the left end, and then remove it. Repeat this
operation two or three times.
cleaner onto the right end of the transfer charger, gently slide
the cleaner to the left end, and then remove it. Repeat this
operation two or three times.
4
Return the charger cleaner
to its original position.
Close the side cover by
pressing the round
projections near the side
cover open button.
to its original position.
Close the side cover by
pressing the round
projections near the side
cover open button.
5
Turn the power switch on. (p.12)
Slide the charger cleaner from the right end to the left end along
the groove of the transfer charger. If the cleaner is stopped on
the way, smudges on copies may occur.
the groove of the transfer charger. If the cleaner is stopped on
the way, smudges on copies may occur.
Display

