Sharp AL-1045 (serv.man6) Service Manual ▷ View online
AL-1555 UNPACKING AND INSTALLATION 5 - 3
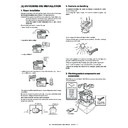
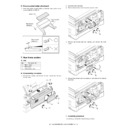
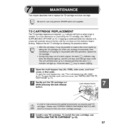
5) Hold the tab of the protective cover and pull the tab to remove the
cover.
6) Gently insert the TD cartridge until it locks in place.
7) Close the front cover and then the side cover by pressing the
round projections near the side cover open button. The
indica-
tor will go out and the ready (
) indicator will light up.
Note: When closing the covers, be sure to close the front cover
securely and then close the side cover. If the covers are closed
in the wrong order, the covers may be damaged.
7. Loading copy paper
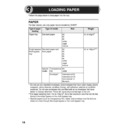
Note: This copier is equipped with two paper trays. Load copy paper
into the two paper trays.
1) Raise the handle of the paper tray and pull the paper tray out until
it stops.
2) Remove the pressure plate lock. Rotate the pressure plate lock in
the direction of the arrow to remove it while pressing down the
pressure plate of the paper tray.
pressure plate of the paper tray.
3) Store the pressure plate lock that was removed in step 2 and the
screw that was removed when unpacking the machine in the front
of the paper tray. To store the pressure plate lock, rotate the lock
to fix it on the relevant location.
of the paper tray. To store the pressure plate lock, rotate the lock
to fix it on the relevant location.
4) Adjust the paper guides on the paper tray to the copy paper width
and length.
Squeeze the lever of paper guide (A) and slide the guide to match
with the width of the paper.
Move paper guide (B) to the appropriate slot as marked on the
tray.
Squeeze the lever of paper guide (A) and slide the guide to match
with the width of the paper.
Move paper guide (B) to the appropriate slot as marked on the
tray.
5) Fan the copy paper and insert it into the tray. Make sure the edges
go under the corner hooks.
Note: Do not load paper above the maximum height line (
).
Exceeding the line will cause a paper misfeed.
6) Gently push the paper tray back into the copier.
Note: After loading copy paper, to cancel the blinking "H" without
restarting copying, press the clear (
) key. The "P" in the
display will go out and the ready (
) indicator will light up.
8. Power to copier
1) Ensure that the power switch of the copier is in the OFF position.
Insert the attached power cord into the power cord socket at the
rear of the copier.
rear of the copier.
2) Plug the other end of the power cord into the nearest outlet.
9. Software for the SHARP personal MFP
series
The supplied CD-ROM includes software for this unit.
MFP driver
Scanner driver
Permits you to operate scanning function of this unit with TWAIN-com-
pliant and WIA-compliant application.
pliant and WIA-compliant application.
Printer driver
Enables you to use the printer function of this unit with your computer.
Print Status Window
The print state and information on current printing are displayed on the
status monitor window.
status monitor window.
Sharpdesk
An integrated software environment that makes it easy to manage doc-
ument and image files and launch applications.
ument and image files and launch applications.
Button Manager
Button Manager enabling the SCANNER key located on the unit.
Paper
guide (B)
guide (B)
Paper
guide (A)
guide (A)
AL-1555 UNPACKING AND INSTALLATION 5 - 4
(Hardware and software requirements)
Check the following hardware and software requirements in order to
install the software.
install the software.
*1: Compatible with Windows 98, Windows Me, Windows 2000 Profes-
sional, Windows XP Professional or Windows XP Home Edition
preinstalled model with USB interface equipped as standard.
preinstalled model with USB interface equipped as standard.
*2: Printing is unavailable in MS-DOS mode.
*3: The administrator's authorization is required to install this software
using this installer.
(Before installation)
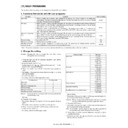
The following table shows the drivers and software that can be
installed for each version of Windows and interface connection
method.
installed for each version of Windows and interface connection
method.
*1: When the unit is connected through the parallel port, the Print Sta-
tus Window can only be used when the parallel port is set to ECP
mode. To set the parallel port mode, refer to your computer manual
or ask the manufacturer of your computer.
mode. To set the parallel port mode, refer to your computer manual
or ask the manufacturer of your computer.
*2: Sharpdesk can be installed when using a parallel interface connec-
tion, however, the unit's scanner function cannot be used.
• If you are using some of your computer's memory as a RAM drive,
the printer driver may not be allocated the correct amount of mem-
ory. In such a case, reduce the size of your RAM disk, or do not use
the RAM disk. Please refer to your Windows documentation for fur-
ther information.
ory. In such a case, reduce the size of your RAM disk, or do not use
the RAM disk. Please refer to your Windows documentation for fur-
ther information.
• Is there another GDI printer driver or a Windows Printing System
printer driver already installed? If installed, change the printer port
setting. For the change of the printer port setting, see "USING
OTHER INSTALLED DRIVERS".
setting. For the change of the printer port setting, see "USING
OTHER INSTALLED DRIVERS".
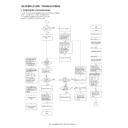
(Flow of installation)
Refer to the following table and then begin installation
(Installing the software)
The following term is used in this section.
MFP
Means the unit as a printer and scanner.
• For this description, it is assumed that the mouse is configured for
right hand operation.
• To print or scan, the MFP must be in the online state.
• The scanner feature only works when using a USB interface cable.
• If any error message appears, solve the problem following the
instructions on the screen. After your problem is solved, the installing
procedure will be continued. Depending on your problem, you may
have to exit the installer. In this case, click the "Cancel" button to exit
the installer. After solving your problem, reinstall the software from
the beginning.
procedure will be continued. Depending on your problem, you may
have to exit the installer. In this case, click the "Cancel" button to exit
the installer. After solving your problem, reinstall the software from
the beginning.
A. Windows XP (USB/parallel interface)
Before starting the installation, make sure the USB or parallel interface
cable is not connected to the MFP.
cable is not connected to the MFP.
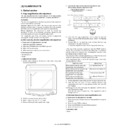
1) Insert the supplied CD-ROM into your CD-ROM drive.
2) Click the "start" button, click "My Computer", and then double-click
the CD-ROM icon.
• When any of "Found New Hardware Wizard" messages appear
during the software installation, be sure to click the "Cancel" but-
ton.
ton.
3) Double-click the "Setup" icon.
If the language selection screen appears after you double click the
"Setup" icon, select the language you wish to use and click the
"Next" button. (Normally, the correct language is selected automati-
cally.)
"Setup" icon, select the language you wish to use and click the
"Next" button. (Normally, the correct language is selected automati-
cally.)
4) Select the software packages to be installed, and then click the
"Next" button.
The software packages with checkmark on the list on the screen
will be installed.
will be installed.
Click the "Display README" button to show the information on the
selected package.
selected package.
Computer type
IBM PC/AT or compatible computer equipped with
a USB1.1
a USB1.1
*1
or bi-directional parallel interface
(IEEE 1284)
Operating
system
system
*2
Windows 95, Windows 98, Windows Me, Windows
NT Workstation 4.0 (ServicePack 5 or later)
NT Workstation 4.0 (ServicePack 5 or later)
*3
,
Windows 2000 Professional, Windows XP
Professional
Professional
*3
, Windows XP Home Edition
*3
Display
800 x 600dots (SVGA) display with 256 colors (or
better)
better)
Hard disk free
space
space
150MB or more
Other
requirement for
hardware
requirement for
hardware
An environment on which any of the operating
systems listed above can fully operate
systems listed above can fully operate
MFP Driver
Button
Manager
Sharpdesk
Printer
driver/
Print Status
Window
Scanner
driver
Users of Windows
98/Me/2000/XP
who will use the
USB interface
connection
98/Me/2000/XP
who will use the
USB interface
connection
Available
*1
Available Available
Available
Users of Windows
98/Me/2000/XP
who will use the
parallel interface
connection
98/Me/2000/XP
who will use the
parallel interface
connection
Not
Available
Not
Available
Available
*2
Windows 95/NT 4.0
users
users
Operating
system
Interface
Reference pages for how to install
Windows XP
USB/
Parallel
Installing onto Windows XP (USB/parallel
interface)
interface)
Windows 98
USB
Installing onto Windows 98/Me/2000 (USB
interface)
interface)
Parallel
Installing onto Windows 95/98/Me/NT4.0/
2000 (Parallel interface)
2000 (Parallel interface)
Windows Me
USB
Installing onto Windows 98/Me/2000 (USB
interface)
interface)
Parallel
Installing onto Windows 95/98/Me/NT4.0/
2000 (Parallel interface)
2000 (Parallel interface)
Windows
2000
USB
Installing onto Windows 98/Me/2000 (USB
interface)
interface)
Parallel
Installing onto Windows 95/98/Me/NT4.0/
2000 (Parallel interface)
2000 (Parallel interface)
Windows 95/
NT 4.0
Parallel
Installing onto Windows 95/98/Me/NT4.0/
2000 (Parallel interface)
2000 (Parallel interface)
AL-1555 UNPACKING AND INSTALLATION 5 - 5
• If you are using the parallel interface connection, do not select
the Button Manager checkbox because this feature is not sup-
ported with the parallel interface.
ported with the parallel interface.
• If the following screen appears, click the "OK" button. Review the
contents in "BEFORE INSTALLATION", and then select only
appropriate the software packages to be installed.
appropriate the software packages to be installed.
5) Review the software packages to be installed on the screen, and
then click the "Start" button.
The software packages to be installed will be displayed on the
screen. If inappropriate packages are displayed, click the "Back"
button to select appropriate packages again.
screen. If inappropriate packages are displayed, click the "Back"
button to select appropriate packages again.
6) Copying files for MFP driver installation and parallel interface setup
(This step will start if it was selected in step 4).
1. After confirming the message in the "Welcome" window, click
the "Next" button.
2. A dialog box appears asking you to verify that the USB or paral-
lel interface cable is not connected to the MFP. Make sure that
the interface cable is not connected and click the "Next" button.
the interface cable is not connected and click the "Next" button.
3. Click the "Next" button in the dialog box to install the MFP driver
or Cancel to quit the installation.
The setup program will start to copy the files.
If the following screen appears while the files are being copied
(the message may appear more than once), click "Continue
Anyway".
If the following screen appears while the files are being copied
(the message may appear more than once), click "Continue
Anyway".
4. When the "The MFP driver installation is complete." dialog box
appears, click the "OK" button.
The Button Manager installer will start.
7) Begin installation of the Button Manager (This step will start if it was
selected in step 4).
1. After confirming the message in the "Welcome" window, click
the "Next" button.
2. Read the message in the "Please read the following informa-
tion." window, and then click the "Next" button.
3. When a message appears that lets you specify the location for
the software to be installed, click the "Next" button.
4. If the program displays, "Do you want the Button Manager
added to Windows Startup?", check "Yes" and click the "OK"
button.
button.
The setup program will start to copy the files.
5. Click the "Finish" button when the message informs you that
setup is successful.
The Sharpdesk installer will start.
8) Begin installation of the Sharpdesk (This step will start if it was
selected in step 4).
1. After confirming the message in the "Welcome to Sharpdesk
installation" window, click the "Next" button.
2. Read the message in the "Information" window, and then click
the "Next" button.
3. When the "Choose Destination Location" window appears, click
the "Next" button.
4. When the "Select Program Folder" window appears, click the
"Next" button.
The setup program will start to copy the files.
If the dialog box asking "If you have TIFF files saved using
Photo-Shop or Imaging for Windows you should hit Skip"
appears. Answer the question to continue the Sharpdesk instal-
lation.
If the dialog box asking "If you have TIFF files saved using
Photo-Shop or Imaging for Windows you should hit Skip"
appears. Answer the question to continue the Sharpdesk instal-
lation.
5. Click the "Finish" button when the message informs you that
Setup is complete.
9) Click the "Close" button when the message informs you that "Setup
has finished". When the "Now connect the MFP interface cable to
the PC" dialog box appears, click the "OK" button.
the PC" dialog box appears, click the "OK" button.
• After the installation, a message to restart your computer may be
displayed. In this case, click the "Yes" button to restart your com-
puter.
puter.
• For parallel interface connection ensure that your computer and
MFP are turned off before connecting the cable.
10) Connect the USB interface cable or parallel interface cable (see
page 5-8).
Windows will detect the MFP and the Plug and Play screen will
appear. If you are using Windows XP with the parallel interface, go
to step 12.
appear. If you are using Windows XP with the parallel interface, go
to step 12.
11) Begin installation of the scanner driver.
1. "SHARP AL-xxxx" (where xxxx is the model name of your
MFP) will appear in the "Found New Hardware Wizard" dialog
box. Select "Install the software automatically (Recom-
mended)" and click the "Next" button.
box. Select "Install the software automatically (Recom-
mended)" and click the "Next" button.
2. The "Install hardware" dialog box will appear. Click the "Con-
tinue Anyway" button.
3. When installation of the driver is completed, click the "Finish"
button to finish the scanner driver installation.
AL-1555 UNPACKING AND INSTALLATION 5 - 6
12) Begin installation of the printer driver.
1. "SHARP AL-xxxx" (where xxxx is the model name of your
MFP) will appear in the "Found New Hardware Wizard" dialog
box. Select "Install the software automatically (Recom-
mended)" and click the "Next" button.
box. Select "Install the software automatically (Recom-
mended)" and click the "Next" button.
2. The "Hardware Installation" dialog box will appear. Click the
"Continue Anyway" button.
3. When installation of the driver is completed, click the "Finish"
button to finish the printer driver installation.
You have completed the installation of all the software.
B. Windows 98/Me/2000 (USB interface)
Before starting the installation, make sure the USB interface cable is
not connected to the MFP.
not connected to the MFP.
1) Insert the supplied CD-ROM into your CD-ROM drive.
2) Double-click "My Computer", and then double-click the CD-ROM
icon.
• When any of "Hardware Found", or "Found New Hardware Wiz-
ard" messages appear during the software installation, be sure
to click the "Cancel" button.
to click the "Cancel" button.
3) Double-click the "Setup" icon.
• If the language selection screen appears after you double click
the "Setup" icon, select the language you wish to use and click
the "Next" button. (Normally, the correct language is selected
automatically.)
the "Next" button. (Normally, the correct language is selected
automatically.)
4) Select the software packages to be installed, and then click the
"Next" button.
The software packages with checkmark on the list on the screen
will be installed. Click the "Display README" button to show the
information on the selected package.
will be installed. Click the "Display README" button to show the
information on the selected package.
• If the following screen appears, click the "OK" button. Review the
contents in "BEFORE INSTALLATION", and then select the
appropriate driver software packages to be installed.
appropriate driver software packages to be installed.
5) Review the software packages to be installed on the screen, and
then click the "Start" button.
The software packages to be installed will be displayed on the
screen. If inappropriate packages are displayed, click the "Back"
button to select appropriate packages again.
screen. If inappropriate packages are displayed, click the "Back"
button to select appropriate packages again.
6) Copying files for MFP driver installation.
1. After confirming the message in the "Welcome" window, click
the "Next" button.
2. A dialog box appears asking you to verify that the interface
cable is not connected to the MFP. Make sure that the interface
cable is not connected and click the "Next" button.
cable is not connected and click the "Next" button.
3. Click the "Next" button in the dialog box showing the files to be
copied for installation of the MFP driver.
The setup program will start to copy the files.
In Windows 2000, if the following screen appears while the files
are being copied (the message may appear more than once),
click "Yes" in Windows 2000.
are being copied (the message may appear more than once),
click "Yes" in Windows 2000.
4. The following screen appears when all of the files for the USB
interface connection have been copied. If you are not using a
parallel interface cable for connection to the MFP, please click
the "No" button.
parallel interface cable for connection to the MFP, please click
the "No" button.
5. When the "The MFP driver installation is complete." dialog box
appears, click the "OK" button.
The Button Manager installer will start.
7) Begin installation of the Button Manager (This step will start if it was
selected in step 4).
1. After confirming the message in the "Welcome" window, click
the "Next" button.
2. Read the message in the "Please read the following informa-
tion." window, and then click the "Next" button.
3. When a message appears that lets you specify the location for
the software to be installed, click the "Next" button.
4. If the program displays, "Do you want to add Button Manager to
Startup program?", check "Yes" and click the "OK" button.
The setup program will start to copy the files.
5. Click the "Finish" button when the message to inform you of the
completion of the installation appears.
The Sharpdesk installer will start.
8) Begin installation of the Sharpdesk (This step will start if it was
selected in step 4).
1. After confirming the message in the "Welcome to Sharpdesk
installation" window, click the "Next" button.
2. Read the message in the "Information" window, and then click
the "Next" button.
3. When the "Choose Destination Location" window appears, click
the "Next" button.
4. When the "Select Program Folder" window appears, click the
"Next" button.
The setup program will start to copy the files.
If the dialog box asking "If you have TIFF files saved using
Photo-Shop or Imaging for Windows you should hit Skip"
appears. Answer the question to continue the Sharpdesk instal-
lation.
Photo-Shop or Imaging for Windows you should hit Skip"
appears. Answer the question to continue the Sharpdesk instal-
lation.
5. Click the "Finish" button when the message to inform you of the
completion of the installation appears.
9) Click the "Close" button when the message to inform you of the
completion of the installation appears. When the "Now connect the
MFP interface cable to the PC. This will finalize the drivers installa-
tion and settings." dialog box appears, click the "OK" button.
MFP interface cable to the PC. This will finalize the drivers installa-
tion and settings." dialog box appears, click the "OK" button.

