Sharp LL-T1815 (serv.man4) Service Manual ▷ View online
PC-UM10M
LL-T1815-H/B CONNECTION, ADJUSTMENT, OPERATION, AND FUNCTIONS
2 – 1
CHAPTER 2. CONNECTION, ADJUSTMENT, OPERATION, AND FUNCTIONS
1. CONNECTING THE MONITOR AND TURNING THE MONITOR ON AND OFF
Caution: • When connecting, ensure that both the monitor and com-
puter are switched off.
• Be careful not to overly bend the cable or add extension
cords as this could lead to malfunction.
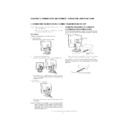
Cable storage
If necessary, excess cable can be housed in the stand.
1.
Remove the cover.
Gently pull the top of the cover towards yourself.
Gently pull the top of the cover towards yourself.
2.
Run cable along the back of the stand.
Pass cable in front of the stand, and then bring it through the back.
• If the display is to be rotated, first house the cables with the dis-
play in the long height position, so there is sufficient length when
the display is turned.
3.
Refit the cover.
Be careful not to pinch the cable.
• If the cover is hard to refit, do not force it. Check whether cables
are trapped.
Caution: If the display is to be rotated, first house the cable, and then
check while gently turning the display. If it cannot be turned,
rehouse the cable with sufficient slack. (If there is insufficient
cable length, rotation will be impossible. Forcing rotation may
cable length, rotation will be impossible. Forcing rotation may
cause cable disconnection.)
CONNECTING THE MONITOR TO A COMPUTER
Connecting using accessory analog signal cable
Connect the accessory analog signal cable to the analog RGB input ter-
minal of the display, and the analog RGB output terminal of the com-
puter.
• Paying attention to connector direction, firmly insert the signal
cable to terminal, and then tighten the screws at both sides.
If connecting to a D-sub 15 pin 2 row Apple Power Macintosh, attach a
Macintosh conversion adapter (commercially available) to the analog
signal cable.
signal cable.
Analog RGB input
terminal
terminal
Analog signal cable
Analog RGB output
terminal
terminal
Macintosh conversion adapter
PC-UM10M
LL-T1815-H/B CONNECTION, ADJUSTMENT, OPERATION, AND FUNCTIONS
2 – 2
When connecting using separately sold digital or analog
signal cables
signal cables
The separately sold display cable enables connection between the DVI-
I input terminal on the display and the digital or analog RGB output ter-
minal of the computer.
When connecting to a digital RGB output terminal:
• Use a digital signal cable (model name: NLC01E)
• For digital RGB connection, the monitor has an input for connecting
to a computer with a DVI-compatible output connector (DVI-D 24 pin
or DVI-I 29 pin) and SXGA output capability. (Depending on the type
or DVI-I 29 pin) and SXGA output capability. (Depending on the type
of computer to be connected, the display may not work correctly.)
When connecting to an analog RGB output terminal:
• Use an analog signal cable (model name: NLC02E).
• Paying attention to connector direction, firmly insert the signal
cable to terminal, and then tighten the screws at both sides.
Note: When using digital or analog signal cables, set [INPUT-2] to
[1 LINE].
Set the monitor as follows when establishing a digital connection with a
Power Mac using an ADC-DVI adapter made by Belkin. (Operation has
been checked with the Power Mac G4 M7627J/A)
• Perform settings with the Power Mac power supply off.
1.
After connecting the power cord, turn on the monitor’s main power.
2.
Press the
e
button and
d
button simultaneously, and while doing
this press the POWER button (i.e. turn the power on).
3.
Set the input terminal to which the Belkin ADC-DVI adapter is con-
nected to ON.
Use the SELECT button to select [INPUT1] or [INPUT2], and use
the
the
e d
buttons to select [ON] and [OFF].
• Do not set to [ON] if you are not using a Belkin ADC-DVI adapter,
as this may result in incorrect display.
4.
Press the power button, and turn off the monitor power.
This completes setting.
When connecting using a separately sold 2-input cable
The separately sold 2-input cable (model name:NLC03J) enables 2 sys-
tem connection.
tem connection.
1. Connect a 2-input cable (purchased separately) to the DVI-I input
Cterminal on the display.
2. Connect the analog and digital signal cables (purchased separately)
to the 2-input cable, then connect to a computer.
• Paying attention to connector orientation, firmly insert the signal cable
into the PC, and then tighten the screws at both sides.
Notes:
• When using a 2-input cable, set [INPUT-2] to [2LINES].
• The monitor connected to the mini D-sub connector of the 2-input
cable may not be automatically recognized and setup under Plug &
Play. Perform storage of setup information manually.
Play. Perform storage of setup information manually.
Display cable
(purchased separately)
(purchased separately)
RGB output terminal
DVI-I input terminal
M A C D I G I T A L
INPUT-2
OFF
ON
DVI-I input terminal
mini D-sub 15 pin
2-input cable
(purchased
separately)
(purchased
separately)
DVI-D24 pin
Analog signal cable
Digital signal cable
(NL-C01E, purchased separately)
(NL-C01E, purchased separately)
Analog RGB output terminal
Digital RGB output terminal
PC-UM10M
LL-T1815-H/B CONNECTION, ADJUSTMENT, OPERATION, AND FUNCTIONS
2 – 3
Connect the accessory audio cable
When the accessory audio cable is connected to the audio output termi-
nal of the computer, the sound of the connected computer is output
from the display speakers. You can also use the headphone jack of the
from the display speakers. You can also use the headphone jack of the
display.
CONNECTION OF HEADPHONES
(COMMERCIALLY AVAILABLE)
(COMMERCIALLY AVAILABLE)
Headphones (commercially available) can be connected.
Notes:
• When the headphones are connected, no sound can be heard from
the monitor speakers.
CONNECTING THE MONITOR TO A POWER SOURCE
TURNING THE POWER ON
1. Turn on the main power of the monitor.
• When switching the main power switch on and off, always wait
for an interval of at least 5 seconds. Rapid switching may result
in malfunction.
2. Press the monitor’s POWER button.
The power LED will light up orange.
3. Turn on the computer.
When a signal is input from the computer, the power LED lights up
green, and the screen is displayed (After power is turned on, it may
green, and the screen is displayed (After power is turned on, it may
take a little time until the screen is displayed.)
• If the input terminal to which the computer is connected has not
been selected, the screen will not be displayed. If necessary,
perform input terminal switching. (right column)
perform input terminal switching. (right column)
Notes: (when using an analog signal)
• If using the monitor for the first time or after having changed the sys-
tem settings during use, perform an automatic screen adjustment.
• When connecting to a notebook, if the notebook computer’s screen is
set so that it is displaying at the same time, the MS-DOS screen may
not be able to display properly. In this case, change the settings so
not be able to display properly. In this case, change the settings so
that only the monitor is displaying.
Audio input terminal
Audio cable
To audio output
terminal
terminal
Headphone terminal
Headphones
Power terminal
AC outlet
Power cord
Main power switch
ON
Press power button
Turn on the computer
power supply.
PC-UM10M
LL-T1815-H/B CONNECTION, ADJUSTMENT, OPERATION, AND FUNCTIONS
2 – 4
CHANGING BETWEEN INPUT TERMINALS
Use the INPUT button to switch between signal input terminals.
The input signal type (ANALOG/DIGITAL) is displayed within angle
brackets < >.
brackets < >.
When using a 2-input cable
Note:
• When there is no input signal, [NO SIGNAL] is displayed.
TURNING THE POWER OFF
1.
Turn the computer off.
2.
Press the monitor’s POWER button.
The Power LED will disappear.
If the monitor will not be used for a long time, turn off the main power
switch of the monitor, and remove the power plug from the outlet.
2. INSTRUCTIONS FOR ATTACHING A VESA
COMPLIANT ARM
An arm or stand based on the VESA standard (commercially available)
can be attached to the monitor.
Procurement of the arm or stand is at the customer’s discretion.
Procurement of the arm or stand is at the customer’s discretion.
Arms or stands able to be used
Attachments must satisfy the following.
• Compatible with the VESA standard
• Have a gap of 100 mm x 100 mm between the screw holes on the
section to be attached
• Not be likely to fall off or break off after being attached to the monitor.
How to attach the arm or stand
• Be careful not to overly bend the cable or add extension cords as this
could lead to malfunction.
• While following these instructions, please also refer to the installation
instructions in the operation manual included with the arm or stand.
1. Remove the cable.
2. Spread out a soft cloth on a suitable horizontal surface.
3. Being careful not to damage the monitor, gently lay the monitor on it
display-side down.
Caution: Securely grasp both the display and stand, and gently tip over.
When the monitor is inclined, the stand may suddenly pop out
and cause injury.
and cause injury.
4. Remove the four screws and then remove the stand from the moni-
tor.
Notes: • The stand is specially made for use with this monitor. Once
having removed the stand, never attempt to attach it to
another device.
another device.
• Once having removed the screws, store them together with
the stand and if the stand is ever re-attached be sure to use
the original screws. Using different screws could lead to a
malfunction.
malfunction.
Caution: Do not disassemble the stand. Parts may spring out and cause
injury.
INPUT-1
< >
INPUT-2
< >
INPUT
Select [INPUT-1]
Select [INPUT-2]
INPUT 2-A
<ANALOG>
INPUT 2-D
<DIGITAL>
<DIGITAL>
INPUT-1
Select [INPUT-1]
Select [INPUT-2]
(analog)
Select [INPUT-2]
(degital)
INPUT
INPUT
INPUT
Turn the computer off
OFF
Press power button
Display

