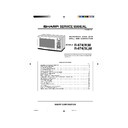
Sharp R-874 (serv.man5) Service Manual ▷ View online
R-874M - 3
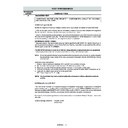
REMEMBER TO CHECK 3D
1) Disconnect the supply.
2) Door opened, and wedged open.
3) Discharge high voltage capacitor.
2) Door opened, and wedged open.
3) Discharge high voltage capacitor.
WARNING: AGAINST THE CHARGE OF THE HIGH-
VOLTAGE CAPACITOR
The high-voltage capacitor remains charged about 60 sec-
onds after the oven has been switched off. Wait for 60
seconds and then short-circuit the connection of the high-
voltage capacitor (that is, of the connecting lead of the high-
voltage rectifier) against the chassis with the use of an
insulated screwdriver.
onds after the oven has been switched off. Wait for 60
seconds and then short-circuit the connection of the high-
voltage capacitor (that is, of the connecting lead of the high-
voltage rectifier) against the chassis with the use of an
insulated screwdriver.
Sharp recommend that wherever possible fault-finding is
carried out with the supply disconnected. It may in, some
cases, be necessary to connect the supply after the outer
case has been removed, in this event carry out 3D checks and
then disconnect the leads to the primary of the High voltage
transformer. Ensure that these leads remain isolated from
other components and the oven chassis. (Use insulation tape
if necessary.) When the testing is completed carry out 3D
checks and reconnect the leads to the primary of the High
voltage transformer.
SERVICING
WARNING TO SERVICE PERSONNEL
Microwave ovens contain circuitry capable of producing very high voltage and current, contact with following parts will
result in electrocution.
High voltage capacitor, High voltage transformer, Magnetron, High voltage rectifier assembly, High voltage harness.
result in electrocution.
High voltage capacitor, High voltage transformer, Magnetron, High voltage rectifier assembly, High voltage harness.
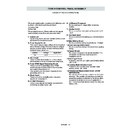
REMEMBER TO CHECK 4R
1) Reconnect all leads removed from components during
testing.
2) Replace the outer case (cabinet).
3) Reconnect the supply.
4) Run the oven. Check all functions.
testing.
2) Replace the outer case (cabinet).
3) Reconnect the supply.
4) Run the oven. Check all functions.
Microwave ovens should not be run empty. To test for the
presence of microwave energy within a cavity, place a cup of
cold water on the oven turntable, close the door and set the
power to HIGH and set the microwave timer for two (2) minutes.
When the two minutes has elapsed (timer at zero) carefully
check that the water is now hot. If the water remains cold carry
out 3D checks and re-examine the connections to the compo-
nent being tested.
When all service work is completed, and the oven is fully
assembled, the microwave power output should be checked and
a microwave leakage test should be carried out.
assembled, the microwave power output should be checked and
a microwave leakage test should be carried out.
GENERAL INFORMATION
WARNING
THIS APPLIANCE MUST BE EARTHED
IMPORTANT
THE WIRES IN THIS MAINS LEAD ARE COLOURED IN ACCORDANCE WITH THE FOLLOWING CODE:
GREEN-AND-YELLOW
: EARTH
BLUE
: NEUTRAL
BROWN
: LIVE
R-874 S/MANUAL
11/7/01, 10:59 am
3
R-874M - 4
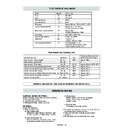
ITEM
DESCRIPTION
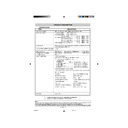
Power Requirements
230 - 240 Volts / 50 Hertz / Single phase, 3 wire earthed
Power Consumption
Microwave cooking
1 .45kW Approx. 6.5 A
Convection cooking
1.53 kW Approx. 6.4 A
Top Grill mode ...................... 1.05 kW
Approx. 4.2 A
Grill cooking
Bottom Grill mode ................. 0.55 kW
Approx. 2.3 A
Top and Bottom mode ......... 1.55 kW
Approx. 6.3 A
Micro and Top Grill ................. 2.4 kW
Approx. 10.4 A
Micro and Bottom Grill .......... 1.95 kW
Approx. 8.5 A
Dual cooking Micro and Convection
2.4 kW
Approx. 10.4A
Power Output
900 W nominal of RF microwave energy (measured by method of IEC 60705)
Operating frequency 2450 MHz
Operating frequency 2450 MHz
Top Grill Grill heating element Power Output
1.0 kW
Bottom heating element Power Output
0.5 kW
Case Dimensions
Width 520 mm
Height 309 mm (including foot)
Depth 488 mm
Cooking Cavity Dimensions
Width 349 mm
Height 207 mm
Depth 357 mm
Turntable diameter
325 mm
Control Complement
Touch Control System
Clock (1:00 - 12:59) / Timer (0 - 99 minutes 90 sec.)
Microwave Power for Variable Cooking
Repetition Rate;
100 (HIGH) ....................... Full power throughout the cooking time
70 (MEDIUM HIGH) ......................... approx. 70% of FULL Power
50 (MEDIUM) ................................... approx. 50% of FULL Power
30 (MEDIUM LOW) .......................... approx. 30% of FULL Power
10 (LOW) ......................................... approx. 10% of FULL Power
Convection temperature control range:
250˚C, 230˚C, 220˚C, 200˚C, 180˚C, 160˚C, 130˚C, 100˚C, 70˚C and 40˚C
DISPLAY indicators
TIME keys DUAL COVECTION/GRILL key
INSTANT COOK keys LESS/MORE keys
EXPRESS COOK keys WEIGHT keys
EXPRESS DEFROST keys KITCHEN TIMER/CLOCK SET key
MEAL IN ONE keys INFO key
GRILL key WEIGHT CONVERSION key
MICROWAVE POWER LEVEL key STOP/CLEAR key
CONVECTION
0
Ckey START/AUTO MINUTE key
Net Weight
Approx. 20 kg
As part of our policy of continuous improvement, we reserve the
right to alter design and specifications without notice
right to alter design and specifications without notice
SPECIFICATION
PRODUCT DESCRIPTION
Note:
Temperature measurements taken whilst the oven is in convection mode will differ from the displayed level.
This is due to the grill elements turning on and off in order to regulate the oven temperature.
This will not affect the cooking results as long as the operation manual and cook book are followed correctly.
R-874 S/MANUAL
11/7/01, 10:59 am
4
R-874M - 5
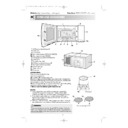
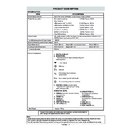
OVEN
9. Door seals and sealing surfaces
10.Ventilation openings
11.Outer cabinet
12.Power supply cord
13.Turntable
14.Low rack
15.High rack
10.Ventilation openings
11.Outer cabinet
12.Power supply cord
13.Turntable
14.Low rack
15.High rack
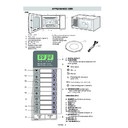
1. Control panel
2. Oven lamp
3. Grill heating element (Top Grill)
4. Door opening button
5. Waveguide cover
6. Oven cavity
7. Turntable motor shaft
8. Grill heating element
2. Oven lamp
3. Grill heating element (Top Grill)
4. Door opening button
5. Waveguide cover
6. Oven cavity
7. Turntable motor shaft
8. Grill heating element
(Bottom Grill)
CONTROL PANEL
9
7
10
4
1
8
6
5
3
2
11
12
10
14
15
13
APPEARANCE VIEW
AUTO indicator, showing auto cooking on progress.
DEFROST indicator.
TOP GRILL indicator.
BOTTOM GRILL indicator
CONVECTION indicator.
COOK indicator showing oven in operation.
MICROWAVE indicator.
WEIGHT indicators.
LESS/MORE indicators.
DIGITAL DISPLAY.
INFO indicator for interactive display.
EXPRESS DEFROST keys.
INFO key.
LESS/MORE keys.
INSTANT COOK keys.
GRILL key.
Press to select Grill
Press to select Grill
DUAL CONVECTION/GRILL key.
KITCHEN TIMER/CLOCK SETkey.
START/AUTO MINUTE key.
% percentage microwave power level indicator.
TIME keys.
STOP/CLEAR key.
WEIGHT CONVERSION key
MICROWAVE POWER LEVEL key.
WEIGHT keys.
CONVECTION
0
C key.
EXPRESS COOK keys.
MEAL IN ONE keys
R-874 S/MANUAL
11/7/01, 10:59 am
5
R-874M - 6
OPERATION SEQUENCE
OFF CONDITION
Closing the door activates the monitored latch switch and
the stop switch.
IMPORTANT:
When the oven door is closed, the contacts COM-NC
of the monitor switch must be open. When the micro-
wave oven is plugged in a wall outlet (230 - 240V /
50Hz), the line voltage is supplied to the noise filter.
the stop switch.
IMPORTANT:
When the oven door is closed, the contacts COM-NC
of the monitor switch must be open. When the micro-
wave oven is plugged in a wall outlet (230 - 240V /
50Hz), the line voltage is supplied to the noise filter.
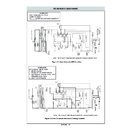
Figure O-1 on page
30
1. The control unit is not energized. The display shows
nothing (Fig. O-1 (a)).
2. Open the door. The contacts (COM-NC) of the moni-
tored latch switch are closed and the control unit is
energized. Then contacts of relays RY1 and RY5 are
closed, and the oven lamp will light and the display will
show "ENERGY SAVE MODE" (Fig. O-1(b)).
energized. Then contacts of relays RY1 and RY5 are
closed, and the oven lamp will light and the display will
show "ENERGY SAVE MODE" (Fig. O-1(b)).
3. Close the door. The contacts (COM-NC) of the moni-
tored latch switch are opened and the contacts of relay
RY1 are opened and the oven lamp will be turned off.
The display will show " .
RY1 are opened and the oven lamp will be turned off.
The display will show " .
0". (Fig. O-1(c)).
NOTE: Energy save mode
1. If the oven has not been used for more than 2 minutes,
1. If the oven has not been used for more than 2 minutes,
the contacts of the relay RY5 will be opened and the
control unit will be not energized. Open and close the
door, the control unit will resume.
control unit will be not energized. Open and close the
door, the control unit will resume.
2. If the clock is set, this energy save mode does not work.
MICROWAVE COOKING CONDITION
HIGH COOKING
Enter a desired cooking time by touching the TIME keys
and start the oven by touching START key.
Enter a desired cooking time by touching the TIME keys
and start the oven by touching START key.
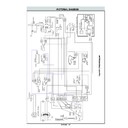
Function sequence Figure O-2 on page 31
CONNECTED COMPONENTS
RELAY
Oven lamp, Turntable motor
RY1
High voltage transformer
RY2
Fan motor
RY6
1. The line voltage is supplied to the primary winding of
the high voltage transformer. The voltage is converted
to about 3.3 volts A.C. output on the filament winding
and high voltage of approximately 2000 volts A.C. on
the secondary winding.
to about 3.3 volts A.C. output on the filament winding
and high voltage of approximately 2000 volts A.C. on
the secondary winding.
2. The filament winding voltage (3.3 volts) heats the
magnetron filament and the high voltage (2000 volts) is
sent to the voltage doubling circuit, where it is doubled
to negative voltage of approximately 4000 volts D.C..
sent to the voltage doubling circuit, where it is doubled
to negative voltage of approximately 4000 volts D.C..
3. The 2450 MHz microwave energy produced in the
magnetron generates a wavelength of 12.24 cm. This
energy is channelled through the waveguide (transport
channel) into the oven cavity, where the food is placed
to be cooked.
energy is channelled through the waveguide (transport
channel) into the oven cavity, where the food is placed
to be cooked.
4. When the cooking time is up, a signal tone is heard and
the relays RY1 + RY2 + RY6 go back to their home
position. The circuits to the oven lamp, high voltage
transformer, fan motor and turntable motor are cut off.
position. The circuits to the oven lamp, high voltage
transformer, fan motor and turntable motor are cut off.
5. When the oven door is opened during a cooking cycle,
the switches come to the following condition.
Switch
Contact
Condition
During
During
Oven Door
Cooking
Open(No cooking)
COM-NO
Closed
Opened
Monitored latch switch
COM-NC
Opened
Closed
Stop switch
COM-NO
Closed
Opened
COM-NO
Closed
Opened
Monitor Switch
COM-NC
Opened
Closed
The circuit to the high voltage transformer is cut off when
the contacts of relay RY2, and the contacts (COM-NO) of
the contacts of relay RY2, and the contacts (COM-NO) of
the monitored latch switch and monitor switch are made
open. The circuit to the fan motor is cut off when the relay
RY6 is made open. The circuit to the turntable motor is cut
off when the contacts (COM-NO) of the monitored latch
switch are made open. The relay RY2 and RY6 are made
open when the door is opened. The oven lamp remains on
even if the oven door is opened after the cooking cycle has
been interrupted, because the relay RY1 stays closed.
Shown in the display is remaining time.
6. MONITOR SWITCH CIRCUIT
The monitor switch is mechanically controlled by the
oven door, and monitors the operation of the moni-
tored latch switch.
oven door, and monitors the operation of the moni-
tored latch switch.
6-1. When the oven door is opened during or after the
cycle of a cooking program, the monitored latch
switch and stop switch must open their contacts
(COM-NO) first. And the contacts (COM-NC) of the
monitored latch switch are made closed. After that the
contacts (COM-NC) of the monitor switch can be
closed and the contacts (COM-NO) of monitor switch
are made open.
switch and stop switch must open their contacts
(COM-NO) first. And the contacts (COM-NC) of the
monitored latch switch are made closed. After that the
contacts (COM-NC) of the monitor switch can be
closed and the contacts (COM-NO) of monitor switch
are made open.
6-2. When the oven door is closed, the contacts (COM-
NC) of the monitor switch SW3 must be opened and
the contacts (COM-NO) of monitor switch must be
closed. After that the contacts (COM-NO) of the
monitored latch switch and the stop switch are made
closed. And the contacts (COM-NC) of the monitored
latch switch are made open.
the contacts (COM-NO) of monitor switch must be
closed. After that the contacts (COM-NO) of the
monitored latch switch and the stop switch are made
closed. And the contacts (COM-NC) of the monitored
latch switch are made open.
6-3. When the oven door is opened and the contacts
(COM-NO) of the monitored latch switch remain
closed, the fuse F8A will blow. Because the relay RY1
and monitor switch are closed and a short circuit is
caused.
closed, the fuse F8A will blow. Because the relay RY1
and monitor switch are closed and a short circuit is
caused.
MEDIUM HIGH, MEDIUM, MEDIUM LOW, LOW
COOKING
COOKING
When the microwave oven is preset for variable cooking
power, the line voltage is supplied to the high voltage
transformer intermittently within a 32-second time base
through the relay contact which is coupled with the cur-
rent-limiting relay RY2. The following levels of microwave
power are given.
power, the line voltage is supplied to the high voltage
transformer intermittently within a 32-second time base
through the relay contact which is coupled with the cur-
rent-limiting relay RY2. The following levels of microwave
power are given.
Note:
The On/Off time ratio does not exactly correspond
to the percentage of microwave power, because
approx. 3 seconds are needed for heating up the
magnetron filament.
to the percentage of microwave power, because
approx. 3 seconds are needed for heating up the
magnetron filament.
GRILL COOKING CONDITION
TOP GRILL (Figure O-3a)
In this condition the food is cooked by the top grill heating
element . Programme the desired cooking time by touch-
ing the TIME keys and touh the GRILL key once. When the
STARTkey is touched, the following operations occur:
1. The numbers on the digital readout start the count
In this condition the food is cooked by the top grill heating
element . Programme the desired cooking time by touch-
ing the TIME keys and touh the GRILL key once. When the
STARTkey is touched, the following operations occur:
1. The numbers on the digital readout start the count
down to zero.
2. The oven lamp, cooling fan motor and turntable motor
are energized.
3. The relay RY3 is energized and the main supply
900W
(HIGH)
32 sec. ON
630W MEDIUM
HIGH
Approx. 70%
100%
24 sec. ON
8 sec. OFF
14 sec. OFF
20 sec. OFF
26 sec. OFF
450W (MEDIUM)
Approx. 50%
18 sec. ON
270W MEDIUM
LOW
Approx. 30%
12 sec. ON
90W
(LOW)
Approx. 10%
6 sec. ON
R-874 S/MANUAL
11/7/01, 10:59 am
6

