Sharp R-750AM (serv.man6) Service Manual ▷ View online
11
750A -
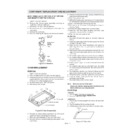
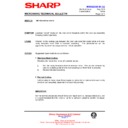
MONITORED LATCH SWITCH, STOP SWITCH
AND MONITOR SWITCH REMOVAL
AND MONITOR SWITCH REMOVAL
1. CARRY OUT 3D CHECKS.
2. Remove the control panel assembly referring to
2. Remove the control panel assembly referring to
“CONTROL PANEL REMOVAL”.
3. Disconnect the leads from all switches.
4. Remove the two (2) screws holding the latch hook to the
4. Remove the two (2) screws holding the latch hook to the
oven cavity.
5. Remove the latch hook.
6. Push the retaining tab slightly and remove the switch.
6. Push the retaining tab slightly and remove the switch.
9. Release door panel from eight (8) tabs of door frame by
sliding door panel downward.
10. Now, door panel is free.
11. Slide latch head upward and remove it from door frame
11. Slide latch head upward and remove it from door frame
by releasing latch spring from door frame and latch head.
12. Now, latch head and latch spring are free.
13. Remove the two (2) screws holding the glass stopper to
13. Remove the two (2) screws holding the glass stopper to
the door frame.
14. Remove the glass stopper from the door frame.
15. Slide the front door glass leftwards and then slide
15. Slide the front door glass leftwards and then slide
upwards to release the tabs holding it.
16. Now, the front door glass is free
RE-INSTALL
1. Re-install the front door glass to the door frame as
1. Re-install the front door glass to the door frame as
follows.
1) Insert the upper edge of the front door glass into the six
(6) tabs of the door frame.
2) Slide the front door glass downwards and insert the
lower edge of the front door glass into the six (6) tabs of
the door frame.
the door frame.
3) Slide the front door glass rightwards and insert the right
edge of the front door glass into the one (1) tab of the
door frame.
door frame.
2. Re-install the glass stopper to the door frame as follows.
1) Re-install the glass stopper to the door frame so that the
1) Re-install the glass stopper to the door frame so that the
two (2) holes of the glass stopper meet the two (2) pins
of the door frame.
of the door frame.
2) Hold the glass stopper to the door frame with the two (2)
screws.
3. Re-install the latch spring to the latch head. Re-install
the latch spring to the door frame. Re-install latch head
to door frame.
to door frame.
4. Re-install door panel to door frame by fitting eight (8)
tabs of door frame to eight (8) holes of door panel.
5. Fit the door panel to the door frame with four (4) screws.
6. Inserttwo (2) pins of door panel on two (2) hole of upper
6. Inserttwo (2) pins of door panel on two (2) hole of upper
and lower oven hinges.
7. Re-install choke cover to door panel .
Note:
After any service to the door;
Make sure that door sensing switch and monitored
latch switch are operating properly.
latch switch are operating properly.
Figure C-6. Door Replacement
MONITOR
SWITCH
SWITCH
MONITORED
LATCH
SWITCH
LATCH
SWITCH
TAB
TAB
STOP
SWITCH
Figure C-4. Switches
DOOR REPLACEMENT
REMOVAL
1. CARRY OUT 3D CHECKS.
2. Push the open button and open the door slightly.
3. Insert a putty knife (thickness of about 0.5mm) into the
2. Push the open button and open the door slightly.
3. Insert a putty knife (thickness of about 0.5mm) into the
gap between the choke cover and door frame as shown
in Figure C-5 to free engaging parts.
in Figure C-5 to free engaging parts.
4. Release choke cover from door panel.
5. Now choke cover is free.
5. Now choke cover is free.
CHOKE COVER
PUTTY KNIFE
DOOR FRAME
Figure C-5. Door Disassembly
6. Release two (2) pins of door panel from two (2) holes of
upper and lower oven hinges by lifting up.
7. Now, door sub assembly is free from oven cavity.
8. Remove the four (4) screws holding the door panel to the
8. Remove the four (4) screws holding the door panel to the
door frame.
DOOR FILM
COMPONENT REPLACEMENT AND ADJUSTMENT
Removal
1. Tear the door film from the door panel.
2. Now, the door film is free.
1. Tear the door film from the door panel.
2. Now, the door film is free.
Installation
1. Put the tab on the backing film of the door film as shown
1. Put the tab on the backing film of the door film as shown
in Fig. 7.
2. Tear the backing film by pulling the tab.
3. Put the pasted side of the door film on the door panel.
3. Put the pasted side of the door film on the door panel.
Door film
Backing Film
Figure C-7. Door film
12
750A -
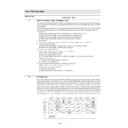
WIRING DIAGRAMS
Figure O-1 Oven Schematic
Note:
AC CORD CONNECTION
BRN : BROWN
BLU : BLUE
G-Y : GREEN AND
AC CORD CONNECTION
BRN : BROWN
BLU : BLUE
G-Y : GREEN AND
YELLOW STRIPE
/15 : SECTIONAL AREA
OF 1.5mm
2
MIN
Indicates components
with potential above 250 V.
with potential above 250 V.
230V/240V ~ 50Hz
EARTH
0.22
µ
/ AC250V
FUSE
15A
15A
NOISE SUPPRESSION COIL
0.0047
µ
/ 250V
0.0047
µ
/ 250V
MAG
THERMAL
CUT OUT
125˚C
THERMAL
CUT OUT
125˚C
FUSE
F8A
F8A
*
H.V. RECTIFIER
*
H.V.
CAPACITOR
1.07
1.07
µ
F
2100VAC
*
MAGNETRON
*
POWER TRANSFORMER
GRILL HEATER
TURNTABLE
MOTOR
FAN MOTOR
OVEN LAMP
A3
A1
SW3:
STOP
SW
RY3
COM
RY1
NO
B1
B2
COM
NO
FM
OL
A5
RY2
G-Y / 15
BLU / 15
BRN / 15
N
GRILL
THERMAL
CUT-OUT
150˚C - 130˚C
THERMAL
CUT-OUT
150˚C - 130˚C
SW2:
MONITOR
SWITCH
MONITOR
SWITCH
SW1:
MONITORED
LATCH
SWITCH
SWITCH
10M/0.5W
680K/0.5W
NO
OVEN
THERMAL
CUT-OUT
160˚C
*
ASYMETRIC
RECTIFIER
NO
NC
L
TTM
Display

