Sharp R-2498G (serv.man3) Service Manual ▷ View online
26
R-2498G
SERVICE INFORMATION
IMPORTANT: When replace the magnetron MG1 and/or MG2, the relays RY3 and RY4 on control unit must be
replaced at the same time. Because if the magnetron's life has been over, the relay's life may also
be over.
be over.
MICROWAVE MEASUREMENT
After any repair, the microwave oven must be checked for
microwave leakage to ensure continued safe operation.
BS EN 60335-2-25 specifies that the maximum permitted
leakage with a load of 275 ml is 50 W/m
microwave leakage to ensure continued safe operation.
BS EN 60335-2-25 specifies that the maximum permitted
leakage with a load of 275 ml is 50 W/m
2
(equivalent to 5
mW/cm
2)
at a distance of 5 cm from the oven.
PREPARATION
The following items are required to carry out this test:-
1. A low form of 600 ml beaker made from an electrically
1. A low form of 600 ml beaker made from an electrically
non-conductive material, such as glass or plastic, with
an inside diameter of approximately 8.5 cm. This must
contain 275
an inside diameter of approximately 8.5 cm. This must
contain 275
±
15 ml of water, at an initial temperature
of 20
±
2˚C.
2. A leakage detector which has been calibrated within
the preceding 12 months to a stand whose accuracy
can be traced to National Physical Laboratory Stand-
ards.
can be traced to National Physical Laboratory Stand-
ards.
Recommended instruments are:
Apollo "XI"
Celtec "A100"
Celtec "A100"
Before commencing the test, check that the leakage
detector is functioning and adjusted according to the
manufacturer's instructions, and any spacers are fitted to
detector is functioning and adjusted according to the
manufacturer's instructions, and any spacers are fitted to
ensure that measurement is taken 5cm from the surface
of the oven.
of the oven.
PROCEDURE
1. Place the beaker containing the water load in the oven
cavity at the centre of the turntable. The placing of this
standard load in the oven is important, not only to
protect the oven, but also to ensure that any leakage
it is not disguised by too large a load absorbing energy.
standard load in the oven is important, not only to
protect the oven, but also to ensure that any leakage
it is not disguised by too large a load absorbing energy.
2. Close the oven door, and with the power level set to
FULL, turn the oven ON with the timer set for a few
minutes operation. Should the water begin to boil
before the test has been completed, it should be
replaced.
minutes operation. Should the water begin to boil
before the test has been completed, it should be
replaced.
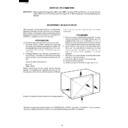
3. As shown in the diagram below, move the probe slowly
(not faster than 2.5 cm/sec.);-
a) around the edge of the door following the gap
b) across the face of the door
c) across any vents in the oven's sides, rear or top
b) across the face of the door
c) across any vents in the oven's sides, rear or top
Dotted line indicates the path taken by the leakage detector.
Whilst the maximum leakage permitted in BS EN 60335-2-25 is 50 W/m
2
(equivalent to 5 mW/cm
2
), it is not normal to
detect any significant leakage, and therefore any detected leakage should be investigated.
27
R-2498G
Figure O-2. Oven SChematic-ON Condition
SCHEMATIC
NOTE: CONDITION OF OVEN
1. DOOR CLOSED.
2. TIME KEY TIUCHED.
3. COOKING TIME PROGRAMMED.
4. START KEY TOUCHED
NOTE: " " INDICATES COMPONENTS WITH POTENTIALS ABOVE 250V.
C1 and C2: 1.07
µ
F/ AC 2100V
Figure O-1. Oven SChematic-OFF Condition
SCHEMATIC
NOTE: CONDITION OF OVEN
1. DOOR CLOSED
2.
0
APPEARS ON DISPLAY
F1 : FUSE 13A
NOISE FILTER
SW1:
1ST LATCH SWITCH
(PRIMARY INTERLOCK SWITCH)
1ST LATCH SWITCH
(PRIMARY INTERLOCK SWITCH)
SW4:
MONITOR
SWITCH
R1:
MONITOR
RESISTOR
TC3:
BLOWER MOTOR
THERMAL CUT OUT
115C
°
A7
A5
TC4:
OVEN THERMAL
CUT OUT 115C
°
F2:
FUSE
F6.3A
SW2: 2ND LATCH SWITCH
F4: FUSE M8A
A3
TC2: MAGNETRON
THERMAL CUT OUT
145C
THERMAL CUT OUT
145C
°
(LOWER)
OVEN LAMP
BLOWER MOTOR
A1
CONTROL
UNIT
UNIT
B1
SW3:
3RD LATCH SWITCH
3RD LATCH SWITCH
EXHAUST
THERMISTER
SW5: STOP SWITCH
TAB3
D3
TAB2
TAB1
TAB4
T1: HIGH VOLTAGE
TRANSFORMER
230V - 240V~50Hz
ASYMMETRIC
RECTIFIER
RECTIFIER
H. V. RECTIFIER
C1: H.V. CAPACITOR
MG1: MAGNETRON (UPPER)
(REAR)
F3:
FUSE M8A
FUSE M8A
OL
SM
STIRRER MOTOR
SM
BM
RY1
RY3
RY4
TC1:
MAGNETRON
THERMAL
CUT OUT
145C
MAGNETRON
THERMAL
CUT OUT
145C
°
(UPPER)
B2
B3
D1
H1
H3
INTAKE
THERMISTER
MAGNETRON
THERMISTER
ASYMMETRIC
RECTIFIER
RECTIFIER
H. V. RECTIFIER
C2: H.V. CAPACITOR
MG2: MAGNETRON (LOWER)
T2: HIGH VOLTAGE
TRANSFORMER
(FRONT)
(FRONT)
NOISE FILTER
SW1:
1ST LATCH SWITCH
(PRIMARY INTERLOCK SWITCH)
1ST LATCH SWITCH
(PRIMARY INTERLOCK SWITCH)
SW4:
MONITOR
SWITCH
R1:
MONITOR
RESISTOR
TC3:
BLOWER MOTOR
THERMAL CUT OUT
115C
°
A7
A5
TC4:
OVEN THERMAL
CUT OUT 115C
°
F2:
FUSE
F6.3A
SW2: 2ND LATCH SWITCH
A3
TC2: MAGNETRON
THERMAL CUT OUT
145C
THERMAL CUT OUT
145C
°
(LOWER)
OVEN LAMP
BLOWER MOTOR
A1
CONTROL
UNIT
UNIT
B1
SW3:
3RD LATCH SWITCH
3RD LATCH SWITCH
EXHAUST
THERMISTER
SW5: STOP SWITCH
TAB3
D3
TAB2
TAB1
TAB4
T1: HIGH VOLTAGE
TRANSFORMER
ASYMMETRIC
RECTIFIER
RECTIFIER
H. V. RECTIFIER
C1: H.V. CAPACITOR
MG1: MAGNETRON (UPPER)
(REAR)
OL
SM
STIRRER MOTOR
SM
BM
RY1
RY3
RY4
TC1:
MAGNETRON
THERMAL
CUT OUT
145C
MAGNETRON
THERMAL
CUT OUT
145C
°
(UPPER)
B2
B3
D1
H1
H3
INTAKE
THERMISTER
MAGNETRON
THERMISTER
ASYMMETRIC
RECTIFIER
RECTIFIER
H. V. RECTIFIER
C2: H.V. CAPACITOR
MG2: MAGNETRON (LOWER)
T2: HIGH VOLTAGE
TRANSFORMER
F1 : FUSE 13A
F4: FUSE M8A
F3:
FUSE M8A
FUSE M8A
230V - 240V~50Hz
28
R-2498G
6
4
5
1
2
3
6
4
5
1
2
3
A
B
C
D
E
F
G
H
A
B
C
D
E
F
G
H
BRN
NOISE FILTER
FERRITE
CLAMP R
FERRITE
FERRITE
L
N
BLU
F1:
FUSE 13A
WHT
BLK
SW5 : STOP
SWITCH
1 BLK
3 BLK
2
CN-H
TAB2
TAB1
CN-A
4
1 ORG
5 WHT
3 PNK
2
6
7 BLK
BRN
TAB3
TAB4
NO
COM.
BRN
ORG
ORG
COM.
NO
SW3 :
3RD LATCH
SWITCH
WHT
GRN
RED
WHT
GRY
COM.
NO
SW1 : 1ST LATCH
SWITCH
(Cabinet side)
COM.
NO
COM.
NC
WHT
GRY
HIGH VOLTAGE COMPONENTS
MG1 :
MAGNETRON
(Upper)
MG2 :
MAGNETRON
(Lower)
T1 :
HIGH VOLTAGE
TRANSFORMER
H. V. RECTIFIER
ASYMMETRIC
RECTIFIER
C2 : HIGH VOLTAGE
CAPACITOR
B
L
U
EXHAUST THERMISTOR
YLW
WHT
OL :
OVEN LAMP
& SOCKET
O
R
G
O
R
G
PNK
F4 :
FUSE
M8A
TC4 :
OVEN
THERMAL
CUT- OUT
TC2 :
MAGNETRON
THERMAL CUT- OUT
(Lower)
F2 :
FUSE
F6.3A
G
/
Y
POWER
SUPPLY
CORD
WHT
ORG
TC3 :
BLOWER
MOTOR
TAERMAL
CUT- OUT
PNK
GRY
SW4 :
MONITOR
SWITCH
BM :BLOWER
MOTOR
ORG
ORG
BRN
1 GRN
3 GRY
2 RED
CN-B
1 BLK
3 BLK
2
CN-D
GRN
GRN
BLU
INTAKE THERMISTOR
WHT
SW2 : 2ND LATCH
SWITCH
(Oven side)
BLK
WHT
WHT
SM: STIRRER MOTOR
YLW
PNK
RED
BLK
GRY
PNK
ORG
PNK
T2 :
HIGH VOLTAGE
TRANSFORMER
C1 : HIGH VOLTAGE
CAPACITOR
H. V. RECTIFIER
ASYMMETRIC
RECTIFIER
ORG
TC1 : MAGNETRON
THERMAL
CUT- OUT
(Upper)
BRN
BRN
BRN
SM: STIRRER MOTOR
WHT
GRY
RED
ORG
BLK
G
R
Y
PNK
GRY
PNK
ORG
ORG
BLK
BLK
MAGNETRON
THERMISTOR
BRN
WHT
B
R
N
G
R
Y
G
R
Y
W
H
T
O
R
G
R1 :
MONITOR
RESISTOR
F3 :
FUSE
M8A
TOUCH CONTROL PANEL
CN-J
IC
CN-H
CN-B
CT-1
TAB2
RY-3
TAB1
RY-1
CN-A
T
CT-2
RY-4
TAB3
TAB4
CN-E
Figure S-1. Pictorial Diagram
29
R-2498G
6
4
5
1
2
3
6
4
5
1
2
3
A
B
C
D
E
F
G
H
A
B
C
D
E
F
G
H
Figure S-2. Control Panel Circuit
POWER
%
ON
6G
5G
4G
3G
2G
1G
aa
aa
b
c
d
e
f
g
h
a
b
c
d
e
f
g
1
26
1
F
1
F
P
N
C
N
B
L
B
U
h
g
g
f
e
d
c
b
a
e
d
c
b
a
G
1
G
2
G
3
G
4
G
5
G
6
i
j
k
j
k
P
N
2
F
2
F
P30
P27
P26
P25
P24
P23
P22
P21
P20
P17
P16
P15
P14
P13
P12
P11
P10
PO7
PO6
PO5
PO4
PO3
PO2
PO1
PO0
P37
P36
P35
P34
P33
P32
P31
P26
P25
P24
P23
P22
P21
P20
P17
P16
P15
P14
P13
P12
P11
P10
PO7
PO6
PO5
PO4
PO3
PO2
PO1
PO0
P37
P36
P35
P34
P33
P32
P31
VCC
VSS
XOUT
XIN
P70
P71
XOUT
XIN
P70
P71
RESET
INT0
INT1
P42
P43
P44
P45
P46
P47
P50
P51
P52
P53
P54
P55
P60
AN1
AN2
AN3
AN4
AN5
AN6
AN7
VREF
AVSS
VEE
INT1
P42
P43
P44
P45
P46
P47
P50
P51
P52
P53
P54
P55
P60
AN1
AN2
AN3
AN4
AN5
AN6
AN7
VREF
AVSS
VEE
CF1
CST4.00MGW
2200p
C80
16V
2200p
C81
16V
33
35
40
45
50
55
60
64
32
30
25
20
15
10
5
1
IC1
IZA648DR
R80
R81
220K
220K
15K
R85
15K
R84
R82
4.7K
R83
4.7K
E5
F5
F4
E4
E3
F3
F2
E2
E1
F1
K3
K2
K1
J3
J2
J1
ENCODER
B
A
COM.
SW3
SW1
SW4
SW2
SW.UNIT
G2
G1
I1
I2
SW5
START
DEFROST
MEDIUM
MED LOW
HIGH
SW.UNIT
R63 47K
R37 47K
R36 47K
D32
D33
R51 5.1K
3.3K
(J4)
(J3)
(J2)
(J1)
VA
C60
0.01
µ
25V
MAGNETRON THERMISTOR
DOOR SW.
EXHAUST
THERMISTOR
H3
H1
B1
B2
B3
Q70
KRA101M
R70
3.3K
SP1
D50
R50
100
C50
D20
11ES1
R40
1.1K
R41
20K
R42
3.3K
: IF NOT SPECIFIED, 1SS270A
: IF NOT SPECIFIED, 1/4W 5%
: IF NOT SPECIFIED, 0.01
µ
16V
TAB4
TAB3
TAB2
TAB1
A1
A3
A5
A7
OVEN LAMP
BLOWER
MOTOR
STIRRER
MOTOR
AC230-240 V
50HZ
MICRO 1
MICRO 2
D31
R33
1K
D30
R32
1K
R31
1.6KF
R35
300K
C31
22
µ
25V
R30
1.6KF
R34
300K
C30
22
µ
25V
+
–
+
–
D23
CT2
CT1
RY3
RY2
RY1
D21
VRS1
10G471K
(J9)
Q21
DTD143ES
Q22
DTB143ES
Q23
DTB143ES
7
8
4
5
3
1
+
–
C21
4.7
µ
35V
0.1
µ
C10
50V
R20
470
Q20
DTA114YS
Q10
KRA101M
C20
0.1
µ
50V
+–
C11
T1 PA081DR
D1–D4 : 11ES1
D1
D3
D2
D4
C1
0.1
µ
50V
C2
1000
µ
35V
+
–
VR
VA
ZD1
HZ12C1
R1 1.8K
Q1
2SB953
+
–
C3
3.3
µ
50V
C4
0.01
µ
25V
+
–
R2
(5)
560 1/2W
C5
47
µ
16V
ZD2
HZ4C3
R3 1K
Q2
2SA1561
R10
15K
VC
C6
C7
R4
15K
+
–
+
–
D5
D6
D7
11ES1
11ES1
C8
100
µ
16V
VP
C9
22
µ
25V
R5 15 1/2W
C12
0.1
µ
50V
CONTROL UNIT
a
b
cd
R65
1.8K
D3
C90
R90 4.7 K
R91 6.8 K
D1
INTAKE
THERMISTOR
D22
Display

