Sharp DV-HR350H (serv.man11) Service Manual / Technical Bulletin ▷ View online
DVD 2005 07 01
Date of Issue: 20
th
December 2005
Classification:
White
DVD/HHD RECORDER TECHNICAL BULLETIN
Page 1 of 4
Sharp Electronics (UK) Limited
Reference - AvW 10 07 2005 - 1
Revision - 2
White – Carry out as required
Yellow – Carry out as required and whenever the unit comes in for service
Red – Carry out on all units
MODELS
DVHR300H
DVHR350H
REASON
A number of problems with the above units can be caused by failure of the internal
software. There are two main software updates that can be applied to the units. The
first is the writer software and the second is the flash (or back-end) software. Both of
these are updated easily using a CD-R disc recorded with the correct files - see
instructions below.
software. There are two main software updates that can be applied to the units. The
first is the writer software and the second is the flash (or back-end) software. Both of
these are updated easily using a CD-R disc recorded with the correct files - see
instructions below.
SYMPTOM Software revisions have been released to cure various fault symptoms, a list of these,
in chronological order, is given below.
DVD Writer Software Updates
Version
Number
Number
Release Date
Reason
1.33
25
th
March 2004
Failure to initialise or recognise a DVD-RW disc made
by Ritek (Sony brand)
by Ritek (Sony brand)
1.35
18
th
May 2004
Recording to a DVD-RW stops in error.
Recorded time on a DVD-RW is shorter than the
space available on the disc.
Recorded time on a DVD-RW is shorter than the
space available on the disc.
1.43
24
th
March 2005
Recording to a DVD-RW disc stops with an error.
A recorded DVD-RW is initialised automatically.
A recorded DVD-RW is initialised automatically.
1.44
15
th
April 2005
Unusual sound heard from the DVD writer (sled
motor) when opening the disc tray.
motor) when opening the disc tray.
1.45
26
th
May 2005
After recording DVD-R disc, it may sometimes
become unreadable.
become unreadable.
Note
The DVD writer software must be updated to the latest version. The latest version will
encompass all the previous updates.
The DVD writer software must be updated to the latest version. The latest version will
encompass all the previous updates.
DVD 2005 07 01
Date of Issue: 20
th
December 2005
Classification:
White
DVD/HHD RECORDER TECHNICAL BULLETIN
Page 2 of 4
Sharp Electronics (UK) Limited
Reference - AvW 10 07 2005 - 1
Revision - 2
White – Carry out as required
Yellow – Carry out as required and whenever the unit comes in for service
Red – Carry out on all units
Flash Software Updates
Version
Number
Number
Release Date
Reason
1.09
28
th
April 2004
Timer recording is not executed.
After first timer recording, the next timer entry is
cancelled.
After first timer recording, the next timer entry is
cancelled.
1.10
1
st
October 2004
Aspect ratio is deformed during time shift recording.
Picture pauses after 2 to 3 seconds when playing
back from title list with timer on.
Only first chapter is dubbed, even though multiple
chapters are selected during chapter dubbing.
LCD backlight functionality during timer recording
improved.
Delayed starting of timer recordings.
Picture pauses after 2 to 3 seconds when playing
back from title list with timer on.
Only first chapter is dubbed, even though multiple
chapters are selected during chapter dubbing.
LCD backlight functionality during timer recording
improved.
Delayed starting of timer recordings.
1.20
11
th
March 2005
RGB and Y/C colour is not outputted correctly.
Blue screen not cancelling
If the dubbing destination drive is full, error message
is not displayed.
After HDD timer recording, can not start the timer
record in DVD mode.
If the timer is set for a period longer than 12 hours,
the message 'error in hard disc' appears.
During low power timer standby, the bypass signal
from L1 to L2 disappears after 6 seconds.
Poor key response in low power timer standby.
Vertical blanking interval too short.
Note
The Flash software must be updated to the latest version. The latest version will
encompass all the previous updates.
The Flash software must be updated to the latest version. The latest version will
encompass all the previous updates.
DVD 2005 07 01
Date of Issue: 20
th
December 2005
Classification:
White
DVD/HHD RECORDER TECHNICAL BULLETIN
Page 3 of 4
Sharp Electronics (UK) Limited
Reference - AvW 10 07 2005 - 1
Revision - 2
White – Carry out as required
Yellow – Carry out as required and whenever the unit comes in for service
Red – Carry out on all units
ACTION
To update the software, follow the instructions below. It is only necessary to update
the software to the latest version.
the software to the latest version.
DVD Writer Software Upgrade Procedure
1. Copy the latest DVD writer software from the Technical Web onto the hard drive of
your computer.
2. Unzip this file.
3. Run the extracted executable file. This will result in one file being generated.
4. Copy this file onto the root directory of a blank CD-R. Note that the recording
3. Run the extracted executable file. This will result in one file being generated.
4. Copy this file onto the root directory of a blank CD-R. Note that the recording
speed must be as low as possible and the CD-R of a reasonable quality. The disc
MUST be finalised.
MUST be finalised.
5. Turn on the unit to be upgraded.
6. Eject the disc tray.
7. Load the CD-R.
8. Close the disc tray.
9. After about 10 seconds the LCD display on the front of the unit will change to
6. Eject the disc tray.
7. Load the CD-R.
8. Close the disc tray.
9. After about 10 seconds the LCD display on the front of the unit will change to
000300.
10. After about three minutes the LCD display will change to 000307 (note that the
number may be different on your unit, when the number changes, the internal
update operation is complete).
update operation is complete).
11. Remove the disc from the disc tray. Do not close the disc tray.
12. Press the standby button to turn the power off.
13. When the power down cycle is complete, turn the unit back on.
14. The disc tray will close.
12. Press the standby button to turn the power off.
13. When the power down cycle is complete, turn the unit back on.
14. The disc tray will close.
15.
Update is complete.
Flash Software Upgrade Procedure
1. Copy the latest flash software from the Technical Web onto the hard drive of your
computer.
2. Unzip this file.
3. Run the extracted executable file. This will result in three files and a directory
3. Run the extracted executable file. This will result in three files and a directory
(containing six files) being generated.
4. Copy these files and directory onto the root directory of a blank CD-R. Note that
the recording speed must be as low as possible and the CD-R of a reasonable
quality. The disc MUST be finalised.
quality. The disc MUST be finalised.
5. Turn on the unit to be upgraded.
6. Eject the disc tray.
7. Load the CD-R.
8. Close the disc tray.
6. Eject the disc tray.
7. Load the CD-R.
8. Close the disc tray.
DVD 2005 07 01
Date of Issue: 20
th
December 2005
Classification:
White
DVD/HHD RECORDER TECHNICAL BULLETIN
Page 4 of 4
Sharp Electronics (UK) Limited
Reference - AvW 10 07 2005 - 1
Revision - 2
White – Carry out as required
Yellow – Carry out as required and whenever the unit comes in for service
Red – Carry out on all units
9. After about 10 seconds the LCD display on the front of the unit will change to
000200.
10. After about thirty seconds the LCD display will change to 000207 (note that the
number may be different on your unit, when the number changes, the internal
update operation is complete). DO NOT turn the power off during this process.
update operation is complete). DO NOT turn the power off during this process.
11. Remove the disc from the disc tray. Do not close the disc tray.
12. Press the standby button to turn the power off.
13. When the power down cycle is complete, turn the unit back on.
14. The disc tray will close.
15. Press and hold the CH+ and REC STOP buttons together for more than two
12. Press the standby button to turn the power off.
13. When the power down cycle is complete, turn the unit back on.
14. The disc tray will close.
15. Press and hold the CH+ and REC STOP buttons together for more than two
seconds.
16. The LCD display will change to 040800.
17. Press the 9 button on the remote control.
18. After a while the LCD display will change to 0517.
19. Press the standby button to return to the standby mode.
20. Disconnect the AC cable.
17. Press the 9 button on the remote control.
18. After a while the LCD display will change to 0517.
19. Press the standby button to return to the standby mode.
20. Disconnect the AC cable.
Checking the Software Versions
1. Connect the unit to a suitable display.
2. Turn the unit on.
3. Wait until the HDD and DVD buttons have stopped flashing.
4. Press the CH+ and REC STOP buttons together for about five seconds.
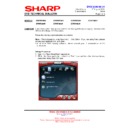
5. The monitor display will change as below.
2. Turn the unit on.
3. Wait until the HDD and DVD buttons have stopped flashing.
4. Press the CH+ and REC STOP buttons together for about five seconds.
5. The monitor display will change as below.
6. To exit this menu, enter the standby mode.
In the above example the DVD writer software is verson 1.44. The flash software
version is 1.20
version is 1.20
Flash software
version
version
DVD Writer
software
version
software
version
Display

