Sharp XL-T200 (serv.man8) Service Manual ▷ View online
– 9 –
XL-T200H
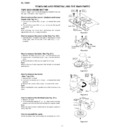
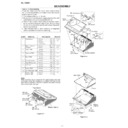
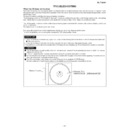
How to remove the tape mechanism PWB
(See Fig. 9-1.)
(See Fig. 9-1.)
1. Remove the screws (F1) x 1 pc., to remove the tape
mechanism PWB.
2. Remove the screws (F2) x 1 pc.
3. Remove the solder joints (F3) x 2 pcs., to remove the tape
3. Remove the solder joints (F3) x 2 pcs., to remove the tape
mechanism PWB.
Tape
Mechanism
PWB
Mechanism
PWB
Tape
Mechanism
PWB
Mechanism
PWB
(F3)x2
Solder
Joint
Solder
Joint
(F2)x1
ø2x8mm
ø2x8mm
(F1)x1
ø2x3mm
ø2x3mm
Figure 9-1
Figure 9-2
How to remove the CD lid (See Fig. 9-2.)
Perform steps 1 and 8 of the disassembly method to remove
the gear box.(See page 6,7)
1. Remove the screws (A1) x 2 pcs., to remove the CD lid
motor.
2. Remove the hooks (A2) x 3 pcs., to remove the worm wheel.
Caution:
Be careful so that the gear is not damaged.
(The damage gear emits noise during searching.)
motor.
2. Remove the hooks (A2) x 3 pcs., to remove the worm wheel.
Caution:
Be careful so that the gear is not damaged.
(The damage gear emits noise during searching.)
(A1) x2
ø2 x5mm
ø2 x5mm
Hook
(A2) x3
(A2) x3
CD Lid Motor
Figure 9-3
CD MECHANISM SECTION (See Fig. 9-3.)
Perform steps 1 and 6 of the disassembly method to remove
the CD mechanism.(See page 6,7)
1. Remove the mechanism cover, paying attention to the
the CD mechanism.(See page 6,7)
1. Remove the mechanism cover, paying attention to the
pawls (A1)x 4 pcs.
2. Remove the screws (A2) x 2 pcs., to remove the shaft (A3)
x 1 pc.
3. Remove the stop washer (A4) x 1 pc., to remove the gear
(A5) x 1 pc.
4. Remove the pickup unit.
Note:
After removing the connector for the optical pickup from the
connector, wrap the conductive aluminium foil around the
front end of connector remove to protect the optical pickup
from electrostatic damage.
(A5) x 1 pc.
4. Remove the pickup unit.
Note:
After removing the connector for the optical pickup from the
connector, wrap the conductive aluminium foil around the
front end of connector remove to protect the optical pickup
from electrostatic damage.
Pickup unit
(A2) x2
ø2.6 x6mm
ø2.6 x6mm
(A1) x4
CD Mechanism
Shaft
(A3) x1
(A3) x1
Gear
(A5) x1
(A5) x1
Stop Washer
(A4) x1
(A4) x1
Mechanism Cover
Display

