Sharp SD-SG11 (serv.man2) Service Manual ▷ View online
– 13 –
SD-SG11H
1
Leg Cabinet
1. Screw .................. (A1) x5
13-1
2
Rear Panel
1. Screw .................. (B1) x9
13-1
2. Screw .................. (B2) x1
3
MD/CD Lid Cabinet/ 1. Open it in the direction of
13-2
Loading Gear Ass'y the arrow.
* (Note 1)
* (Note 1)
2. Lid Cushion Cover ... (C1) x2
3. Screw Cover Sheet .. (C2) x1
4. Screw ................. (C3) x5
5. Rear Support Bracket
3. Screw Cover Sheet .. (C2) x1
4. Screw ................. (C3) x5
5. Rear Support Bracket
................................. (C4) x1
6. Socket ................ (C5) x3
4
Front Cabinet
1. Screw ................. (D1) x6
13-2
2. Socket ................ (D2) x2
13-3
3. Tip ...................... (D3) x1
5
Main PWB
1. Screw .................. (E1) x6
13-3
2. Socket ................. (E2) x7
3. Flat Cable ............ (E3) x3
3. Flat Cable ............ (E3) x3
6
MD/CD Block
1. Screw .................. (F1) x5
14-1
2. Socket ................. (F2) x2
14-2
7
Tuner Unit
1. Screw ................. (G1) x2
14-2
8
Jack PWB
1. Screw ................. (H1) x6
14-2
9
MD Sensor PWB
1. Screw .................. (J1) x1
14-3
10
OPEN/CLOSE
1. Screw .................. (K1) x1
14-3
Switch PWB
11
LED A/B PWB
1. Hook .................... (L1) x2
14-4
2. Screw .................. (L2) x4
12
Front Decoration
1. Screw ................. (M1) x8
14-4
Panel
2. Earth Plate ......... (M2) x1
13
Top Cabinet
1. Screw ................. (N1) x3
14-5
14
MD/CD Switch PWB 1. Screw ................ (P1) x10
14-5
15
Socket PWB
1. Screw ................. (Q1) x2
14-6
16
CD Mechanism Ass'y 1. Screw ................. (R1) x4
14-6
17
MD Mechanism Unit 1. Screw .................. (S1) x4
14-6
18
MD Mechanism/
1. Screw .................. (T1) x8
15-1
MD Main PWB
2. Flat Cable ............ (T2) x3
* (Note 2)
3. Flexible PWB ...... (T3) x1
4. Socket ................. (T4) x2
4. Socket ................. (T4) x2
DISASSEMBLY
STEP
REMOVAL
PROCEDURE
FIGURE
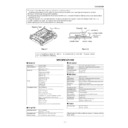
Figure 13-1
Caution on Disassembly
Follow the below-mentioned notes when disassembling
the unit and reassembling it, to keep it safe and ensure
excellent performance:
1. Take compact disc and minidisc out of the unit.
2. Be sure to remove the power supply plug from the wall
Follow the below-mentioned notes when disassembling
the unit and reassembling it, to keep it safe and ensure
excellent performance:
1. Take compact disc and minidisc out of the unit.
2. Be sure to remove the power supply plug from the wall
outlet before starting to disassemble the unit.
3. Take off nylon bands or wire holders where they need to
be removed when disassembling the unit. After servicing
the unit, be sure to rearrange the leads where they were
before disassembling.
If the screw of the wrong length is applied on the MD
mechanism unit (screw for mounting parts to the MD
mechanism chassis), it may contact the optical pickup
and cause the unit to malfunction.
the unit, be sure to rearrange the leads where they were
before disassembling.
If the screw of the wrong length is applied on the MD
mechanism unit (screw for mounting parts to the MD
mechanism chassis), it may contact the optical pickup
and cause the unit to malfunction.
4. Take sufficient care on static electricity of integrated
circuits and other circuits when servicing.
MD/CD/TUNER UNIT
* (Note 1)
Screws are covered. Remove the cushion covers first with a sharp-
ended stick and then screws.
Be careful not to damage them when removing. They will be reused.
* (Note 2)
After pulling out the optical pickup connector, wrap the tip of it with
conductive aluminium foil or the like to protect the optical pickup from
the static electricity.
Figure 13-2
Figure 13-3
(A1)x5
ø3x10mm
(B1)x9
ø3x10mm
(B2)x1
ø3x8mm
Rear Panel
Front Cabinet
Leg Cabinet
(D1)x3
ø3x10mm
(D1)x1
ø3x8mm
(C3)x1
ø3x10mm
(C3)x2
ø3x10mm
(C1)x2
(D1)x2
ø3x10mm
Socket
PWB
Loading Gear
Ass'y
MD/CD Lid
Cabinet
(C2)x1
(C5)x3
CD Mechanism
Unit
Unit
MD Mechanism
Unit
Front
Cabinet
(C3)x2
ø3x10mm
(C4)x1
Lug Wire
(E1)x6
ø3x8mm
(D2)x1
(E2)x2
Main PWB
Main PWB
Jack PWB
(E2)x1
(E3)x1
Main PWB
Jack PWB
Jack PWB
(D2)x1
(E3)x1
(E3)x1
(D3)x1
(E2)x1
(E2)x1
(E2)x2
SD-SG11H
– 14 –
Figure 14-1
Figure 14-2
Figure 14-3
Figure 14-4
Figure 14-5
Figure 14-6
CD Mechanism
Ass'y
MD/CD
Mechanism
Frame
MD Mechanism
Unit
(F1)x1
ø3x8mm
(F1)x1
ø3x8mm
(F1)x3
ø3x10mm
Tuner Unit
Jack PWB
(H1)x3
ø3x8mm
(H1)x1
ø3x10mm
(H1)x2
ø3x10mm
(G1)x2
ø3x8mm
(F2)x1
(F2)x1
OPEN/CLOSE
Switch PWB
MD/CD Lid
Cabinet
MD Sensor
PWB
(J1)x1
ø2.6x8mm
(K1)x1
ø2.6x8mm
Front
Cabinet
Front
Decoration
Panel
LED B PWB
LED A
PWB
Lug Wire
(M1)x1
ø3x6mm
(M1)x1
ø3x6mm
(L1)x1
(L1)x1
(M1)x6
ø3x6mm
(L2)x4
ø3x10mm
(M2)x1
Lug
Wire
Front
Cabinet
Top Cabinet
(N1)x3
ø3x10mm
(P1)x5
ø3x10mm
(P1)x5
ø3x10mm
CD Switch
PWB
MD Switch
PWB
Socket PWB
MD Mechanism
Unit
CD Mechanism
Ass'y
(S1)x2
ø3x10mm
(Q1)x2
ø3x10mm
(S1)x2
ø3x10mm
(R1)x2
ø3x10mm
(R1)x2
ø3x10mm
MD/CD
Mechanism Frame
– 15 –
SD-SG11H
Figure 15-1
Figure 15-2
Special driver
(Amplifier unit: aluminium decorative plate)
To prohibit users' disassembling the unit, special screws are
used to fix the decorative plate. A special driver is required.
To prohibit users' disassembling the unit, special screws are
used to fix the decorative plate. A special driver is required.
Figure 15-4
Special driver bit
(Torque head: T8 type)
1
Leg Cabinet
1. Screw .................. (A1) x5
15-3
2
Rear Cabinet
1. Screw ................ (B1) x12
15-3
3
Front Cabinet
1. Screw ................. (C1) x6
15-4
4
Rear Panel
1. Screw ................. (D1) x6
16-1
2. Socket ................ (D2) x1
3. Solder ............... (D3) x4
3. Solder ............... (D3) x4
5
Speaker Terminal
1. Solder ................. (E1) x4
16-1
PWB
6
1-Bit Amp. Unit
1. Screw .................. (F1) x2
16-1
2. Socket ................. (F2) x4
7
Terminal PWB
1. Screw ................. (G1) x2
16-2
2. Socket ................ (G2) x2
8
Power/Amp. LED
1. Screw ................. (H1) x2
16-2
PWB
2. Socket ................ (H2) x2
9
Shield Cover
1. Screw ................ (J1) x12
16-3
2. Heat Sink ............ (J2) x1
3. 1-Bit Amp. Bracket ... (J3) x1
3. 1-Bit Amp. Bracket ... (J3) x1
10
1-Bit Amp. PWB
1. Screw .................. (K1) x4
16-4
STEP
REMOVAL
PROCEDURE
FIGURE
AMPLIFIER UNIT
Figure 15-3
(T2)x2
(T1)x1
ø
2x2mm
(T1)x1
ø
2x3mm
(T1)x1
ø
2x3mm
(T1)x1
ø
2x3mm
(T1)x1
ø
2x3mm
(T2)x1
(T4)x1
(T4)x1
(T1)x1
ø
2x3mm
(T1)x2
ø
1.7x3mm
Shield Case, Bottom
(T3)x1
Optical pickup
Flexible PWB (*1)
Flexible PWB (*1)
Pull
Pull
MD Main PWB
MD Mechanism
Shield Case, Side
Shield Case, Top
(*1) After pulling out the flexible
PWB for the optical pickup,
wrap its tip with conductive
aluminium foil or the like to
protect the optical pickup from
the static electricity.
PWB for the optical pickup,
wrap its tip with conductive
aluminium foil or the like to
protect the optical pickup from
the static electricity.
(A1)x5
ø3x10mm
(B1)x1
ø3x10mm
(B1)x3
ø3x10mm
(B1)x1
ø3x8mm
(B1)x1
ø3x10mm
(B1)x6
ø3x10mm
Rear Cabinet
Leg Cabinet
Front Cabinet
(C1)x2
ø3x8mm
(C1)x2
ø3x8mm
(C1)x2
ø3x10mm
Washer
Front Cabinet
SD-SG11H
– 16 –
Figure 16-1
Figure 16-2
Figure 16-4
Figure 16-3
(D1)x1
ø3x8mm
(D1)x1
ø3x10mm
(D1)x1
ø3x10mm
(D1)x1
ø3x8mm
(F2)x1
(F2)x1
(F2)x1
(E1)x4
(F2)x1
(D2)x1
(D3)x4
(F1)x2
ø3x8mm
(D1)x2
ø4x10mm
1-Bit Amp.
Unit
Rear
Panel
Power Trans
PWB
Speaker
Terminal
PWB
Terminal PWB
Power PWB
Power
PWB
(H1)x1
ø3x10mm
(H1)x1
ø3x8mm
(G1)x2
ø3x8mm
(H2)x2
(G2)x2
Power Trans
PWB
Power
PWB
Main Chassis
Power LED
PWB
Power Trans
PWB
Terminal
PWB
Terminal
PWB
(J1)x2
ø3x8mm
(J1)x1
ø3x6mm
(J1)x1
ø3x6mm
(J1)x1
ø3x6mm
(J1)x1
ø3x10mm
(J1)x4
ø3x8mm
(J1)x1
ø3x6mm
(J1)x1
ø3x8mm
(J3)x1
(J2)x1
Washer
Washer
Shield
Cover
(K1)x4
ø3x10mm
1-Bit Amp.
PWB
Be careful of the
silicon grease.
silicon grease.
ADJUSTMENT
Figure 16-5
4 Pin Extension Connector
QCNWN6939AFZZ

