LG V-2620DE Service Manual ▷ View online
VACUUM POWER ADJUSTMENT
-5-
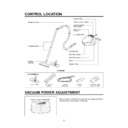
CONTROL LOCATION
CANISTER
ATTACHMENTS
NOZZLE ASM
EXTENSION
WANDS
FLEXIBLE
HOSE ASM
CREVICE
TOOL
FILTER BAG ASM
(PAPER, OPTION)
CREVICE TOOL
WHEEL
CARRYING POCKET
CARRYING POCKET
SUCTION INLET
POWER CORD
SWITCH BUTTON (ON/OFF)
POWER CONTROL
REGULATOR
REGULATOR
CORD REEL
BUTTON
BUTTON
DUST INDICATOR
FLEXIBLE HOSE ASM
FLEXIBLE
HOSE ASM
HOSE ASM
EXTENSION WANDS
MIN
MAX
Power Control Regulator
When you want to control the vacuum power for curtains and clothes,
slide the power control regulator on the body.
slide the power control regulator on the body.
-11-
BLOCK DIAGRAM
PRINTED CIRCUIT BOARD
BL
BR
BL
S/W
BR
BR
PLUG
CORD
REEL
ASM
P.W.B
MOTOR
C2
0.22
630V
0.22
630V
C1
0.47
250V
0.47
250V
230V
50Hz
50Hz
T1
T2
DIAC
R4
33
1/2W
R2
33
1/2W
R3
1/2W
VR2
250K
S/W
M
C2
0.1
250V
0.1
250V
R1
100
1/2W
R5
180K
1/4W
1/4W
BR:BROWN
BL:BLUE
SCHEMATIC DIAGRAM
BL
S/W
BR
BL
BR
BR
PLUG
P.W.B
M
CORD
REEL
ASM
BR:BROWN
BL:BLUE
DISASSEMBLY
• Almost all of the parts of this vacuum cleaner can be
assembled with a screw driver and each connecting com-
ponent easily fits each other.
Disassemble one by one referring to the exploded view.
ponent easily fits each other.
Disassemble one by one referring to the exploded view.
• If possible, don't disassemble except for the necessary
parts. It is not necessary to disassemble the parts that
are not detailed in the exploded view.
are not detailed in the exploded view.
1. Filter Cover Replacement
1) Open filter cover by lifting the front as shown.
2) Push the hinge side by inserting flat screw driver in crack
between hinge and body cover.
2. Indicator Assembly Replacement
1) Remove the two screws fastening the indicator assembly
and filter cover.
2) Lift the indicator assembly. At time, place the indicator
assembly for you to see the spring via the dust indica-
tor(Indicator Cover)
tor(Indicator Cover)
3. Body Cover Assembly Replacement
1) Open the filter cover in the direction of arrow and remove
the two screws fastening the body base.
2) Pull out the rear hook and then lift body cover.
3) Strip off the lead wires from the push switch.
NOTE: Before attempting to service or adjust any part of the vacuum cleaner, disconnect the electrical power supply cord
from the wall outlet.
Rear
Hook
Hook
Push
Switch
Switch
Hinge
Indicator
Assembly
Assembly
Indicator
Assembly
Assembly
-6-
-7-
4. Push Switch Replacement
• Grasp the push swith body by using the long nose, and then
push it out.
5. P.W.B ASM Replacement.
1) Remove the screws fastening the P.W.B Asm on the
body cover.
2) When reassembling, lay the sliding lever with power con-
trol regulator.
6. Motor Assembly Replacement.
• Lift the motor assembly in the direction of the arrow after
stripping off the lead wires.
7. Cord Reel Assembly Replacement
• Lift the cord reel assembly from the body base in the
direction of the arrow.
8. Bumper Separation
1) Remove the front cover from body base by flat screw dri-
ver.
2) Strip off the bumper from body base.
Power control
regulator.
regulator.
Sliding lever
Motor
ASS'Y
ASS'Y
Cord Reel
ASS'Y
ASS'Y
Bumper

