LG LB-E4880CL / LB-E6080CL Service Manual ▷ View online
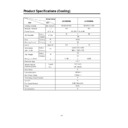
Product Specifications (Cooling)
Model Name
Item
Unit
Cooling Capacity
Btu/h(kcal/h)
Moisture Removal
l
/ h
Power Source
Ø, V, Hz
Indoor
Outdoor
Input
Cooling
Running Current
Cooling
E.E.R.
Btu/h-W
Indoor
Outdoor
Indoor
Outdoor
Refrigerant (R-22)
g
Remocon Type
Liquid
Gas
Drain Hose
Connecting Wire
Main Power Cable
Time Delay Safety Function
Soft Dry
Fan Speed (Indoor)
Timer
Self-Diagnosis
Air Circulation
m
3
/min
Dimensions
(W x H x D)
Net. Weight
mm
kg
W
A
LB-E4880CL
LB-E6080CL
–5–
Service Valve &
Connecting Tube
Connecting Tube
48,000(12,090)
60,000(15,120)
6.0
6.5
3Ø, 380-415V, 50Hz
50
59
105
6,000
10
8.0
10
1,230 x 370 x 680
900 x 1,200 x 370
70
90
4,100
4,200
L.C.D
1/2" (12.7)
3/4" (19.05)
O
1.25mm
2
¤C
3.5mm
2
¤C
O
O
3 (Hi, Med, Low)
24Hrs
O
3-way Valve
1. Pump down
• Procedure
(1) Confirm that both liquid side and gas side
valves are set to the open position.
– Remove the valve stem caps and confirm that
the valve stems are in the raised position.
– Be sure to use a hexagonal wrench to operate
the valve stems.
(2) Operate the unit for 10 to 15 minutes.
(3) Stop operation and wait for 3 minutes, then
connect the charge set to the service port of
the 3-way valve.
– Connect the charge hose to the service port.
the 3-way valve.
– Connect the charge hose to the service port.
(4) Air purging of the charge hose.
– Open the low-pressure valve on the charge set
slightly to air purge from the charge hose.
(5) Set the liquid side valve to the closed
position.
(6) Operate the air conditioner in cooling mode
and stop it when the gauge indicates
1kg/cm
1kg/cm
2
g.
(7) Immediately set the 3-way valve to the closed
position.
– Do this quickly so that the gauge ends up
– Do this quickly so that the gauge ends up
indicating 3 to 5kg/cm
2
g.
(8) Disconnect the charge set, and mount the 2-
way and 3-way valve’s stem nuts and the
service port nut.
– Use torque wrench to tighten the service port
service port nut.
– Use torque wrench to tighten the service port
nut to a torque of 1.8 kg.m.
– Be sure to check for gas leakage.
Lo
Closed
Purge the air
Outdoor unit
Indoor unit
Liquid side
Gas side
CLOSE
Open
2-Way
valve
valve
3-Way
valve
valve
3-Way
valve
valve
CLOSE
–23–
1) Re-air purging
(Re-installation)
• Procedure
(1) Confirm that both the liquid side valve and the
gas side valve are set to the closed position.
(2) Connect the charge set and a gas cylinder to
the service port of the 3-way valve.
– Leave the valve on the gas cylinder closed.
– Leave the valve on the gas cylinder closed.
(3) Air purging.
– Open the valves on the gas cylinder and the
charge set. Purge the air by loosening the flare
nut on the liquid side valve approximately 45°
for 3 seconds then closing it for 1 minute;
repeat 3 times.
nut on the liquid side valve approximately 45°
for 3 seconds then closing it for 1 minute;
repeat 3 times.
– After purging the air, use a torque wrench to
tighten the flare nut on liquid side valve.
(4) Check for gas leakage.
– Check the flare connections for gas leakage.
(5) Discharge the refrigerant.
– Close the valve on the gas cylinder and
discharge the refrigerant until the gauge
indicates 3 to 5 kg/cm
indicates 3 to 5 kg/cm
2
g.
(6) Disconnect the charge set and the gas
cylinder, and set the 2-way and 3-way valves
to the open position.
– Be sure to use a hexagonal wrench to operate
to the open position.
– Be sure to use a hexagonal wrench to operate
the valve stems.
(7) Mount the valve stem nuts and the service
port nut.
– Use torque wrench to tighten the service port
– Use torque wrench to tighten the service port
nut to a torque of 1.8 kg.m.
– Be sure to check for gas leakage.
* CAUTION:
Do not leak the gas in the air during Air
Purging.
Purging.
Lo
Closed
OPEN
Closed
Gas cylinder
R22
Outdoor unit
Indoor unit
Liquid side
Gas side
CLOSE
3-Way
valve
valve
2-Way
valve
valve
3-Way
valve
valve
–24–
2) Balance refrigerant of the 3-way valve
(Gas leakage)
• Procedure
(1) Confirm that both the liquid side and gas side
valves are set to the back seat.
(2) Connect the charge set to the 3-way valve’s
port.
– Leave the valve on the charge set closed.
– Connect the charge hose to the service port.
– Leave the valve on the charge set closed.
– Connect the charge hose to the service port.
(3) Open the valve (Lo side) on the charge set
and discharge the refrigerant until the gauge
indicates 0 kg/cm
indicates 0 kg/cm
2
G.
– If there is no air in the refrigerant cycle (the
pressure when the air conditioner is not
running is higher than 1 kg/cm
running is higher than 1 kg/cm
2
G), discharge
the refrigerant until the gauge indicates 0.5 to 1
kg/cm
kg/cm
2
G. if this is the case, it will not be
necessary to apply a evacuatin.
– Discharge the refrigerant gradually; if it is
discharged too suddenly, the refrigeration oil
will also be discharged.
will also be discharged.
Lo
Open
Open
3-Way
valve
valve
Gas side
CLOSE
OPEN
Outdoor unit
Liquid side
Indoor unit
2-Way
valve
valve
3-Way
valve
valve
–25–

